15 Easy Kid-Friendly Lunchbox Meal Prep Ideas for School
Kid-friendly lunchbox meal prep makes packing nutritious and delicious lunches for school a breeze. With a little planning and creativity, you can whip up a variety of tasty and appealing options that your kids will love while keeping things simple for busy mornings. Get set to make lunchtime exciting and satisfying!
Homemade Chicken Nuggets
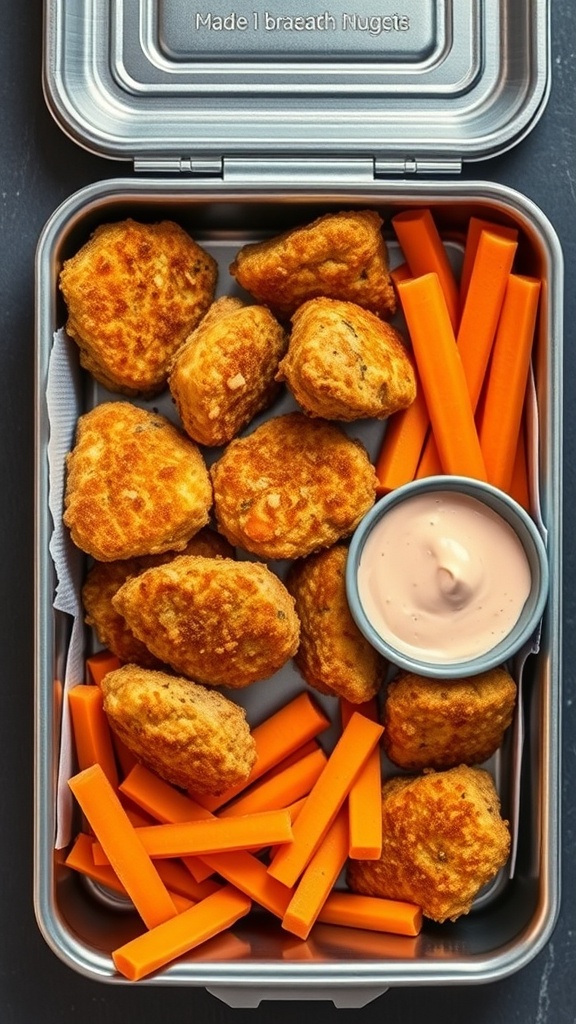
Homemade chicken nuggets are a fantastic option for school lunches. They are not only tasty but also easy to prepare. In the image, you can see a lunchbox filled with golden-brown chicken nuggets, perfectly paired with crunchy carrot sticks and a small bowl of dipping sauce. This colorful combination makes lunchtime exciting for kids!
Making chicken nuggets at home allows you to control the ingredients. You can use fresh chicken, season it to your liking, and even sneak in some veggies. Plus, they can be made in batches and frozen for quick meals during the week.
Here’s how to whip up these delicious nuggets!
Cheesy Quesadilla Triangles
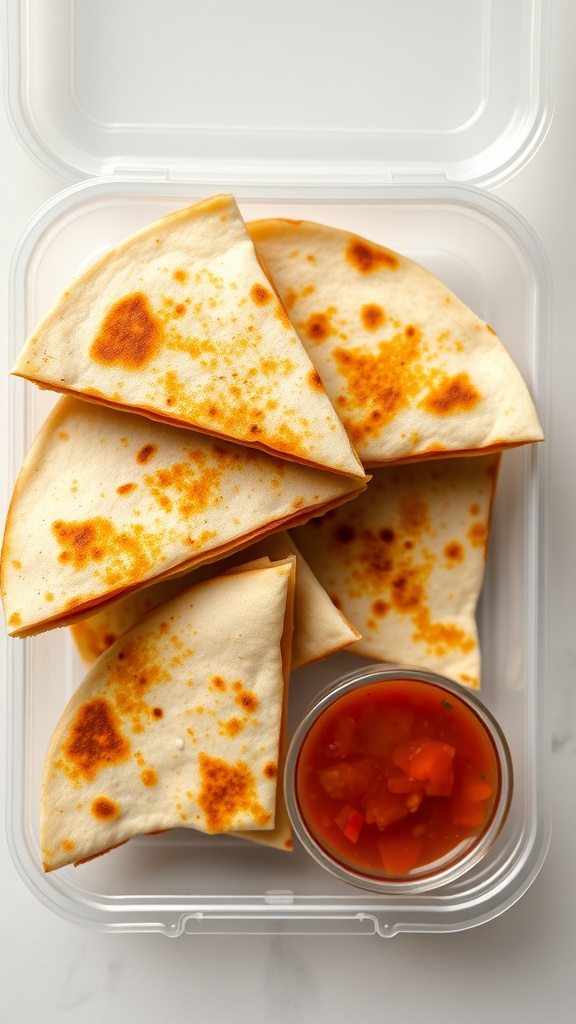
Cheesy quesadilla triangles are a hit for school lunches! They are easy to make and can be packed with your child’s favorite ingredients. These golden, crispy triangles are not just tasty; they are also fun to eat. Pair them with a small container of salsa for dipping, and you’ve got a meal that kids will love.
Making quesadillas is simple. Start with flour tortillas and fill them with cheese and any other fillings you like. You can use chicken, beans, or veggies. Cook them on a skillet until the cheese melts and the tortillas are crispy. Cut them into triangles, and they’re ready to go!
Ingredients
- 4 flour tortillas
- 2 cups shredded cheese (cheddar or mozzarella)
- 1 cup cooked chicken, shredded (optional)
- 1/2 cup bell peppers, diced (optional)
- 1 tablespoon olive oil
- Salsa for dipping
Instructions
- Heat a skillet over medium heat and add olive oil.
- Place one tortilla in the skillet and sprinkle half of the cheese on one half of the tortilla.
- If using, add chicken and bell peppers on top of the cheese.
- Fold the tortilla over and cook for 2-3 minutes until golden brown.
- Flip and cook for another 2-3 minutes until the other side is golden and the cheese is melted.
- Remove from the skillet and let cool slightly before cutting into triangles.
- Pack with salsa in a small container for dipping.
Nut Butter and Banana Roll-Ups
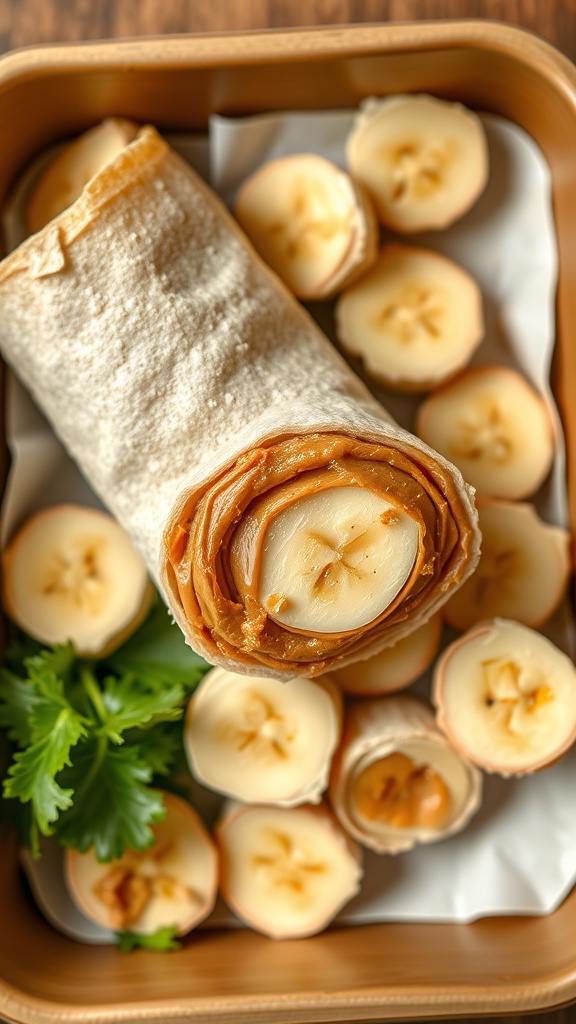
Nut butter and banana roll-ups are a fun and tasty option for school lunches. They are easy to make and packed with energy, making them perfect for kids on the go. The image shows a delicious roll-up made with a soft tortilla, creamy nut butter, and fresh banana slices. Surrounding the roll-up are more banana slices, adding a pop of color and nutrition.
This meal is not only quick to prepare but also customizable. You can use different nut butters like almond or peanut, depending on your child’s preference. These roll-ups are great for lunchboxes or as an after-school snack!
Ingredients
- 1 large tortilla (whole wheat or regular)
- 2 tablespoons nut butter (peanut, almond, or your choice)
- 1 banana
- Honey or maple syrup (optional)
- Cinnamon (optional)
Instructions
- Spread the nut butter evenly over the tortilla.
- Peel the banana and place it at one edge of the tortilla.
- Roll the tortilla tightly around the banana.
- If desired, drizzle honey or maple syrup and sprinkle cinnamon inside before rolling.
- Slice the roll-up into bite-sized pieces for easy eating.
- Pack in a lunchbox with extra banana slices for a fun treat!
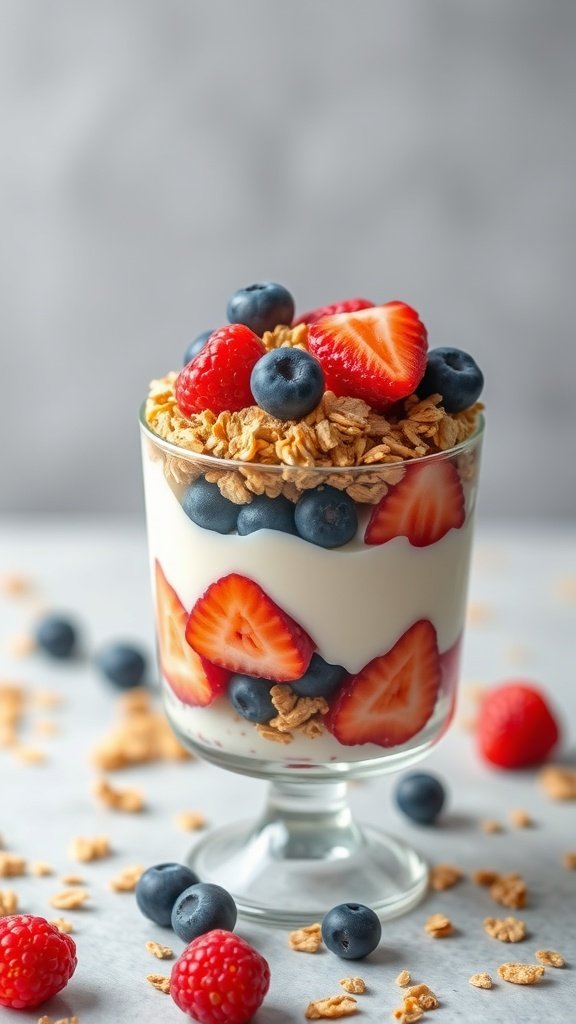
Fruit and Yogurt Parfaits
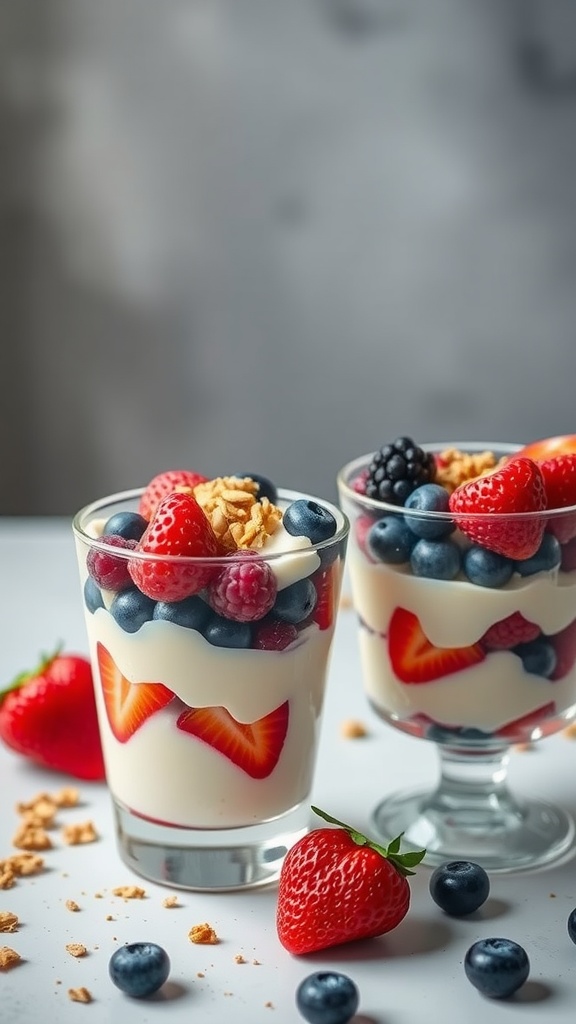
Fruit and yogurt parfaits are a fun and tasty way to pack a nutritious lunch for kids. They look great and are easy to make, making them perfect for school lunches. Layering yogurt, fresh fruits, and crunchy granola creates a delightful treat that kids will love.
You can customize these parfaits with different fruits based on what your kids enjoy. Strawberries, blueberries, and raspberries are popular choices. The creamy yogurt adds a smooth texture, while the granola gives a satisfying crunch. Plus, they are colorful and appealing!
These parfaits can be made ahead of time and stored in the fridge. Just be sure to keep the granola separate until it’s time to eat, so it stays crunchy. This way, your kids can enjoy a fresh and delicious lunch every day!
Ingredients
- 2 cups yogurt (plain or flavored)
- 1 cup granola
- 1 cup strawberries, sliced
- 1 cup blueberries
- 1 cup raspberries
Instructions
- Start by choosing your favorite glass or container for the parfait.
- Layer 1/4 cup of yogurt at the bottom of the glass.
- Add a layer of sliced strawberries, followed by a layer of granola.
- Repeat the layers until the glass is full, finishing with a layer of yogurt on top.
- Top with blueberries and raspberries for a colorful finish.
- Cover with a lid or plastic wrap and store in the fridge until ready to pack for lunch.
Mini Quiches Packed with Protein
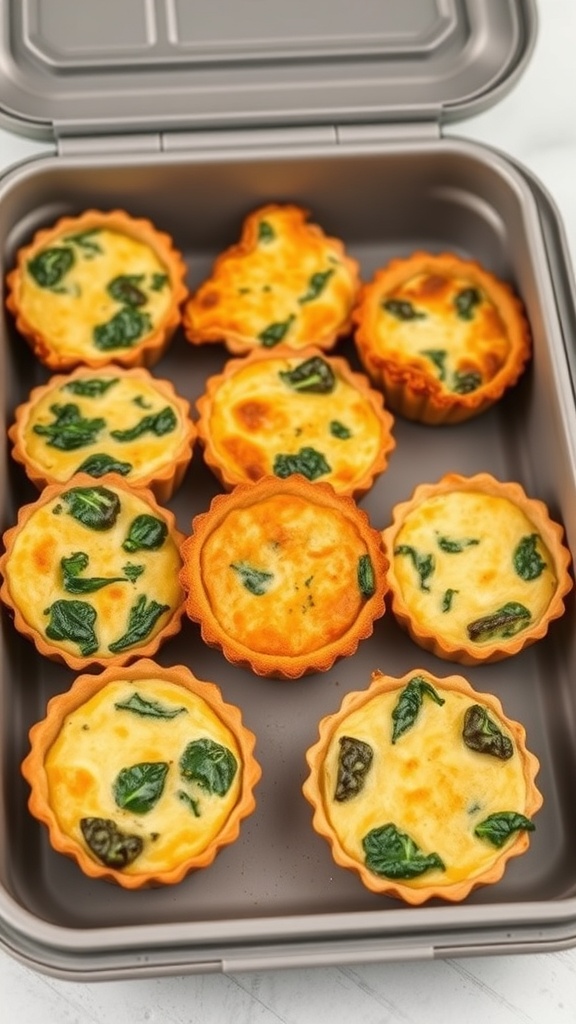
Mini quiches are a fantastic option for school lunches. They are easy to make, fun to eat, and packed with protein to keep kids energized throughout the day. The image shows a delightful assortment of mini quiches, each with a golden crust and filled with vibrant spinach. These little bites are not only tasty but also visually appealing, making them a hit with kids.
Making mini quiches is simple. You can customize them with various ingredients to suit your child’s taste. They can be prepared in advance and stored in the fridge, making them a perfect meal prep option for busy school weeks. Plus, they fit perfectly in lunchboxes!
Ingredients
- 6 large eggs
- 1 cup milk
- 1 cup shredded cheese (cheddar or mozzarella)
- 1 cup fresh spinach, chopped
- 1/2 cup diced bell peppers
- 1/2 teaspoon salt
- 1/4 teaspoon black pepper
- 1/4 teaspoon garlic powder
- 1 tablespoon olive oil (for greasing)
Instructions
- Preheat the oven to 375°F (190°C). Grease a mini muffin tin with olive oil.
- In a large bowl, whisk together the eggs and milk until well combined.
- Add the shredded cheese, chopped spinach, diced bell peppers, salt, pepper, and garlic powder to the egg mixture. Stir until everything is evenly mixed.
- Pour the mixture into the greased muffin tin, filling each cup about 3/4 full.
- Bake for 20-25 minutes, or until the quiches are puffed and golden brown.
- Let them cool for a few minutes before removing them from the tin. Enjoy warm or store in the fridge for later!
Colorful Veggie Wraps
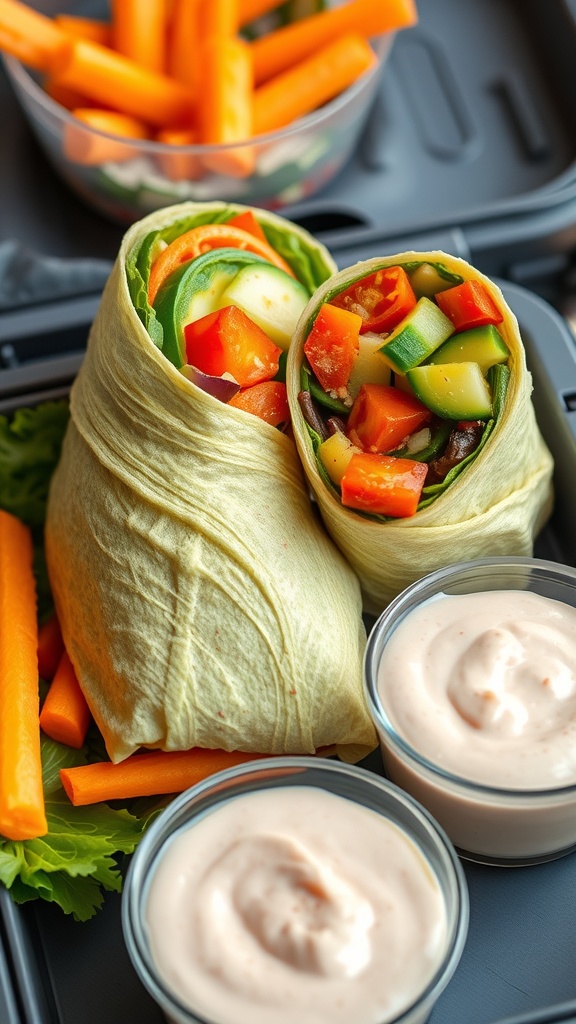
Colorful veggie wraps are a fun and healthy option for school lunches. These wraps are packed with vibrant vegetables that not only look appealing but also provide essential nutrients. Kids will love the crunch of fresh veggies, and you can easily customize them based on their preferences.
To make these wraps, start with a large tortilla or wrap of your choice. Spread a layer of hummus or cream cheese for added flavor. Then, fill it with a mix of sliced bell peppers, cucumbers, zucchini, and carrots. Roll it up tightly and slice it in half for easy eating.
Pair these wraps with a side of carrot sticks and a small container of dip for a complete meal. The combination of colors and textures makes lunchtime exciting!
Ingredients
- 4 large tortillas
- 1 cup hummus or cream cheese
- 1 red bell pepper, sliced
- 1 yellow bell pepper, sliced
- 1 cucumber, sliced
- 1 zucchini, sliced
- 1 cup shredded carrots
- Optional: lettuce leaves
- 2 cups carrot sticks
- 1/2 cup ranch dressing or dip
Instructions
- Spread a layer of hummus or cream cheese on each tortilla.
- Layer the sliced bell peppers, cucumber, zucchini, and shredded carrots on top.
- Add lettuce leaves if desired.
- Roll the tortilla tightly and slice it in half.
- Pack the wraps in a lunchbox with carrot sticks and a small container of ranch dressing or dip.
Pasta Salad with Colorful Veggies
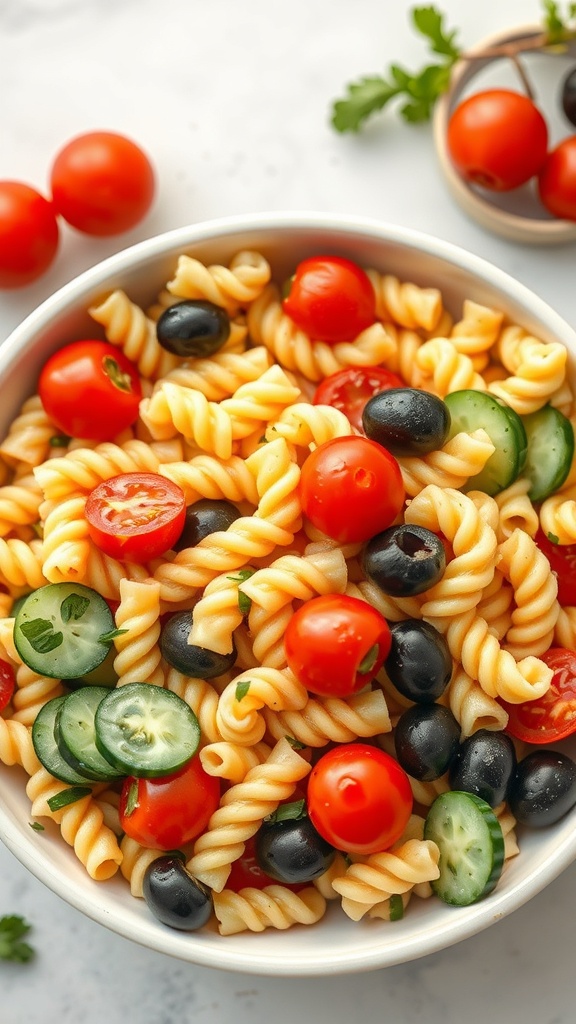
Pasta salad is a fantastic choice for a kid-friendly lunchbox. It’s easy to make, fun to eat, and packed with nutrients. The vibrant colors of the veggies make it visually appealing, which is a big win for picky eaters. In this salad, you’ll find a mix of juicy cherry tomatoes, crunchy cucumbers, and savory black olives. These ingredients not only add flavor but also provide a variety of vitamins and minerals.
Making this pasta salad is simple. Start by cooking your favorite pasta until it’s al dente. While the pasta cools, chop up the veggies. Toss everything together with a light dressing, and you’re ready to pack it up for school. This meal can be made ahead of time, making it perfect for busy mornings.
Kids love the twisty pasta shapes, and you can even let them help with the mixing. It’s a great way to get them involved in their meals. Plus, you can customize the salad with whatever veggies you have on hand. This flexibility makes it a go-to recipe for school lunches!
Ingredients
- 2 cups rotini pasta
- 1 cup cherry tomatoes, halved
- 1 cup cucumber, sliced
- 1/2 cup black olives, sliced
- 1/4 cup fresh parsley, chopped
- 1/4 cup olive oil
- 2 tablespoons vinegar (red wine or apple cider)
- Salt and pepper to taste
Instructions
- Cook the Pasta: Boil water in a large pot. Add the rotini pasta and cook according to package instructions until al dente. Drain and let it cool.
- Prepare the Veggies: While the pasta cools, chop the cherry tomatoes, cucumber, and parsley. Slice the black olives.
- Mix Everything: In a large bowl, combine the cooled pasta, cherry tomatoes, cucumber, black olives, and parsley.
- Dress the Salad: In a small bowl, whisk together olive oil, vinegar, salt, and pepper. Pour the dressing over the pasta salad and toss to combine.
- Pack and Serve: Divide the pasta salad into lunch containers. It can be served immediately or stored in the fridge for later.
Vegetable Sushi Rolls
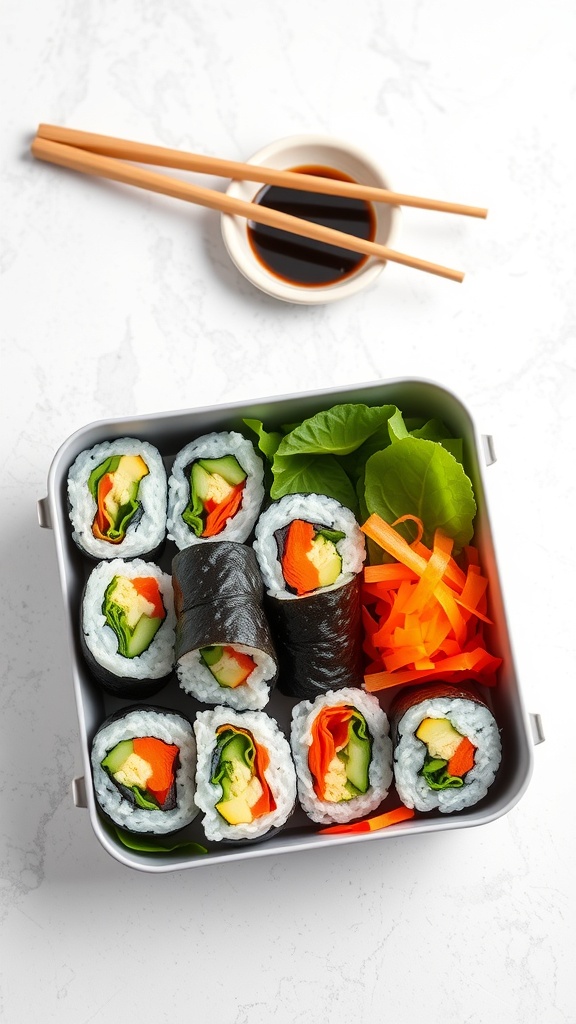
Vegetable sushi rolls are a fun and healthy lunch option for kids. They’re colorful, tasty, and packed with nutrients. Plus, they’re easy to make and can be customized with your child’s favorite veggies. The image shows a delightful lunchbox filled with neatly rolled sushi, featuring vibrant vegetables like carrots, cucumbers, and bell peppers. The sushi is paired with fresh greens and a side of dipping sauce, making it a complete meal.
Making these rolls is a great way to involve kids in the kitchen. They can help with washing and slicing the vegetables, and even rolling the sushi. This hands-on activity not only teaches them about healthy eating but also gives them a sense of accomplishment when they see their creations.
To prepare these rolls, you’ll need sushi rice, nori sheets, and a variety of fresh vegetables. The key is to keep the ingredients simple and fresh. This way, the rolls are not only nutritious but also appealing to young eaters.
Ingredients
- 1 cup sushi rice
- 1 1/4 cups water
- 2 tablespoons rice vinegar
- 1 tablespoon sugar
- 1 teaspoon salt
- 4 sheets nori (seaweed)
- 1 small cucumber, julienned
- 1 carrot, julienned
- 1 bell pepper, thinly sliced
- 1 avocado, sliced
- Soy sauce for dipping
Instructions
- Rinse the sushi rice under cold water until the water runs clear. Combine the rice and water in a pot and bring to a boil. Reduce heat, cover, and simmer for about 20 minutes until the rice is tender.
- In a small bowl, mix rice vinegar, sugar, and salt until dissolved. Once the rice is cooked, remove it from heat and stir in the vinegar mixture. Let it cool.
- Place a bamboo sushi mat on a flat surface. Lay a sheet of nori on the mat, shiny side down. Wet your hands to prevent sticking and spread a thin layer of rice over the nori, leaving a 1-inch border at the top.
- Arrange your choice of vegetables in a line across the center of the rice. Be creative with the colors and textures!
- Using the mat, carefully roll the sushi away from you, pressing gently to keep it tight. Seal the edge with a little water.
- Slice the roll into bite-sized pieces with a sharp knife. Repeat with remaining ingredients.
- Pack the sushi rolls in a lunchbox with some fresh greens and a small container of soy sauce for dipping.
Cottage Cheese with Pineapple
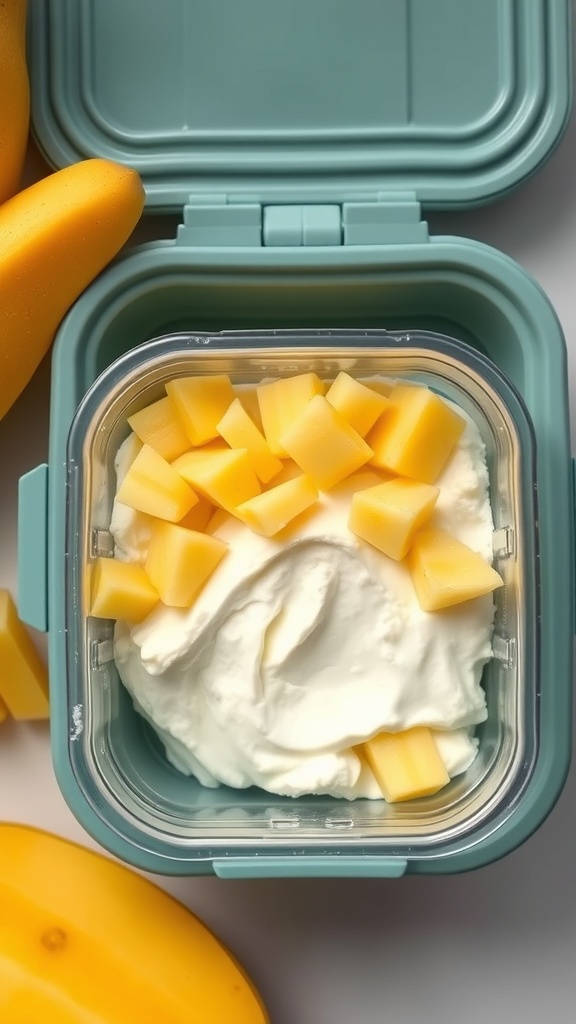
Cottage cheese with pineapple is a fun and nutritious option for school lunches. This dish combines creamy cottage cheese with sweet pineapple chunks, making it a delightful treat for kids. It’s easy to prepare and can be packed in a lunchbox without any fuss.
This meal is not only tasty but also packed with protein and vitamins. Cottage cheese is a great source of calcium, while pineapple adds a burst of flavor and essential nutrients. Kids will love the mix of textures, and it’s a perfect way to sneak in some healthy ingredients.
To make this dish, simply scoop cottage cheese into a container and top it with fresh pineapple chunks. You can use canned pineapple for convenience, but fresh is always a great choice. This meal can be prepped ahead of time, making mornings smoother for busy families.
Ingredients
- 1 cup cottage cheese
- 1/2 cup pineapple chunks (fresh or canned)
- 1 tablespoon honey (optional)
- 1/4 teaspoon cinnamon (optional)
Instructions
- In a bowl, add the cottage cheese.
- Top with pineapple chunks.
- If desired, drizzle honey over the top and sprinkle with cinnamon.
- Mix gently to combine.
- Transfer to a lunch container and seal tightly.
DIY Mini Pizzas
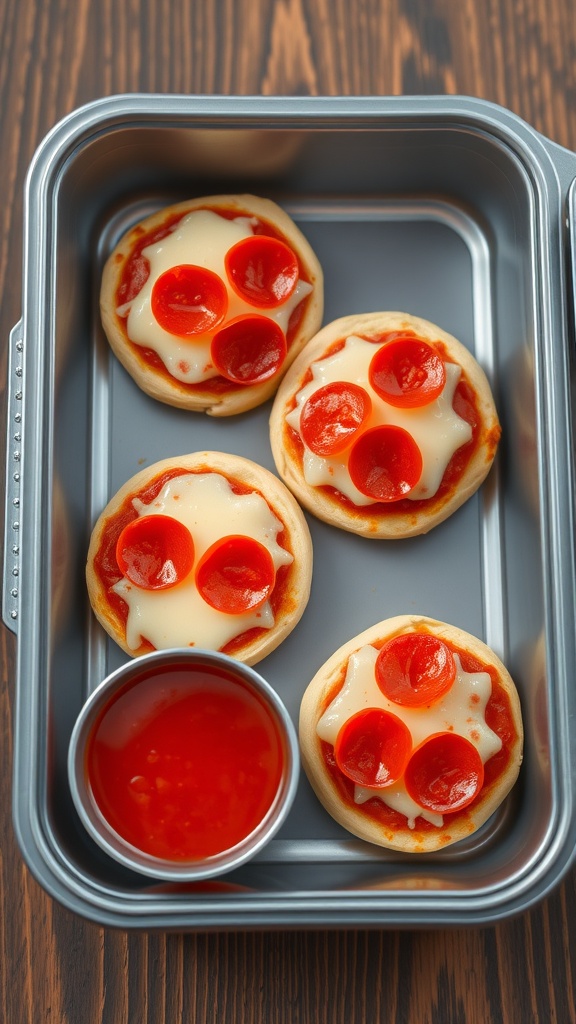
Mini pizzas are a fun and easy lunch option for kids. They are customizable and can be made with various toppings. These little delights are perfect for lunchboxes, and kids love them!
In the image, you can see a set of mini pizzas topped with gooey cheese and pepperoni, neatly packed in a lunch container. A small cup of marinara sauce sits alongside, making it easy for kids to dip their pizzas. This meal is not only tasty but also visually appealing, making lunchtime exciting.
Making mini pizzas at home is simple. You can use store-bought dough or make your own. Let your kids help with the toppings for a fun cooking experience!
Ingredients
- 1 package of pizza dough (store-bought or homemade)
- 1 cup pizza sauce
- 1 ½ cups shredded mozzarella cheese
- 1 cup pepperoni slices
- Optional toppings: bell peppers, olives, mushrooms, or any favorite toppings
Instructions
- Preheat the oven to 400°F (200°C).
- Roll out the pizza dough on a floured surface. Cut out small circles using a cookie cutter or a glass.
- Place the dough circles on a baking sheet lined with parchment paper.
- Spread a spoonful of pizza sauce on each mini pizza.
- Sprinkle shredded mozzarella cheese on top, followed by pepperoni slices.
- Bake in the oven for about 10-12 minutes, or until the cheese is bubbly and the crust is golden.
- Let them cool slightly before packing them in lunchboxes with a small container of marinara sauce for dipping.
Hummus and Veggie Sticks
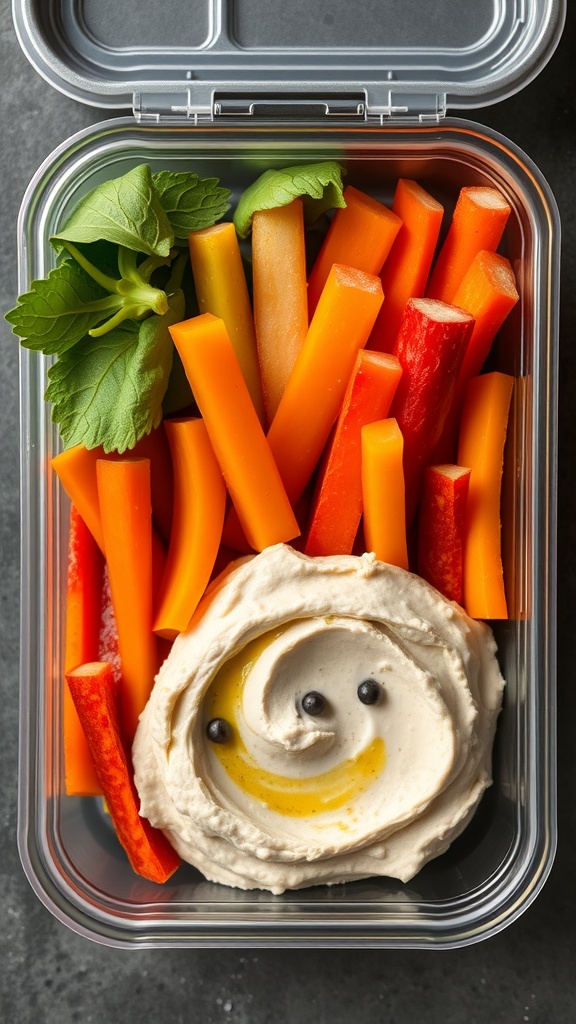
Hummus and veggie sticks make a colorful and healthy lunchbox option for kids. This combo is not only tasty but also packed with nutrients. The bright orange and red veggie sticks add a fun pop of color, making lunchtime more exciting.
Hummus is a creamy dip made from chickpeas, tahini, and olive oil. It’s a great source of protein and fiber. Pairing it with crunchy veggies like carrots and bell peppers gives kids a satisfying snack that keeps them energized throughout the school day.
To prepare this lunchbox meal, simply cut the veggies into sticks and place them alongside a generous scoop of hummus. You can even add a little drizzle of olive oil on top of the hummus for extra flavor. This meal is quick to prepare and can be made in advance, making it perfect for busy mornings.
Ingredients
- 1 cup hummus
- 2 large carrots, cut into sticks
- 1 red bell pepper, cut into sticks
- 1 yellow bell pepper, cut into sticks
- 1 tablespoon olive oil (optional)
- Fresh herbs (like parsley or mint) for garnish
Instructions
- Prepare the Veggies: Wash and peel the carrots. Cut them into sticks. Wash the bell peppers, remove the seeds, and slice them into sticks.
- Assemble the Lunchbox: In a lunchbox, place the hummus in one compartment. Arrange the veggie sticks around it.
- Add a Drizzle: If desired, drizzle olive oil over the hummus for added flavor.
- Garnish: Add fresh herbs to the lunchbox for a touch of color and freshness.
- Pack and Go: Seal the lunchbox and it’s ready for school!
Breakfast Burritos for Lunch
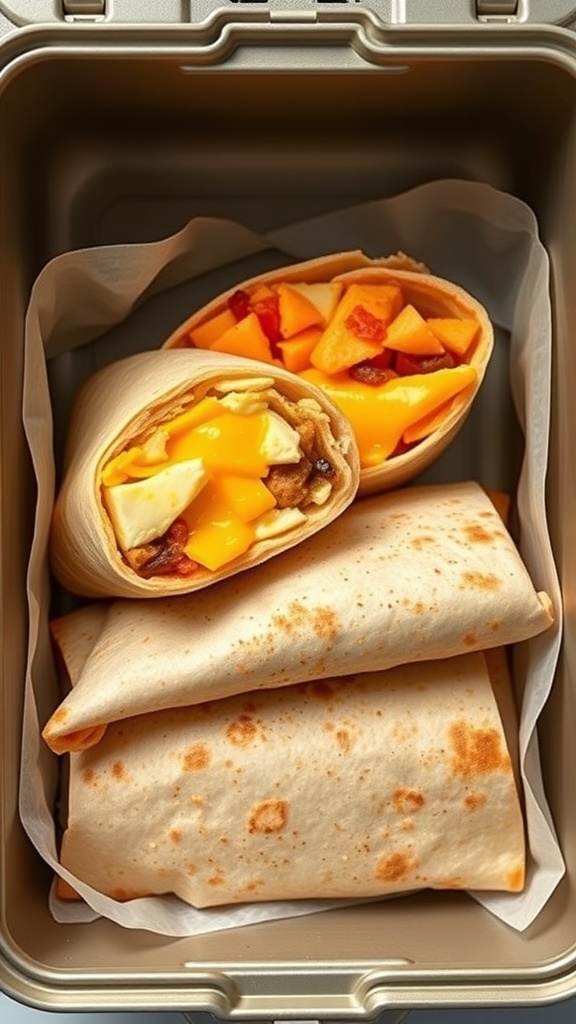
Breakfast burritos are a fantastic option for lunchboxes. They are easy to make and can be filled with a variety of tasty ingredients. In the image, you can see some delicious burritos packed neatly in a lunchbox. They are wrapped tightly, making them perfect for kids to enjoy at school.
These burritos are not only filling but also offer a great way to sneak in some veggies. You can customize them with your child’s favorite ingredients, ensuring they get a nutritious meal. Think scrambled eggs, cheese, and even some diced peppers or spinach for added flavor and nutrition.
Making breakfast burritos is simple. You can prepare them ahead of time and freeze them for quick lunches. Just pop them in the microwave or oven to heat up before packing them in the lunchbox. Pair them with some fruit or yogurt for a balanced meal.
Ingredients
- 4 large flour tortillas
- 6 large eggs
- 1 cup shredded cheese (cheddar or your choice)
- 1 cup cooked and crumbled sausage or bacon
- 1/2 cup diced bell peppers
- 1/4 cup diced onions
- Salt and pepper to taste
- 1 tablespoon olive oil
Instructions
- In a skillet, heat olive oil over medium heat. Add diced onions and bell peppers, cooking until soft.
- In a bowl, whisk the eggs with salt and pepper. Pour into the skillet with the veggies and scramble until fully cooked.
- Add the cooked sausage or bacon and cheese to the egg mixture, stirring until the cheese melts.
- Lay out the tortillas and spoon the egg mixture evenly onto each one. Roll them up tightly.
- Wrap each burrito in foil or parchment paper for easy storage. You can freeze them or keep them in the fridge for a few days.
Savory Muffins with Cheese and Spinach

These savory muffins are a hit with kids and perfect for lunchboxes. Packed with cheese and spinach, they offer a tasty way to sneak in some veggies. The muffins are fluffy and cheesy, making them a delightful treat for school lunches.
In the image, you can see golden-brown muffins, each with vibrant green spinach peeking through. They are arranged neatly in a baking tray, accompanied by fresh cherry tomatoes and basil. This colorful presentation not only looks appetizing but also adds a fun touch to lunchtime.
Making these muffins is simple and quick. They can be made ahead of time and stored for the week, ensuring your little ones have a nutritious option ready to go. Pair them with some fresh fruit or yogurt for a balanced meal.
Ingredients
- 1 cup all-purpose flour
- 1 teaspoon baking powder
- 1/2 teaspoon salt
- 1/2 cup milk
- 1/4 cup vegetable oil
- 2 large eggs
- 1 cup fresh spinach, chopped
- 1 cup shredded cheese (cheddar or mozzarella)
- 1/4 cup chopped green onions (optional)
Instructions
- Preheat the oven to 350°F (175°C) and grease a muffin tin or line with paper liners.
- In a large bowl, mix together the flour, baking powder, and salt.
- In another bowl, whisk together the milk, vegetable oil, and eggs until well combined.
- Pour the wet ingredients into the dry ingredients and stir until just combined.
- Fold in the chopped spinach, shredded cheese, and green onions if using.
- Spoon the batter into the prepared muffin tin, filling each cup about 2/3 full.
- Bake for 18-20 minutes or until the muffins are golden and a toothpick inserted comes out clean.
- Let them cool slightly before removing from the tin. Enjoy warm or store in an airtight container for later!
Fruit Skewers with a Yogurt Dip

Fruit skewers are a fun and colorful addition to any lunchbox. They are easy to make and can be customized with your child’s favorite fruits. In the image, you can see a delightful mix of strawberries, grapes, melon, and other fruits, all neatly arranged on skewers. This not only makes them visually appealing but also encourages kids to enjoy their fruits.
The yogurt dip adds a creamy texture that pairs perfectly with the sweetness of the fruits. It’s a great way to introduce a healthy snack that kids will love. Plus, it’s simple to prepare and can be made ahead of time, making it perfect for busy school mornings.
To make these fruit skewers, you just need to gather some fresh fruits and cut them into bite-sized pieces. Thread them onto skewers, alternating colors and types for a vibrant look. Pair them with a yogurt dip for a tasty treat that’s both nutritious and satisfying.
Chocolate Energy Bites
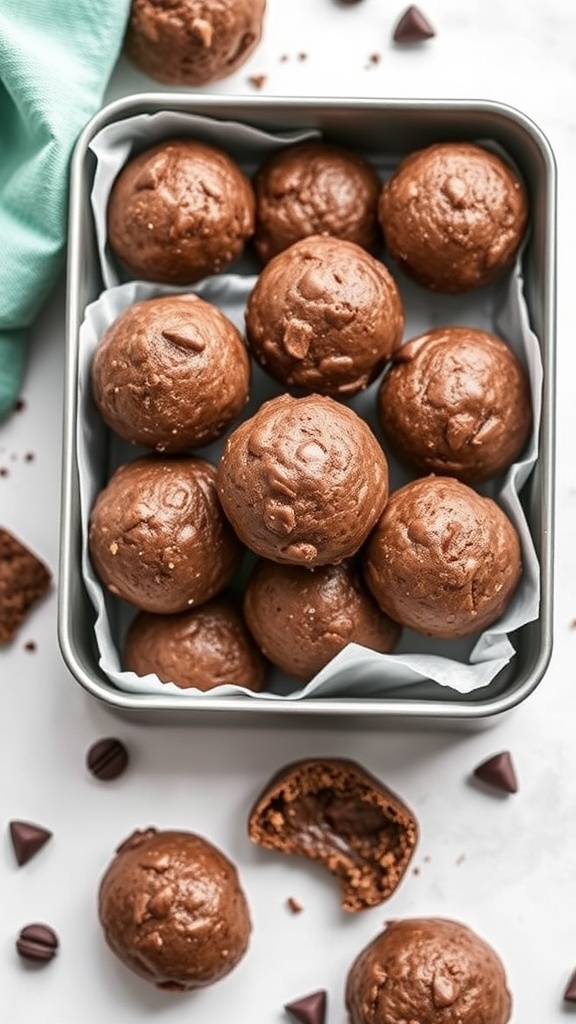
Chocolate energy bites are a fantastic snack for kids, perfect for school lunches. These little treats are packed with nutrients and flavor, making them a great choice for a midday pick-me-up. They look so inviting, with their rich chocolate color and smooth texture, sitting neatly in a lunchbox. Plus, they’re easy to make and can be customized with your child’s favorite ingredients.
Making chocolate energy bites is simple. You can involve your kids in the process, turning it into a fun kitchen activity. They’ll love rolling the mixture into balls and can even help choose add-ins like nuts or dried fruit. These bites are not only delicious but also provide energy to keep them focused throughout the day.
Ingredients
- 1 cup rolled oats
- 1/2 cup peanut butter or almond butter
- 1/3 cup honey or maple syrup
- 1/4 cup cocoa powder
- 1/2 cup chocolate chips
- 1/4 cup chia seeds (optional)
- 1 teaspoon vanilla extract
Instructions
- In a large bowl, mix together the rolled oats, peanut butter, honey, cocoa powder, and vanilla extract until well combined.
- Stir in the chocolate chips and chia seeds if using.
- Using your hands, roll the mixture into small balls, about 1 inch in diameter.
- Place the energy bites on a baking sheet lined with parchment paper.
- Refrigerate for at least 30 minutes to firm up.
- Store in an airtight container in the fridge for up to a week.