
15 High Protein Meal Prep Ideas for Picky Eaters
Meal prepping can be tough when you’re catering to picky eaters, but it doesn’t have to be boring or bland! This guide is packed with high protein recipes that are not only nutritious but also appealing to even the choosiest of palates. From tasty chicken dishes to satisfying snacks, you’ll find plenty of options to keep everyone happy and well-fed throughout the week.
Peanut Butter Banana Overnight Oats

Peanut Butter Banana Overnight Oats are a fantastic choice for picky eaters. They combine the creamy goodness of peanut butter with the sweetness of ripe bananas. This dish is not only delicious but also packed with protein, making it a great option for breakfast or a snack.
In the image, you can see a jar filled with layers of oats, peanut butter, and banana slices. The oats are mixed with a splash of milk, creating a smooth texture. Topped with crunchy pecans, this meal is visually appealing and nutritious.
Making these overnight oats is super easy. Just mix your ingredients the night before and let them sit in the fridge. In the morning, you’ll have a tasty meal ready to go!
Creamy Avocado and Chickpea Salad

This creamy avocado and chickpea salad is a delightful mix of flavors and textures. It’s perfect for picky eaters who may shy away from traditional salads. The vibrant colors of the cherry tomatoes and the creamy avocado make it visually appealing, while the chickpeas add a nice crunch and protein boost.
The base of this salad is fresh spinach, which pairs wonderfully with the other ingredients. The chickpeas provide a hearty element, making this dish filling and nutritious. The creamy avocado not only adds richness but also healthy fats, making it a balanced meal option.
To make this salad, you’ll need just a few simple ingredients. Toss everything together for a quick meal prep option that’s ready in no time. It’s great for lunch or a light dinner, and you can easily customize it by adding your favorite veggies or proteins.
Ingredients
- 1 can chickpeas, drained and rinsed
- 1 ripe avocado, sliced
- 1 cup cherry tomatoes, halved
- 2 cups fresh spinach
- 1 tablespoon olive oil
- Salt and pepper to taste
- Juice of 1 lemon
Instructions
- In a large bowl, combine the chickpeas, cherry tomatoes, and spinach.
- Add the sliced avocado on top.
- Drizzle with olive oil and lemon juice.
- Season with salt and pepper to taste.
- Toss gently to combine, being careful not to mash the avocado.
- Serve immediately or store in the fridge for later.
Turkey and Spinach Stuffed Peppers
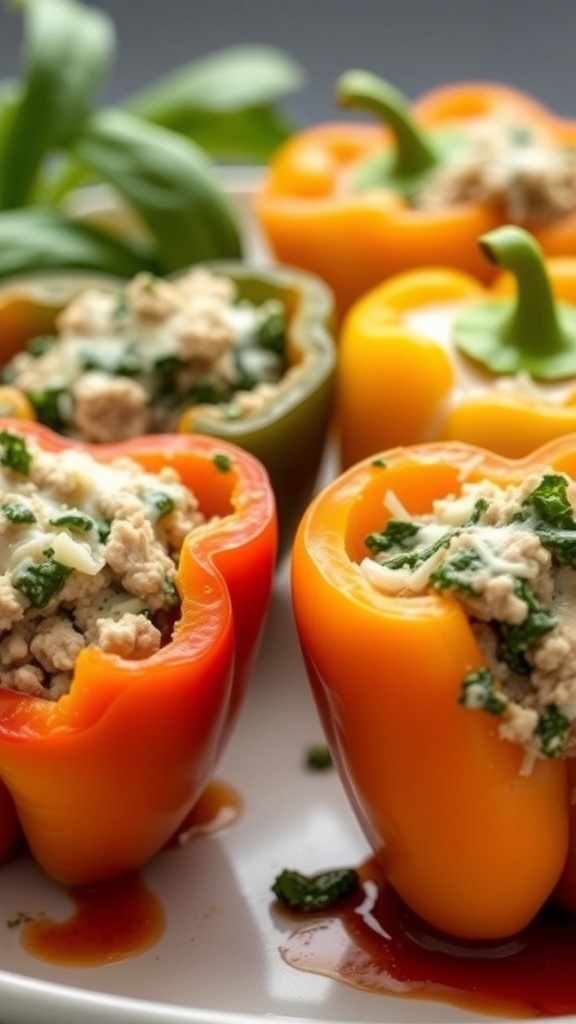
Turkey and spinach stuffed peppers are a fantastic option for picky eaters. These colorful peppers are filled with a tasty mixture of ground turkey, fresh spinach, and cheese, making them both nutritious and appealing. The vibrant colors of the peppers add a fun touch to the meal, making it visually enticing for kids and adults alike.
This dish is not only high in protein but also packed with vitamins and minerals. The combination of turkey and spinach provides a healthy dose of nutrients, while the cheese adds a creamy texture that makes the filling irresistible. Plus, it’s a great way to sneak in some veggies!
Making these stuffed peppers is simple and can be done in under an hour. They can be prepared ahead of time and stored in the fridge, making them perfect for meal prep. Just pop them in the oven when you’re ready to eat!
Ingredients
- 4 large bell peppers (any color)
- 1 pound ground turkey
- 2 cups fresh spinach, chopped
- 1 cup cooked rice (white or brown)
- 1 cup shredded mozzarella cheese
- 1 teaspoon garlic powder
- 1 teaspoon onion powder
- Salt and pepper to taste
- 1 tablespoon olive oil
- 1 cup marinara sauce (optional)
Instructions
- Preheat the oven to 375°F (190°C).
- Cut the tops off the bell peppers and remove the seeds. Place them in a baking dish.
- In a skillet, heat olive oil over medium heat. Add ground turkey and cook until browned, about 5-7 minutes.
- Add chopped spinach, cooked rice, garlic powder, onion powder, salt, and pepper to the skillet. Stir until well combined and spinach is wilted.
- Remove from heat and mix in half of the mozzarella cheese.
- Stuff each bell pepper with the turkey and spinach mixture. Top with remaining mozzarella cheese.
- If using, pour marinara sauce over the stuffed peppers.
- Bake in the preheated oven for 25-30 minutes, until the peppers are tender and cheese is melted.
- Let cool for a few minutes before serving. Enjoy your delicious and healthy meal!
Mini Meatball and Zucchini Skewers
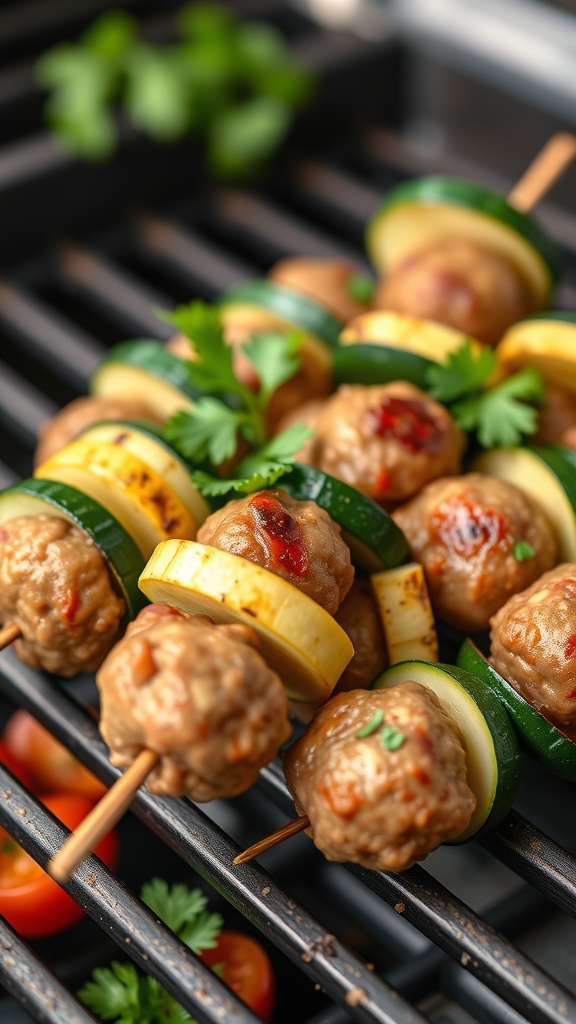
Mini meatball and zucchini skewers are a fun and tasty way to enjoy a high-protein meal, especially for picky eaters. These skewers combine juicy meatballs with fresh zucchini and yellow squash, making them colorful and appealing. The vibrant greens and yellows not only look great but also add a nice crunch to each bite.
These skewers are perfect for meal prep. You can easily make a batch ahead of time and store them in the fridge for quick lunches or dinners. Just pop them on the grill or in the oven when you’re ready to eat. Plus, they’re great for kids and adults alike!
Ingredients
- 1 pound ground turkey or beef
- 1/2 cup breadcrumbs
- 1/4 cup grated Parmesan cheese
- 1 egg
- 1 teaspoon garlic powder
- 1 teaspoon onion powder
- Salt and pepper to taste
- 1 medium zucchini, sliced
- 1 medium yellow squash, sliced
- Skewers (wooden or metal)
Instructions
- Preheat your grill or oven to 400°F (200°C).
- In a large bowl, mix the ground turkey or beef, breadcrumbs, Parmesan, egg, garlic powder, onion powder, salt, and pepper until well combined.
- Form small meatballs, about 1 inch in diameter.
- On each skewer, alternate threading a meatball with slices of zucchini and yellow squash.
- Place the skewers on the grill or a baking sheet and cook for 15-20 minutes, turning occasionally, until the meatballs are cooked through and the veggies are tender.
- Serve warm and enjoy your delicious mini meatball and zucchini skewers!
Savory Chicken and Sweet Potato Bowls
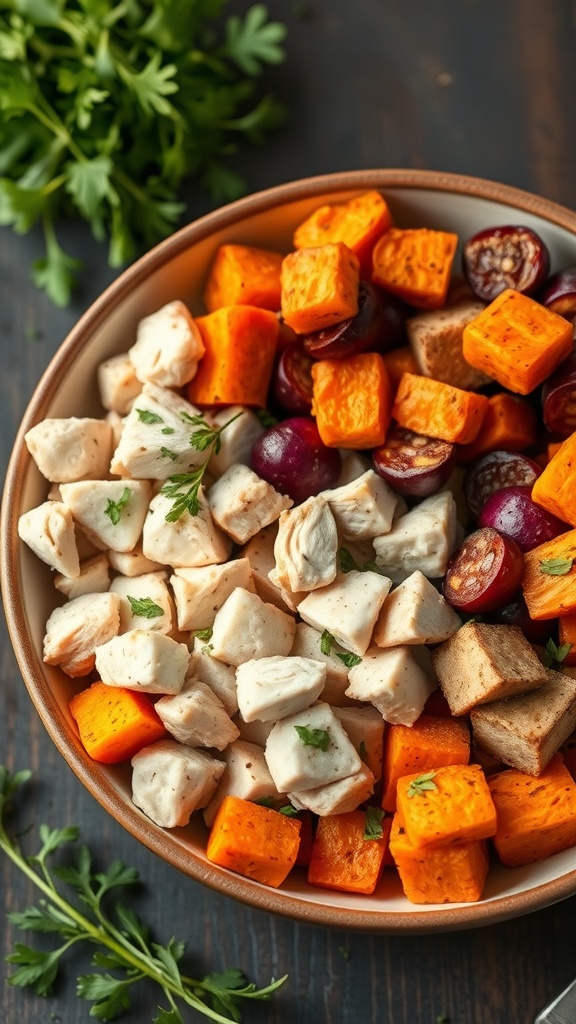
These chicken and sweet potato bowls are perfect for picky eaters. They combine tender chicken, sweet potatoes, and colorful veggies for a meal that’s both nutritious and appealing. The vibrant colors make the dish inviting, and the flavors are simple yet satisfying.
To make this dish, start by roasting sweet potatoes until they are soft and slightly caramelized. While they cook, season and grill or bake chicken until it’s juicy and tender. You can add some grapes for a sweet touch, which pairs nicely with the savory elements. This meal is not just tasty; it’s also high in protein, making it a great option for meal prep.
These bowls are easy to customize. If your picky eater prefers different veggies, feel free to swap them out. You can also adjust the seasoning to match their taste. This dish is all about making healthy eating enjoyable!
Ingredients
- 2 cups sweet potatoes, peeled and cubed
- 2 cups cooked chicken breast, diced
- 1 cup grapes, halved
- 2 tablespoons olive oil
- 1 teaspoon garlic powder
- 1 teaspoon paprika
- Salt and pepper to taste
- Fresh parsley for garnish
Instructions
- Preheat your oven to 400°F (200°C).
- In a bowl, toss the sweet potatoes with olive oil, garlic powder, paprika, salt, and pepper. Spread them on a baking sheet.
- Roast the sweet potatoes for about 25-30 minutes, or until tender and slightly browned.
- While the sweet potatoes are roasting, prepare the chicken. If it’s not already cooked, season it with salt and pepper, then grill or bake until fully cooked.
- Once everything is cooked, assemble the bowls. Start with a base of sweet potatoes, add the chicken, and top with halved grapes.
- Garnish with fresh parsley before serving. Enjoy your delicious and healthy meal prep!
Egg Muffins with Veggies and Cheese

Egg muffins are a fantastic choice for picky eaters. They are easy to make and packed with protein. These little bites are not only colorful but also customizable. You can mix and match veggies and cheese based on what your family likes.
In the image, you can see a delightful assortment of egg muffins. They are filled with a mix of eggs, diced bell peppers, zucchini, and cheese. The vibrant colors make them visually appealing, which is a great way to entice picky eaters. Plus, they are baked in muffin tins, making them the perfect portion size for little hands.
These egg muffins are perfect for meal prep. You can whip up a batch at the beginning of the week and have a quick breakfast or snack ready to go. Just pop them in the microwave for a few seconds, and they’re good to eat!
Now, let’s get to the recipe so you can make these delicious egg muffins at home!
Ingredients
- 6 large eggs
- 1/2 cup milk
- 1 cup diced bell peppers (any color)
- 1 cup diced zucchini
- 1 cup shredded cheese (cheddar or your favorite)
- 1/2 teaspoon salt
- 1/4 teaspoon black pepper
- 1/4 teaspoon garlic powder
Instructions
- Preheat your oven to 350°F (175°C) and grease a muffin tin.
- In a large bowl, whisk together the eggs and milk until well combined.
- Add the diced bell peppers, zucchini, cheese, salt, pepper, and garlic powder. Stir until everything is mixed well.
- Pour the egg mixture evenly into the muffin tin, filling each cup about 3/4 full.
- Bake for 20-25 minutes, or until the muffins are set and lightly golden on top.
- Let them cool for a few minutes before removing from the tin. Enjoy warm or store in the fridge for later!
Cheesy Quinoa and Broccoli Bites
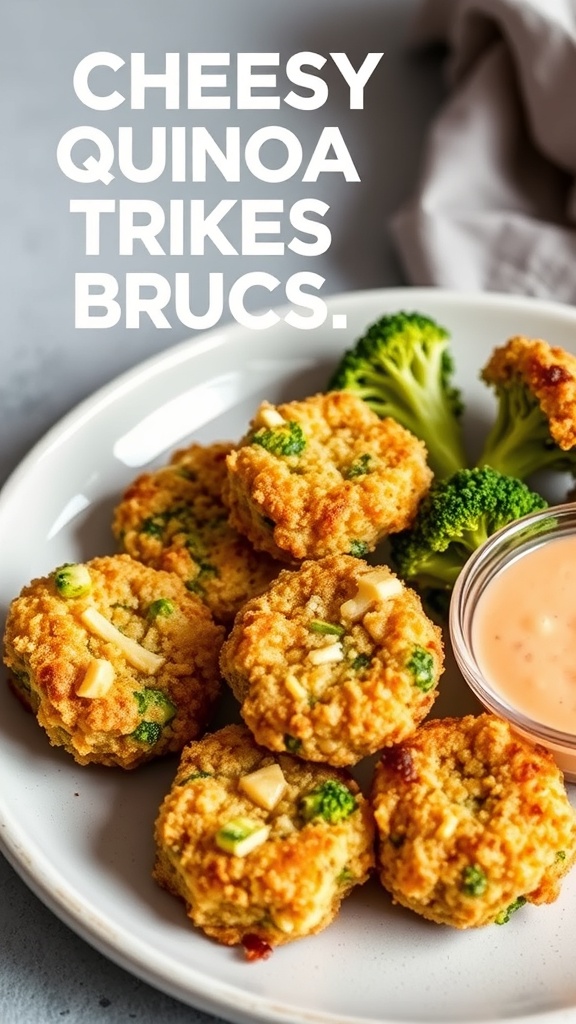
Cheesy Quinoa and Broccoli Bites are a fantastic way to sneak in some nutrition while keeping picky eaters happy. These little bites are packed with protein and flavor, making them a perfect snack or side dish. The combination of quinoa and broccoli creates a delightful texture, while the cheese adds a creamy richness that kids love.
These bites are easy to prepare and can be made ahead of time. They are baked until golden brown, giving them a satisfying crunch. Serve them with a dipping sauce for extra fun!
Ingredients
- 1 cup cooked quinoa
- 1 cup broccoli florets, finely chopped
- 1 cup shredded cheese (cheddar or mozzarella)
- 2 large eggs
- 1/2 cup breadcrumbs
- 1/4 teaspoon garlic powder
- Salt and pepper to taste
- Olive oil spray
Instructions
- Preheat the oven to 375°F (190°C) and line a baking sheet with parchment paper.
- In a large bowl, combine the cooked quinoa, chopped broccoli, shredded cheese, eggs, breadcrumbs, garlic powder, salt, and pepper. Mix well until everything is combined.
- Using your hands, form the mixture into small patties or bites and place them on the prepared baking sheet.
- Lightly spray the tops with olive oil to help them crisp up during baking.
- Bake for 20-25 minutes, or until the bites are golden brown and firm to the touch.
- Let them cool slightly before serving. Enjoy with your favorite dipping sauce!
Lemon Herb Grilled Shrimp Tacos

These Lemon Herb Grilled Shrimp Tacos are a delightful way to enjoy a high-protein meal. The shrimp are perfectly grilled, bringing out their natural sweetness and flavor. Wrapped in soft tortillas, they’re topped with fresh cilantro and a squeeze of lime, making them bright and refreshing.
The image showcases two tacos filled with juicy shrimp, garnished with vibrant green cilantro. A wedge of lime sits alongside, ready to add a zesty kick. This dish is not only appealing to the eyes but also to picky eaters who may shy away from more complex flavors.
Making these tacos is simple and quick, perfect for meal prep. You can grill the shrimp in advance and assemble the tacos when you’re ready to eat. This way, you’ll have a nutritious meal ready to go!
Ingredients
- 1 pound large shrimp, peeled and deveined
- 2 tablespoons olive oil
- 2 tablespoons lemon juice
- 1 teaspoon garlic powder
- 1 teaspoon paprika
- Salt and pepper to taste
- 8 small tortillas
- Fresh cilantro, for garnish
- Lime wedges, for serving
Instructions
- Marinate the Shrimp: In a bowl, combine olive oil, lemon juice, garlic powder, paprika, salt, and pepper. Add the shrimp and toss to coat. Let it marinate for 15-20 minutes.
- Grill the Shrimp: Preheat your grill or grill pan over medium-high heat. Cook the shrimp for 2-3 minutes on each side until they are pink and opaque.
- Warm the Tortillas: While the shrimp are grilling, warm the tortillas on the grill for about 30 seconds on each side.
- Assemble the Tacos: Place grilled shrimp on each tortilla, top with fresh cilantro, and squeeze lime juice over the top.
- Serve: Enjoy your tacos immediately with extra lime wedges on the side!
Cottage Cheese and Fruit Parfait

If you’re looking for a tasty and healthy option, a cottage cheese and fruit parfait is a great choice. This dish is colorful and packed with protein, making it perfect for picky eaters who might shy away from traditional meals. The layers of creamy cottage cheese, fresh fruits, and crunchy granola create a delightful mix of textures and flavors.
Start with a generous scoop of cottage cheese at the bottom of a glass. Next, add a layer of your favorite fruits, like strawberries, blueberries, and raspberries. These fruits not only add sweetness but also provide essential vitamins. Top it off with a sprinkle of granola for that satisfying crunch. Repeat the layers until you reach the top of the glass, and finish with a mint leaf for a pop of color.
This parfait is not just visually appealing; it’s also quick to prepare. It can be made ahead of time, making it a convenient option for breakfast or a snack. Plus, it’s versatile! You can mix and match fruits based on what you have on hand or what your picky eater prefers.
Ingredients
- 2 cups cottage cheese
- 1 cup strawberries, sliced
- 1 cup blueberries
- 1 cup raspberries
- 1 cup granola
- Fresh mint leaves for garnish
Instructions
- In a glass or bowl, add a layer of cottage cheese at the bottom.
- Top with a layer of sliced strawberries, followed by a layer of blueberries.
- Add a layer of granola on top of the fruits.
- Repeat the layers until the glass is filled, finishing with a layer of cottage cheese.
- Garnish with fresh mint leaves and serve immediately or refrigerate for later.
Beef and Broccoli Stir-Fry

Beef and broccoli stir-fry is a classic dish that many picky eaters can enjoy. The combination of tender beef, fresh broccoli, and a savory sauce makes it a hit at the dinner table. This meal is not only tasty but also packed with protein, making it perfect for meal prep.
The vibrant colors of the broccoli and beef in the pan create an inviting sight. The steam rising from the hot dish adds to the appeal, making it hard to resist. This recipe is simple, quick, and can be customized to suit different tastes.
Ingredients
- 1 lb beef (sirloin or flank steak), sliced thinly
- 2 cups broccoli florets
- 1 bell pepper, diced
- 3 tablespoons soy sauce
- 2 tablespoons oyster sauce
- 1 tablespoon cornstarch
- 2 tablespoons vegetable oil
- 2 cloves garlic, minced
- 1 teaspoon ginger, minced
- Salt and pepper to taste
Instructions
- Marinate the Beef: In a bowl, combine sliced beef with soy sauce, oyster sauce, and cornstarch. Let it sit for about 15 minutes.
- Heat the Pan: In a large skillet or wok, heat vegetable oil over medium-high heat.
- Cook the Beef: Add the marinated beef to the hot pan and stir-fry for about 3-4 minutes until browned. Remove from the pan and set aside.
- Add Vegetables: In the same pan, add garlic, ginger, broccoli, and bell pepper. Stir-fry for 4-5 minutes until the vegetables are tender-crisp.
- Combine: Return the beef to the pan, mix well, and cook for an additional 2 minutes. Season with salt and pepper to taste.
- Serve: Enjoy your beef and broccoli stir-fry over rice or noodles!
Baked Salmon with Quinoa and Asparagus

Baked salmon with quinoa and asparagus is a perfect meal for picky eaters. The salmon is rich in protein and omega-3 fatty acids, making it a healthy choice. Quinoa adds a nutty flavor and is packed with nutrients. Asparagus brings a fresh crunch to the plate, making this dish not only tasty but visually appealing too.
To prepare this meal, start by seasoning the salmon with salt, pepper, and a drizzle of olive oil. Bake it in the oven until it’s flaky and tender. While the salmon cooks, prepare the quinoa according to package instructions. You can add some peas or nuts for extra flavor. Finally, steam or roast the asparagus until it’s bright green and tender.
This dish is simple yet satisfying, and it’s easy to customize based on personal preferences. You can swap out the asparagus for another vegetable or add different spices to the salmon. It’s a great way to introduce new flavors without overwhelming picky eaters.
Ingredients
- 2 salmon fillets
- 1 cup quinoa
- 2 cups vegetable broth or water
- 1 bunch asparagus
- 2 tablespoons olive oil
- Salt and pepper to taste
- 1 teaspoon garlic powder (optional)
- Fresh parsley for garnish (optional)
Instructions
- Preheat the oven to 400°F (200°C).
- Season the salmon fillets with salt, pepper, and garlic powder. Place them on a baking sheet lined with parchment paper.
- Drizzle olive oil over the salmon and bake for 12-15 minutes, or until cooked through.
- While the salmon is baking, rinse the quinoa under cold water. In a saucepan, combine quinoa and vegetable broth. Bring to a boil, then reduce heat and simmer for about 15 minutes, or until the liquid is absorbed.
- In the last 5 minutes of cooking the quinoa, steam or roast the asparagus until tender.
- Serve the baked salmon over a bed of quinoa, with asparagus on the side. Garnish with fresh parsley if desired.
Vegetable and Hummus Wraps
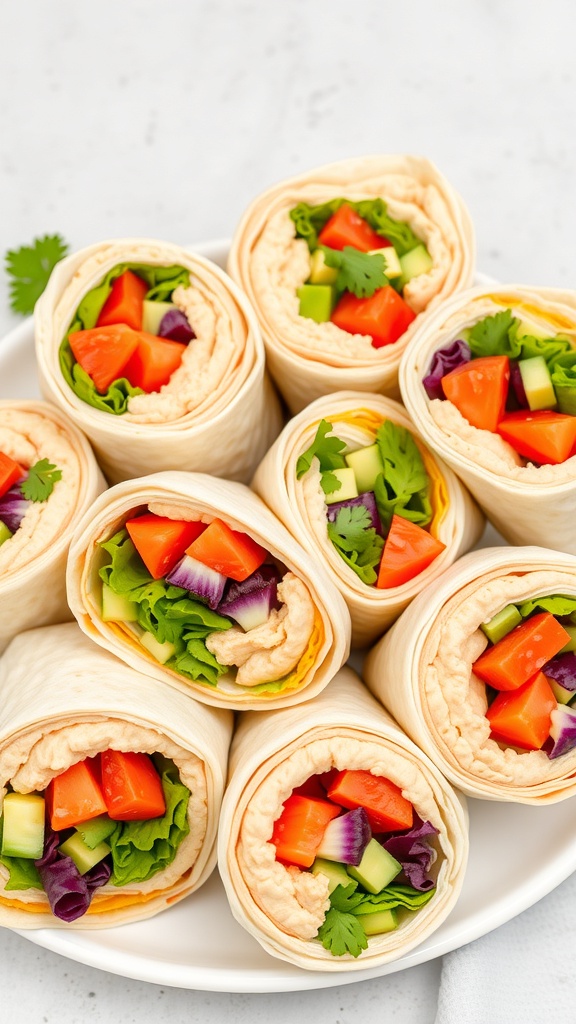
Vegetable and hummus wraps are a fantastic option for picky eaters. They are colorful, tasty, and packed with nutrients. These wraps are not only visually appealing but also easy to make. You can customize them with your favorite veggies, making them a hit for everyone.
Start with a soft tortilla as your base. Spread a generous layer of hummus for a creamy texture and added protein. Then, layer in fresh vegetables like bell peppers, cucumbers, and leafy greens. The crunch of the veggies adds a delightful contrast to the smooth hummus.
These wraps are perfect for lunch, snacks, or even a light dinner. They are portable, making them great for on-the-go meals. Plus, you can prepare them in advance, which makes meal prep a breeze!
Ingredients
- 4 large tortillas
- 1 cup hummus
- 1 red bell pepper, diced
- 1 cucumber, diced
- 1 cup shredded lettuce
- 1/2 cup shredded purple cabbage
- Fresh cilantro leaves (optional)
Instructions
- Spread a layer of hummus on each tortilla, covering the entire surface.
- Evenly distribute the diced bell pepper, cucumber, shredded lettuce, and purple cabbage over the hummus.
- Add fresh cilantro leaves if desired for extra flavor.
- Carefully roll the tortilla tightly from one end to the other.
- Slice each wrap in half and serve immediately or store in the fridge for later.
Pasta Salad with Grilled Chicken and Veggies
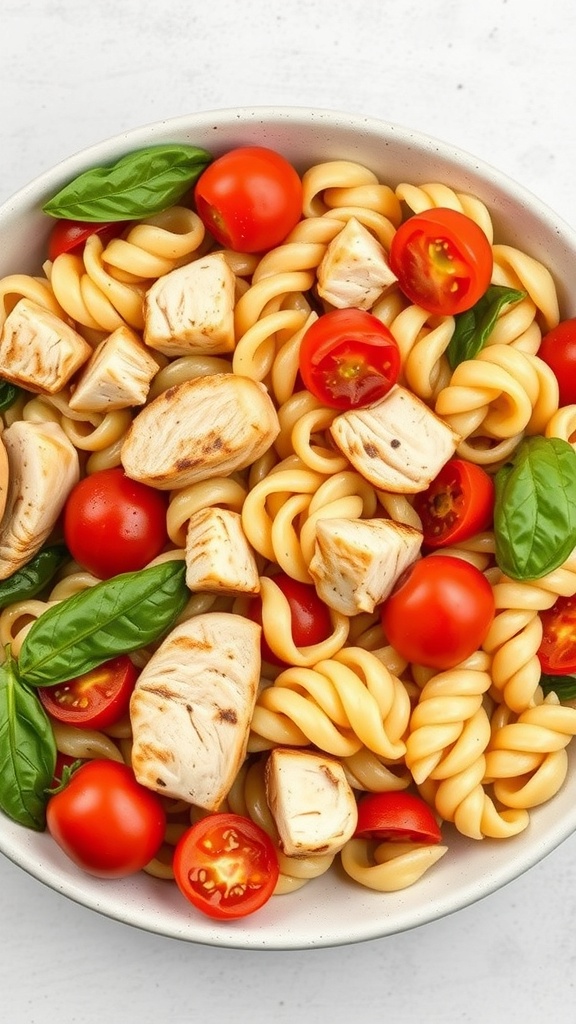
Pasta salad is a great option for picky eaters. It combines familiar flavors with a fun twist. This dish features grilled chicken, colorful veggies, and pasta, making it both appealing and nutritious.
The grilled chicken adds a protein punch, while the cherry tomatoes and fresh basil bring a burst of freshness. This combination not only looks inviting but also tastes delicious. You can easily customize it by adding or swapping ingredients based on your preferences.
Meal prepping this pasta salad is simple. Just cook the pasta, grill the chicken, and chop the veggies. Mix everything together with a light dressing, and you have a meal ready for the week. It’s perfect for lunchboxes or quick dinners.
Ingredients
- 2 cups rotini pasta
- 1 pound grilled chicken breast, diced
- 1 cup cherry tomatoes, halved
- 1/2 cup fresh basil leaves
- 1/4 cup olive oil
- 2 tablespoons balsamic vinegar
- Salt and pepper to taste
Instructions
- Cook the Pasta: Boil water in a large pot. Add the rotini pasta and cook according to package instructions. Drain and let cool.
- Grill the Chicken: Season the chicken breast with salt and pepper. Grill over medium heat until cooked through, about 6-7 minutes per side. Let it rest before dicing.
- Mix Ingredients: In a large bowl, combine the cooled pasta, diced chicken, cherry tomatoes, and basil.
- Prepare the Dressing: In a small bowl, whisk together olive oil, balsamic vinegar, salt, and pepper. Pour over the pasta mixture and toss to combine.
- Serve or Store: Enjoy immediately or store in the fridge for up to 3 days. This pasta salad is great cold or at room temperature.
Baked Tofu with Teriyaki Glaze
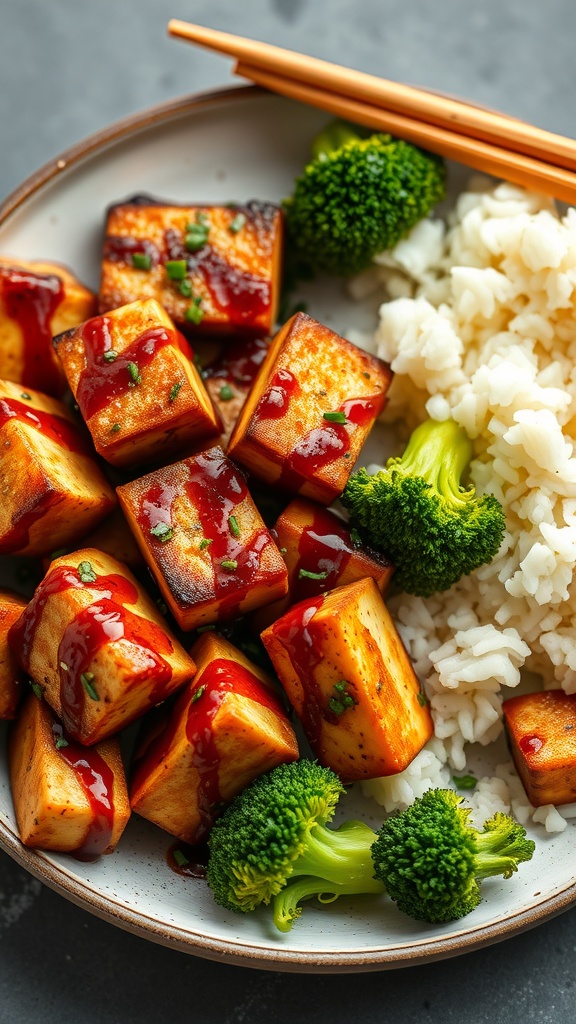
Baked tofu with teriyaki glaze is a fantastic option for picky eaters. The crispy tofu cubes are coated in a sweet and savory glaze that makes them irresistible. This dish pairs perfectly with fluffy rice and vibrant broccoli, creating a colorful and nutritious meal.
To make this dish, you’ll need firm tofu, teriyaki sauce, broccoli, and rice. The tofu is baked until golden, allowing it to absorb the flavors of the glaze. The broccoli adds a nice crunch and a pop of green to the plate.
This meal is not only high in protein but also easy to prepare. It can be made in advance and stored in the fridge for quick lunches or dinners. Plus, the sweet teriyaki sauce helps mask any tofu flavors that picky eaters might shy away from.
Ingredients
- 1 block firm tofu, drained and pressed
- 1/4 cup teriyaki sauce
- 2 cups broccoli florets
- 2 cups cooked rice
- 1 tablespoon olive oil
- 1 teaspoon sesame seeds (optional)
- Chopped green onions for garnish (optional)
Instructions
- Preheat your oven to 400°F (200°C).
- Cut the tofu into bite-sized cubes and place them in a bowl. Pour the teriyaki sauce over the tofu and toss to coat.
- Line a baking sheet with parchment paper. Spread the tofu cubes in a single layer on the sheet.
- Bake for 25-30 minutes, flipping halfway through, until the tofu is golden and slightly crispy.
- While the tofu is baking, steam the broccoli until tender, about 5-7 minutes.
- Serve the baked tofu over a bed of rice, topped with steamed broccoli. Drizzle with extra teriyaki sauce and sprinkle with sesame seeds and green onions if desired.
Stuffed Whole Wheat Pita with Falafel

Stuffed whole wheat pitas are a fantastic option for picky eaters. They are not only healthy but also fun to eat. The image shows a warm pita filled with crispy falafel, fresh lettuce, and a drizzle of creamy sauce. This combination is sure to please even the fussiest of eaters.
Falafel is a great source of protein and pairs perfectly with the whole wheat pita. The pita adds a nice chewy texture that complements the crunch of the falafel. Plus, the freshness of the lettuce adds a pop of color and nutrition.
Making these stuffed pitas is simple. You can prepare the falafel ahead of time and store them in the fridge. When you’re ready to eat, just warm them up and stuff them into the pita with your favorite toppings.
These pitas are versatile too! You can add other veggies like tomatoes or cucumbers, or even a sprinkle of feta cheese for extra flavor. The creamy sauce drizzled on top ties everything together, making each bite delicious.
Ingredients
- 1 cup dried chickpeas (or 1 can, drained)
- 1 small onion, chopped
- 2 cloves garlic, minced
- 1/4 cup fresh parsley, chopped
- 1 teaspoon cumin
- 1 teaspoon coriander
- Salt and pepper to taste
- Oil for frying
- 4 whole wheat pitas
- 1 cup lettuce, shredded
- Your favorite sauce (tahini or yogurt-based)
Instructions
- Soak the chickpeas overnight if using dried ones. Drain and rinse.
- In a food processor, combine chickpeas, onion, garlic, parsley, cumin, coriander, salt, and pepper. Pulse until a coarse mixture forms.
- Shape the mixture into small balls or patties.
- Heat oil in a pan over medium heat. Fry the falafel until golden brown on all sides.
- Warm the whole wheat pitas in the oven or on a skillet.
- Stuff each pita with lettuce and 2-3 falafel balls. Drizzle with your favorite sauce.
- Serve immediately and enjoy!