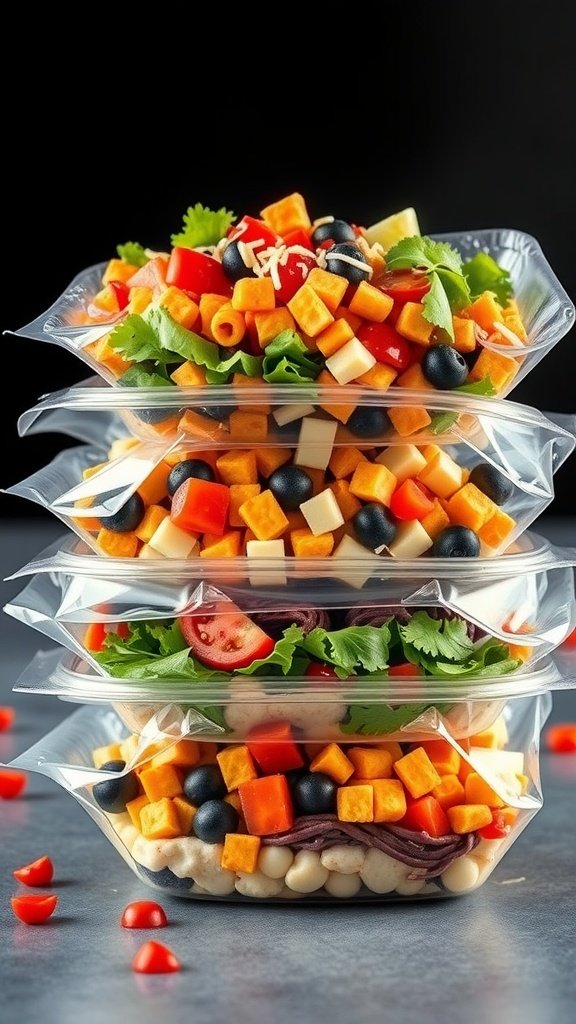
15 Quick Meal Prep Ideas for Moms with Picky Eaters
Meal prep can feel like a chore, especially when you’re juggling picky eaters at home. This guide is here to make it easy and fun, offering quick and tasty meal ideas that your kids will actually eat. Say goodbye to meal-time battles and hello to stress-free cooking!
Fruit and Yogurt Parfaits
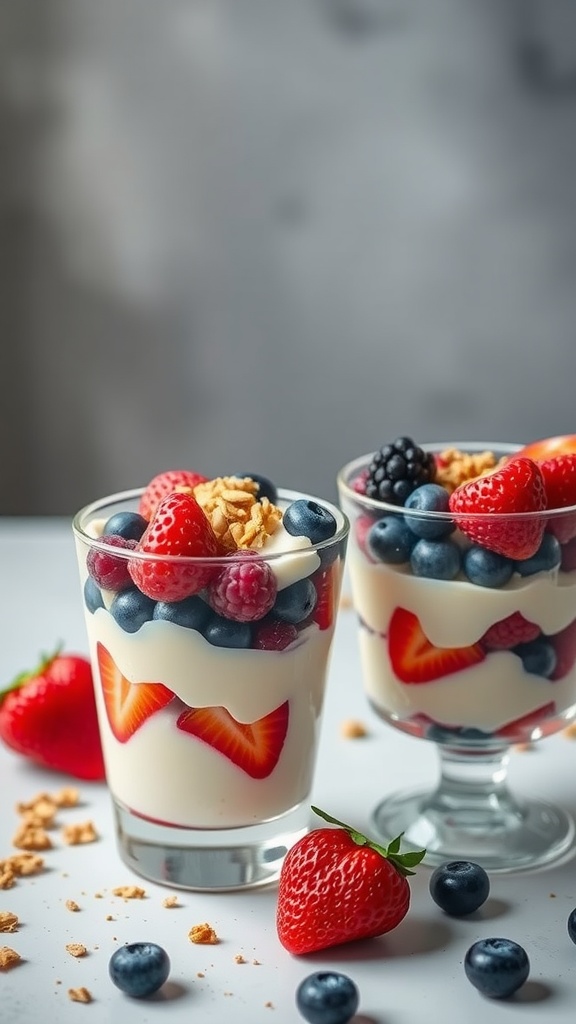
Fruit and yogurt parfaits are a fantastic option for busy moms with picky eaters. They look colorful and inviting, making them a hit with kids. The layers of creamy yogurt, crunchy granola, and fresh fruit create a delightful combination that’s hard to resist.
To make these parfaits, you can use any combination of fruits your kids enjoy. Strawberries, blueberries, and raspberries are popular choices. The best part is that you can prepare them in advance, making breakfast or snack time a breeze!
These parfaits are not only tasty but also packed with nutrients. Yogurt provides protein and calcium, while fruits add vitamins and fiber. Plus, kids can help assemble their own parfaits, making it a fun activity.
Ingredients
- 2 cups yogurt (plain or flavored)
- 1 cup granola
- 1 cup mixed berries (strawberries, blueberries, raspberries)
- Fresh mint leaves for garnish (optional)
Instructions
- Start by washing the berries. Slice the strawberries if they are large.
- In a glass or bowl, layer a spoonful of yogurt at the bottom.
- Add a layer of granola on top of the yogurt.
- Next, add a layer of mixed berries.
- Repeat the layers until the glass is full, finishing with a layer of berries on top.
- Garnish with a mint leaf if desired. Serve immediately or refrigerate for later.
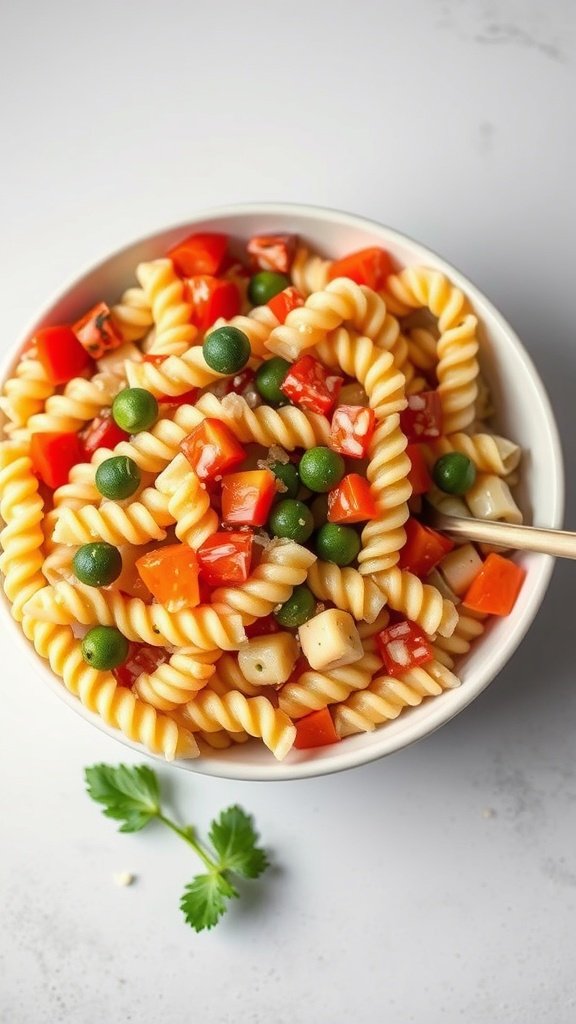
Pasta Salad with Hidden Veggies
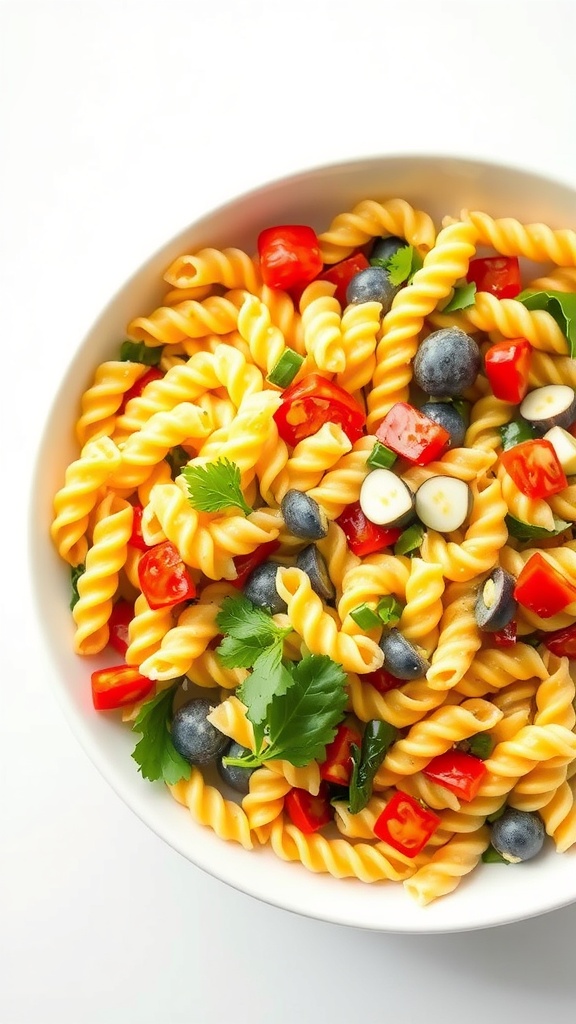
Pasta salad is a fantastic option for busy moms, especially when kids are picky eaters. This dish is colorful and appealing, making it easier to sneak in those veggies. The vibrant red peppers and green peas not only add flavor but also nutrients that kids need.
To make this pasta salad, start with your favorite pasta shape. Cook it until al dente, then toss it with diced bell peppers, peas, and a light dressing. You can even add some cheese for extra taste. This meal can be prepped ahead of time, making it a great choice for lunchboxes or quick dinners.
Kids love the fun shapes of the pasta, and they might not even notice the hidden veggies. This is a simple way to make sure they’re getting a balanced meal without the fuss.
Ingredients
- 2 cups rotini pasta
- 1 cup diced red bell pepper
- 1 cup frozen peas
- 1/2 cup diced cheese (like cheddar or mozzarella)
- 1/4 cup olive oil
- 2 tablespoons lemon juice
- Salt and pepper to taste
Instructions
- Cook the pasta according to package instructions. Drain and let it cool.
- In a large bowl, combine the cooled pasta, diced bell pepper, peas, and cheese.
- In a small bowl, whisk together olive oil, lemon juice, salt, and pepper.
- Pour the dressing over the pasta salad and toss to combine.
- Chill in the refrigerator for at least 30 minutes before serving.
One-Pan Chicken and Veggie Bake
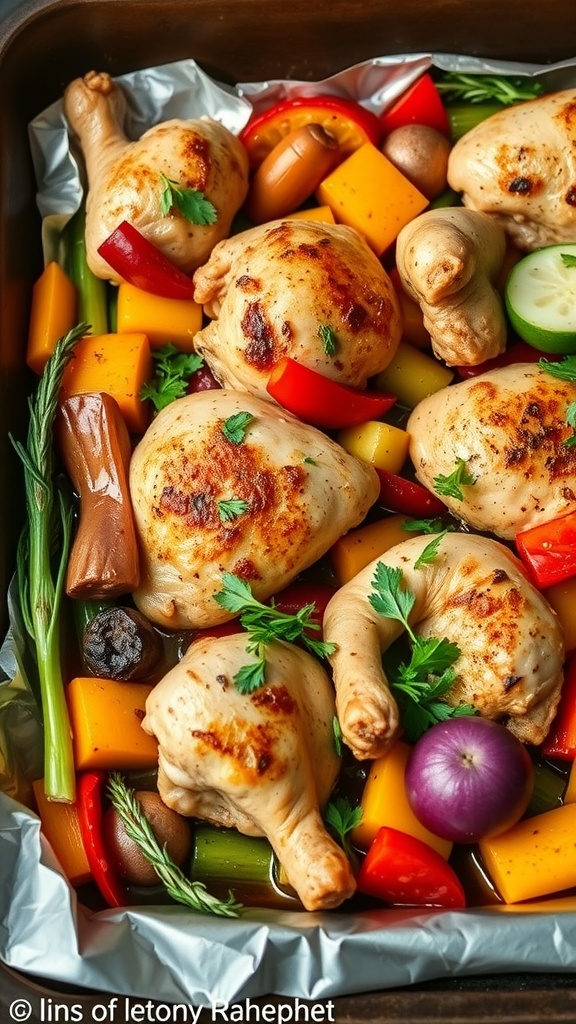
This one-pan chicken and veggie bake is a lifesaver for busy moms. It’s simple, quick, and packed with flavors that even picky eaters will enjoy. The vibrant colors of the veggies make the dish visually appealing, and the aroma while it cooks is simply mouthwatering.
Using chicken drumsticks, you get juicy meat that pairs perfectly with a mix of bell peppers, zucchini, and carrots. This meal is not only nutritious but also easy to clean up, making it a win-win for family dinners.
To prepare, just toss everything in a baking dish, season it well, and let the oven do the work. Your kids will love the tender chicken and sweet veggies, and you’ll love how little effort it takes!
Ingredients
- 4 chicken drumsticks
- 1 red bell pepper, chopped
- 1 yellow bell pepper, chopped
- 1 zucchini, sliced
- 2 carrots, sliced
- 1 onion, quartered
- 2 tablespoons olive oil
- 1 teaspoon garlic powder
- 1 teaspoon paprika
- Salt and pepper to taste
- Fresh parsley for garnish
Instructions
- Preheat your oven to 400°F (200°C).
- In a large baking dish, arrange the chicken drumsticks and surround them with the chopped veggies.
- Drizzle olive oil over everything and sprinkle with garlic powder, paprika, salt, and pepper. Toss gently to coat.
- Bake for 35-40 minutes, or until the chicken is cooked through and the veggies are tender.
- Garnish with fresh parsley before serving. Enjoy your delicious one-pan meal!
Cheesy Broccoli and Rice Casserole
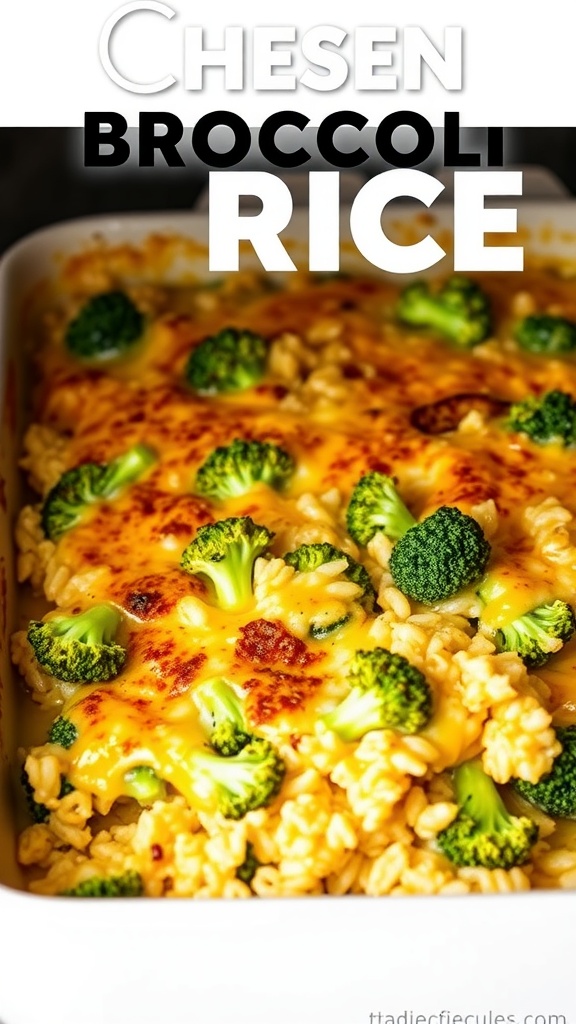
This Cheesy Broccoli and Rice Casserole is a fantastic meal for busy moms with picky eaters. It combines creamy cheese, tender broccoli, and fluffy rice, making it a hit with kids. The bright colors of the broccoli and red peppers make the dish visually appealing, which can help entice little ones to try it.
The casserole is easy to prepare, allowing you to whip it up quickly. You can even make it ahead of time and pop it in the oven when you’re ready to eat. Plus, it’s a great way to sneak in some vegetables without the fuss!
Here’s how to make this delicious dish:
Ingredients
- 2 cups cooked rice
- 2 cups broccoli florets
- 1 cup shredded cheddar cheese
- 1/2 cup diced red bell pepper
- 1 can cream of chicken soup
- 1/2 cup milk
- 1 teaspoon garlic powder
- Salt and pepper to taste
Instructions
- Preheat your oven to 350°F (175°C).
- In a large bowl, mix the cooked rice, broccoli, red bell pepper, cream of chicken soup, milk, garlic powder, salt, and pepper.
- Transfer the mixture to a greased baking dish. Spread it evenly.
- Top with shredded cheddar cheese.
- Bake for 25-30 minutes, or until the cheese is bubbly and golden.
- Let it cool for a few minutes before serving. Enjoy!
Quick Taco Bar Setup
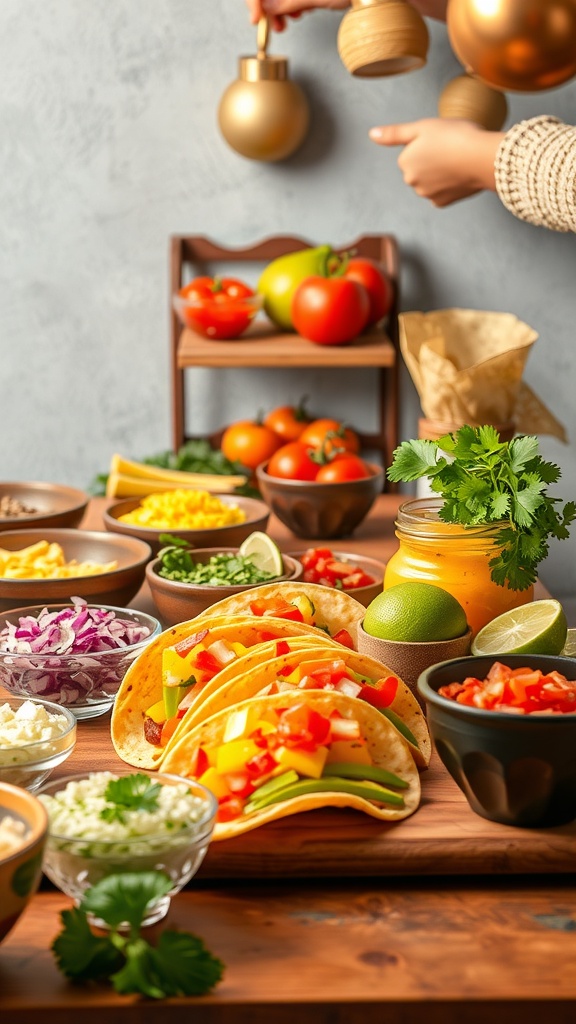
Setting up a taco bar is a fun and easy way to please picky eaters. Kids love customizing their own meals, and tacos are perfect for this. You can lay out a variety of ingredients, allowing everyone to build their own tacos just the way they like.
Start with soft or hard taco shells as the base. Then, offer a selection of proteins like seasoned ground beef, shredded chicken, or even beans for a vegetarian option. Next, add colorful toppings such as diced tomatoes, shredded lettuce, and cheese. Don’t forget the extras like sour cream, guacamole, and salsa!
Arrange everything on a table or kitchen counter. Use small bowls for toppings to keep things organized. This setup not only looks appealing but also makes it easy for kids to pick what they want. You can even include fun garnishes like lime wedges and fresh cilantro to add a little flair.
With a taco bar, mealtime becomes a fun activity. Kids can experiment with different combinations, making it less likely that they’ll turn their noses up at dinner. Plus, it’s quick to prepare and clean up!
Ingredients
- 12 taco shells (soft or hard)
- 1 pound ground beef or shredded chicken
- 1 can black beans, drained and rinsed
- 1 cup shredded lettuce
- 1 cup diced tomatoes
- 1 cup shredded cheese (cheddar or Mexican blend)
- 1/2 cup sour cream
- 1/2 cup guacamole
- 1/2 cup salsa
- 1 lime, cut into wedges
- Fresh cilantro for garnish
Instructions
- Cook the Protein: In a skillet over medium heat, cook the ground beef until browned. Drain excess fat. If using shredded chicken, warm it in a pan with a little seasoning.
- Prepare the Toppings: While the protein is cooking, chop the tomatoes, shred the lettuce, and set out all the toppings in small bowls.
- Warm the Taco Shells: If using hard shells, you can warm them in the oven for a few minutes. Soft shells can be warmed in a microwave or on a skillet.
- Set Up the Taco Bar: Arrange the taco shells and toppings on a table or counter. Let everyone build their own tacos!
- Enjoy: Serve with lime wedges and fresh cilantro for an extra burst of flavor.
Easy Quesadillas with Cheese and Beans

Quesadillas are a fantastic choice for busy moms dealing with picky eaters. They’re quick to make, customizable, and packed with flavor. In the image, you can see golden-brown quesadillas, perfectly crisp on the outside, with melted cheese and beans peeking out. The colorful diced peppers add a fun touch, making them visually appealing for kids.
These quesadillas are not just easy to prepare but also allow you to sneak in some nutrition. You can use whole wheat tortillas for added fiber or throw in some veggies your kids might not usually eat. Plus, they can be served with salsa or guacamole for dipping, making mealtime more exciting.
Here’s a simple recipe to whip up these delicious quesadillas in no time!
Mini Turkey Meatballs with Dipping Sauce
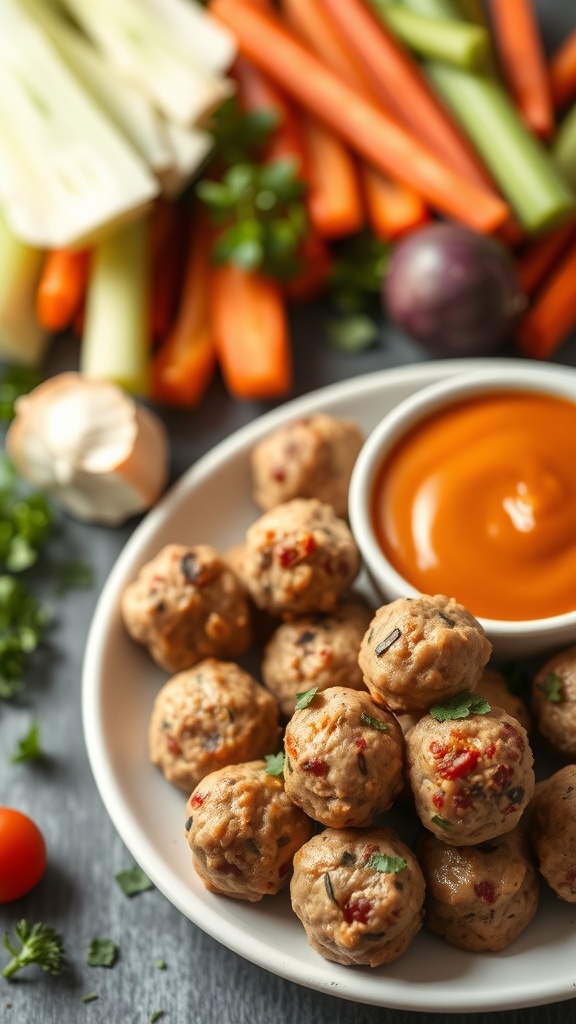
Mini turkey meatballs are a fun and tasty option for kids, especially those who can be a bit picky. These bite-sized delights are not only easy to make, but they also pack a punch of flavor. The bright orange dipping sauce adds a splash of color and a hint of sweetness that kids love. Pair these meatballs with fresh veggie sticks like celery and carrots for a balanced meal that’s sure to please.
Making these mini meatballs is simple. Start by mixing ground turkey with breadcrumbs, egg, and your favorite seasonings. Roll them into small balls and bake until golden. Serve them with a creamy dipping sauce on the side. This way, kids can dip and enjoy, making mealtime more interactive and fun.
Ingredients
- 1 pound ground turkey
- 1/2 cup breadcrumbs
- 1 large egg
- 1 teaspoon garlic powder
- 1 teaspoon onion powder
- 1/2 teaspoon salt
- 1/4 teaspoon black pepper
- 1/4 cup chopped green onions
- 1/2 cup barbecue sauce
- 1/4 cup ranch dressing
- Veggie sticks (carrots, celery, etc.)
Instructions
- Preheat your oven to 375°F (190°C).
- In a large bowl, combine ground turkey, breadcrumbs, egg, garlic powder, onion powder, salt, pepper, and green onions. Mix until well combined.
- Roll the mixture into small balls, about 1 inch in diameter, and place them on a baking sheet lined with parchment paper.
- Bake for 20-25 minutes, or until the meatballs are cooked through and golden brown.
- While the meatballs are baking, mix barbecue sauce and ranch dressing in a small bowl for dipping.
- Serve the meatballs warm with the dipping sauce and veggie sticks on the side.
Homemade Pizza Rolls with Fun Toppings
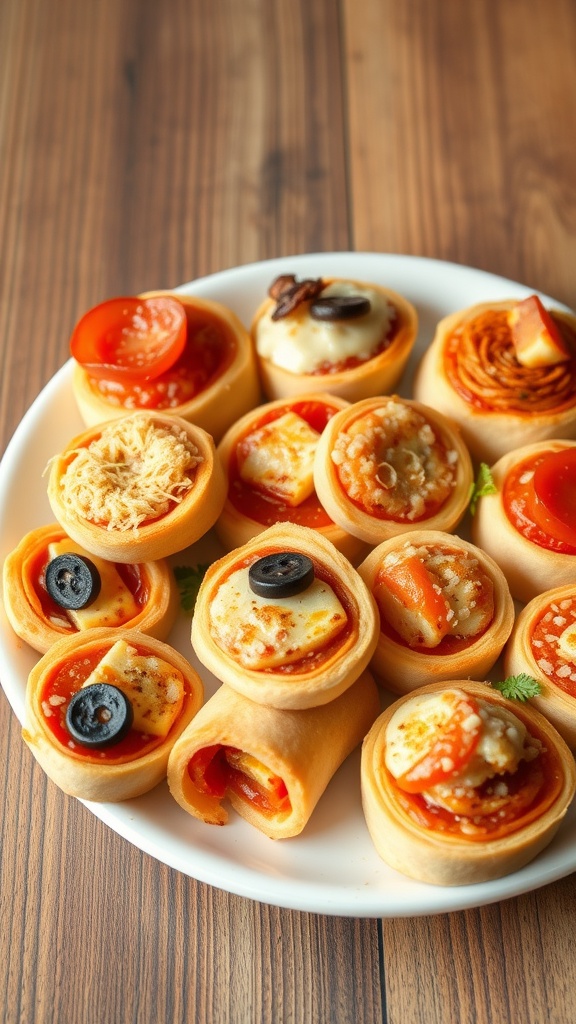
Homemade pizza rolls are a fantastic way to please picky eaters. These little bites are not only fun to make but also allow kids to choose their favorite toppings. The image shows a colorful array of pizza rolls, each topped with different ingredients like olives, tomatoes, and cheese. This variety makes it easy to cater to different tastes.
Making pizza rolls is a simple process. Start with a basic dough, roll it out, and fill it with sauce and toppings. Kids can help with the assembly, making it a fun family activity. The best part? You can customize each roll to suit everyone’s preferences.
These pizza rolls are perfect for lunchboxes or quick snacks. They can be made ahead of time and stored in the fridge or freezer. Just pop them in the oven when you’re ready to eat. Your kids will love the crispy outside and gooey inside!
Ingredients
- 1 cup warm water
- 2 1/4 teaspoons active dry yeast
- 2 tablespoons sugar
- 3 cups all-purpose flour
- 1 teaspoon salt
- 2 tablespoons olive oil
- 1 cup pizza sauce
- 1 cup shredded mozzarella cheese
- 1/2 cup sliced pepperoni
- 1/2 cup sliced olives
- 1/2 cup diced bell peppers
- 1/4 cup grated Parmesan cheese
Instructions
- Activate the Yeast: In a bowl, combine warm water, yeast, and sugar. Let it sit for about 5 minutes until foamy.
- Make the Dough: In a large bowl, mix flour and salt. Add the yeast mixture and olive oil. Stir until a dough forms, then knead for about 5 minutes until smooth.
- Let it Rise: Place the dough in a greased bowl, cover it, and let it rise in a warm place for about 1 hour or until doubled in size.
- Prepare the Filling: Roll out the dough on a floured surface into a rectangle. Spread pizza sauce evenly over the dough, then sprinkle cheese and your choice of toppings.
- Roll and Cut: Roll the dough tightly from one end to the other. Slice into 1-inch pieces and place on a greased baking sheet.
- Bake: Preheat the oven to 375°F (190°C). Bake the rolls for 15-20 minutes or until golden brown. Let them cool slightly before serving.
One-Pot Mac and Cheese with Broccoli
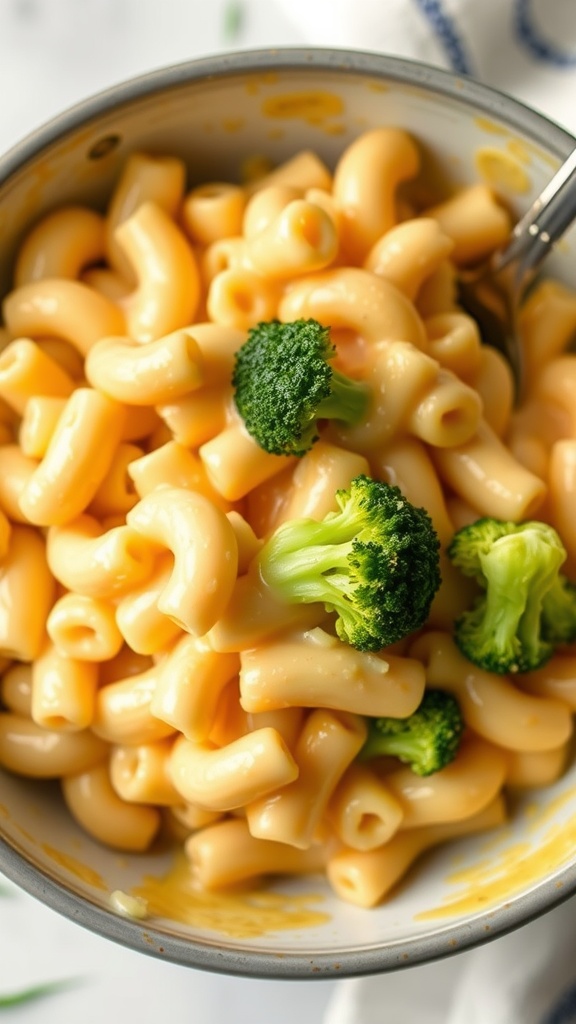
One-Pot Mac and Cheese with Broccoli is a lifesaver for busy moms. This dish combines creamy cheese and tender pasta with vibrant green broccoli, making it appealing to picky eaters. The best part? Everything cooks in one pot, so cleanup is a breeze!
Start by boiling your pasta until it’s just al dente. Then, toss in the broccoli florets during the last few minutes of cooking. This way, they stay bright and crunchy. Once the pasta is ready, drain it and return it to the pot. Add your favorite cheese and a splash of milk for that creamy texture. Stir until everything is melted and combined. It’s that simple!
This meal is not only quick but also packed with nutrients. Kids get their carbs from the pasta and vitamins from the broccoli. Plus, the cheesy goodness makes it hard to resist. Serve it warm, and watch your little ones enjoy every bite!
Oven-Baked Chicken Tenders
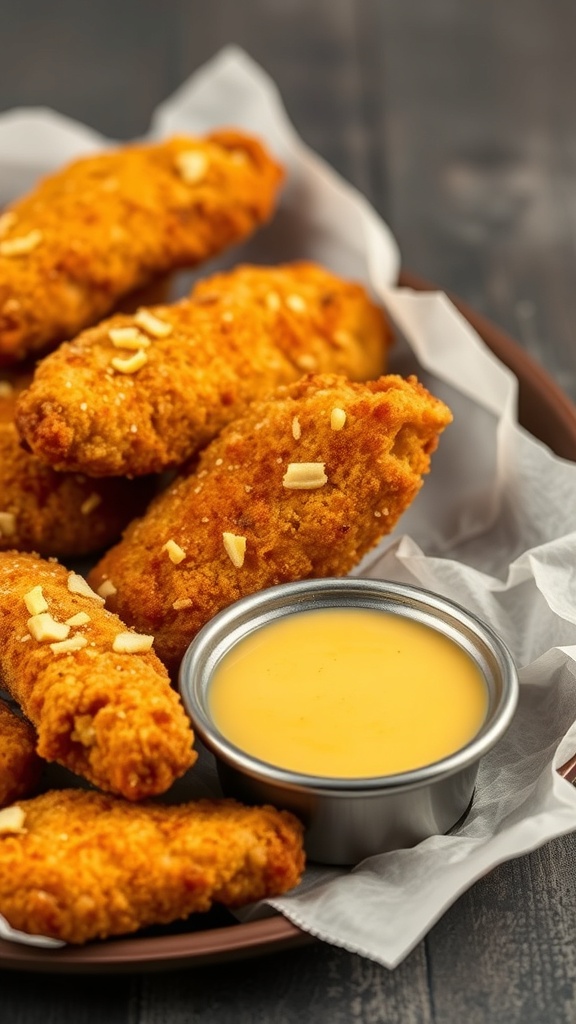
Oven-baked chicken tenders are a fantastic option for busy moms dealing with picky eaters. They’re crispy, flavorful, and easy to make. Plus, they can be paired with a variety of dipping sauces, making them even more appealing to kids. The image shows a delicious platter of golden-brown chicken tenders, perfectly cooked and ready to be enjoyed.
These tenders are not just tasty; they’re also healthier than their fried counterparts. Baking them in the oven allows you to cut down on excess oil while still achieving that satisfying crunch. Serve them with ketchup, ranch, or barbecue sauce for a meal that kids will love.
Making these chicken tenders is simple. You’ll need some basic ingredients, and the preparation is quick. This dish is perfect for meal prep, allowing you to whip up a batch and have them ready for the week.
Veggie-Packed Smoothie Bowls
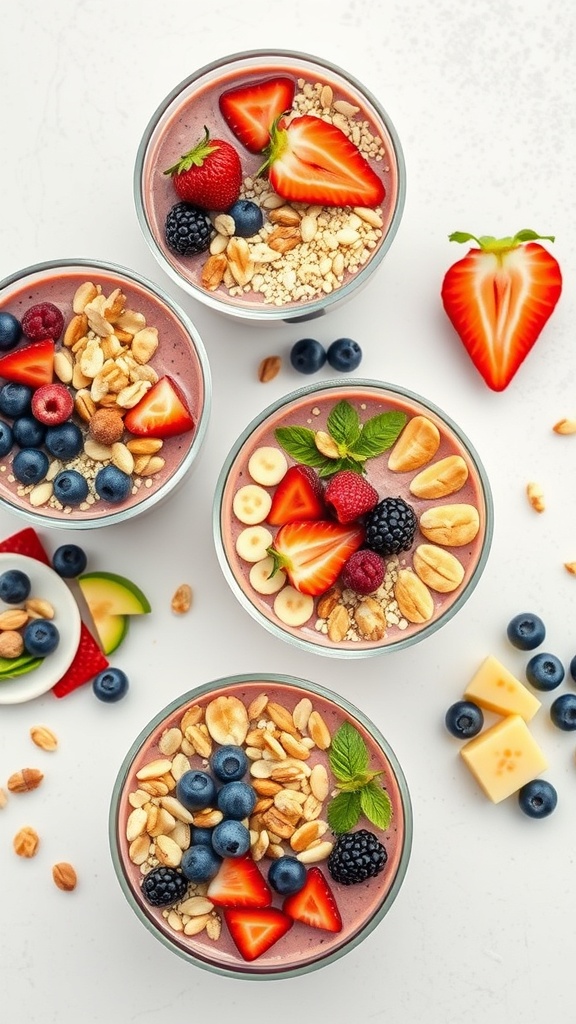
Veggie-packed smoothie bowls are a fun and colorful way to sneak in those essential nutrients for your picky eaters. These bowls are not only visually appealing but also delicious, making them a hit with kids. You can customize the ingredients based on what your children like, ensuring they get a healthy meal without any fuss.
Start with a base of blended fruits and veggies. Spinach or kale can be added without altering the taste too much. Top it off with their favorite fruits, nuts, and seeds. This way, you can create a nutritious meal that feels like a treat!
Here’s a simple recipe to whip up these delightful smoothie bowls:
Ingredients
- 2 cups spinach or kale
- 1 banana
- 1 cup frozen mixed berries
- 1 cup almond milk (or any milk of choice)
- 1 tablespoon honey or maple syrup (optional)
- 1/4 cup granola
- Fresh fruits for topping (strawberries, blueberries, bananas)
- Chopped nuts or seeds (optional)
Instructions
- Blend the spinach or kale, banana, frozen berries, and almond milk together until smooth.
- If you want it sweeter, add honey or maple syrup and blend again.
- Pour the smoothie into bowls.
- Top with granola, fresh fruits, and nuts or seeds as desired.
- Serve immediately and enjoy!
Baked Sweet Potato Fries
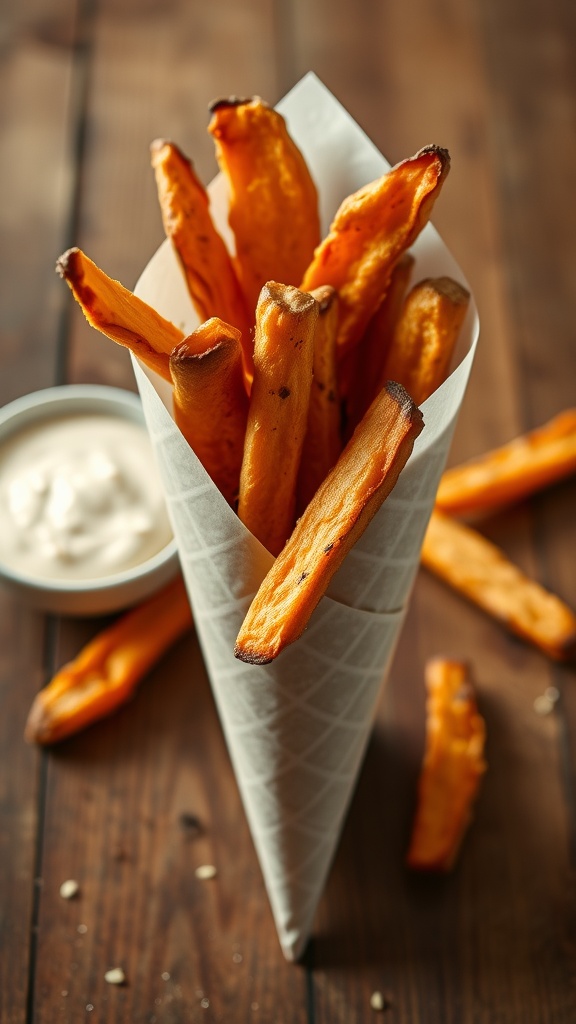
Baked sweet potato fries are a fantastic option for moms dealing with picky eaters. They are crispy, tasty, and packed with nutrients. The vibrant orange color makes them visually appealing, and they pair perfectly with a variety of dips, like ketchup. Kids often love the sweetness of sweet potatoes, making these fries a hit at the dinner table.
Making baked sweet potato fries is simple and quick. You can prepare them in advance, saving time during busy weeknights. Plus, they are healthier than traditional fries, as they are baked instead of fried. This means you can feel good about serving them to your family.
To make these delicious fries, all you need are a few ingredients and some easy steps. Let’s get cooking!
Ingredients
- 2 large sweet potatoes
- 2 tablespoons olive oil
- 1 teaspoon paprika
- 1 teaspoon garlic powder
- Salt and pepper to taste
- Ketchup for dipping
Instructions
- Preheat your oven to 425°F (220°C).
- Peel the sweet potatoes and cut them into thin strips, resembling fries.
- In a large bowl, toss the sweet potato strips with olive oil, paprika, garlic powder, salt, and pepper until well coated.
- Spread the fries in a single layer on a baking sheet lined with parchment paper.
- Bake for 25-30 minutes, flipping halfway through, until they are crispy and golden brown.
- Serve warm with ketchup on the side for dipping.
Simple Stir-Fry with Chicken and Peppers
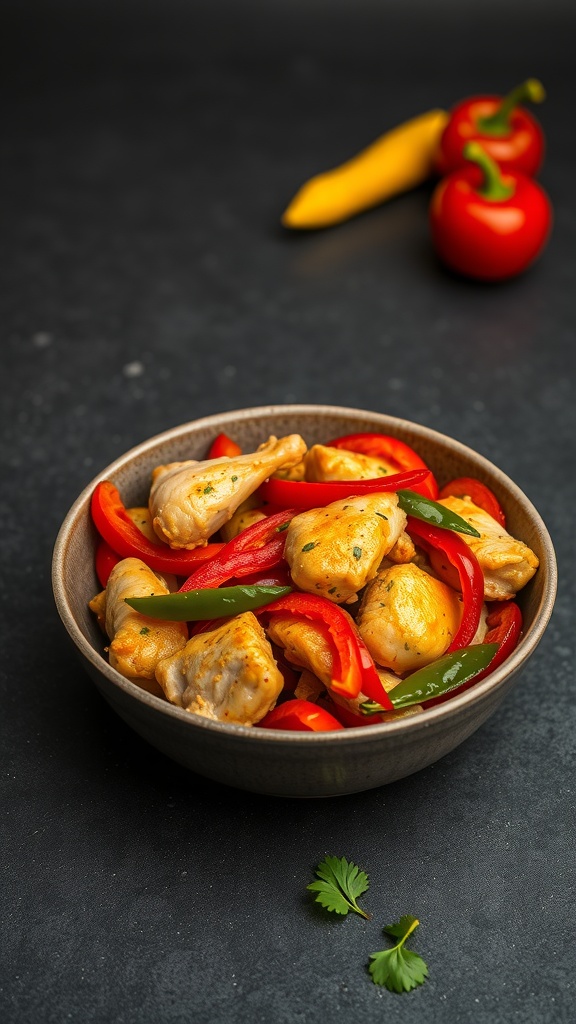
Stir-fry is a fantastic option for busy moms dealing with picky eaters. This simple chicken and pepper stir-fry is colorful, quick to make, and packed with flavor. The bright red and green peppers not only add a pop of color but also provide essential vitamins. Plus, the chicken is tender and juicy, making it a hit with kids.
To make this dish, you’ll need some basic ingredients that you probably already have at home. It’s a great way to sneak in some veggies without the fuss. The best part? You can customize it to suit your kids’ tastes. If they prefer broccoli or carrots, feel free to swap out the peppers!
Let’s get cooking!
DIY Sandwiches with Fun Shapes
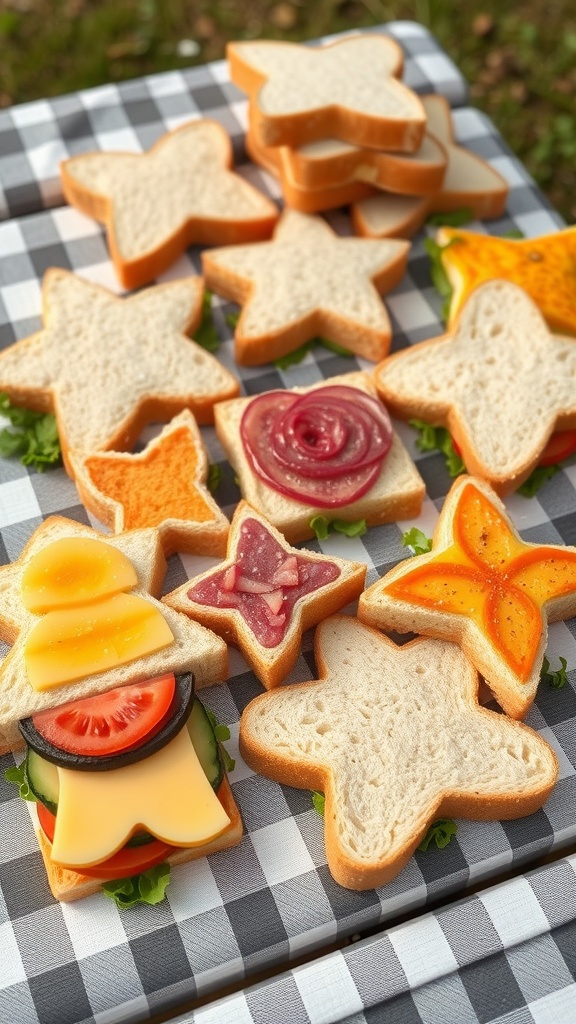
Making meals fun is key when dealing with picky eaters. DIY sandwiches in fun shapes can turn a simple lunch into an exciting treat. Using cookie cutters, you can create star, butterfly, or flower-shaped sandwiches that are sure to catch your kids’ eyes.
Start with fresh bread and layer in their favorite fillings. Cheese, deli meats, and veggies can all be used to create colorful and tasty combinations. The more colorful the sandwich, the more appealing it becomes!
Don’t forget to involve your kids in the process. Let them choose their favorite shapes and fillings. This not only makes them more excited about eating but also encourages them to try new ingredients.
Here’s a simple recipe to get you started on these fun sandwiches:
Ingredients
- 8 slices of bread
- 4 slices of cheese (any kind)
- 4 slices of deli meat (turkey, ham, or chicken)
- 1 tomato, sliced
- 1 cucumber, sliced
- Leafy greens (like lettuce or spinach)
- Condiments (like mayo or mustard)
- Cookie cutters in various shapes
Instructions
- Start by laying out the slices of bread on a clean surface.
- Use cookie cutters to cut out fun shapes from the bread.
- Layer the cheese, deli meat, and veggies on one piece of bread.
- Spread your favorite condiments on another piece of bread and place it on top.
- Press down gently to secure the sandwich.
- Repeat the process with the remaining ingredients.
- Serve immediately or pack them for lunch!
Breakfast Burritos for Dinner
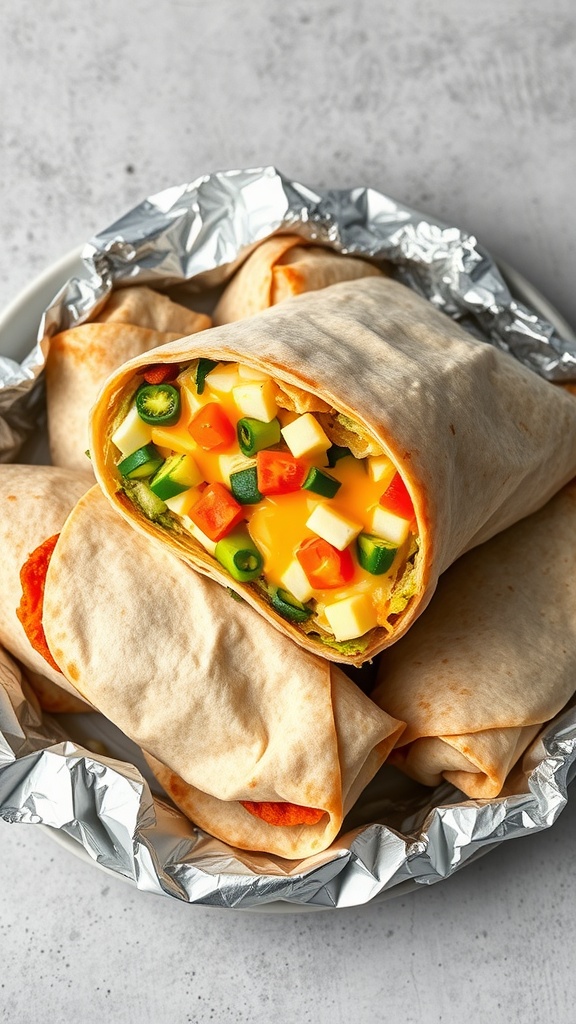
Breakfast burritos are a fantastic choice for dinner, especially when you have picky eaters at home. They are easy to make and can be filled with a variety of ingredients, making them customizable for everyone’s taste. Just imagine a warm tortilla wrapped around fluffy eggs, cheese, and colorful veggies. It’s a fun way to mix breakfast and dinner!
These burritos are not only delicious but also quick to prepare. You can whip them up in no time, making them perfect for busy evenings. Plus, they can be made ahead and frozen for later, which is a real lifesaver for moms on the go.
Let’s get to the good stuff! Here’s a simple recipe that your kids will love. Feel free to switch out the ingredients based on what your family enjoys.
Ingredients
- 4 large flour tortillas
- 6 large eggs
- 1 cup shredded cheese (cheddar or your choice)
- 1 cup diced bell peppers
- 1 cup diced zucchini
- 1/2 cup diced onion
- Salt and pepper to taste
- 1 tablespoon olive oil
- Optional: salsa for serving
Instructions
- Prepare the Filling: In a skillet, heat olive oil over medium heat. Add onions and bell peppers, cooking until softened, about 3-4 minutes. Add zucchini and cook for another 2 minutes.
- Scramble the Eggs: In a bowl, whisk the eggs with salt and pepper. Pour the eggs into the skillet with the veggies. Stir gently until the eggs are fully cooked.
- Assemble the Burritos: Lay a tortilla flat and spoon some of the egg mixture in the center. Sprinkle with cheese. Roll the tortilla tightly, folding in the sides as you go.
- Cook the Burritos: Place the burritos seam-side down in the skillet. Cook for 2-3 minutes on each side until golden brown and crispy.
- Serve: Slice in half and serve with salsa if desired. Enjoy your delicious breakfast burritos for dinner!