16 Easy Family Meal Prep Ideas for Busy Moms
Busy evenings don’t have to mean takeout every night! These 16 family-sized meal prep ideas make weeknight dinners a breeze, helping you whip up delicious meals in no time. With simple recipes and easy prep tips, you’ll enjoy stress-free cooking that keeps everyone happy at the dinner table.
One-Pan Chicken and Veggie Bake
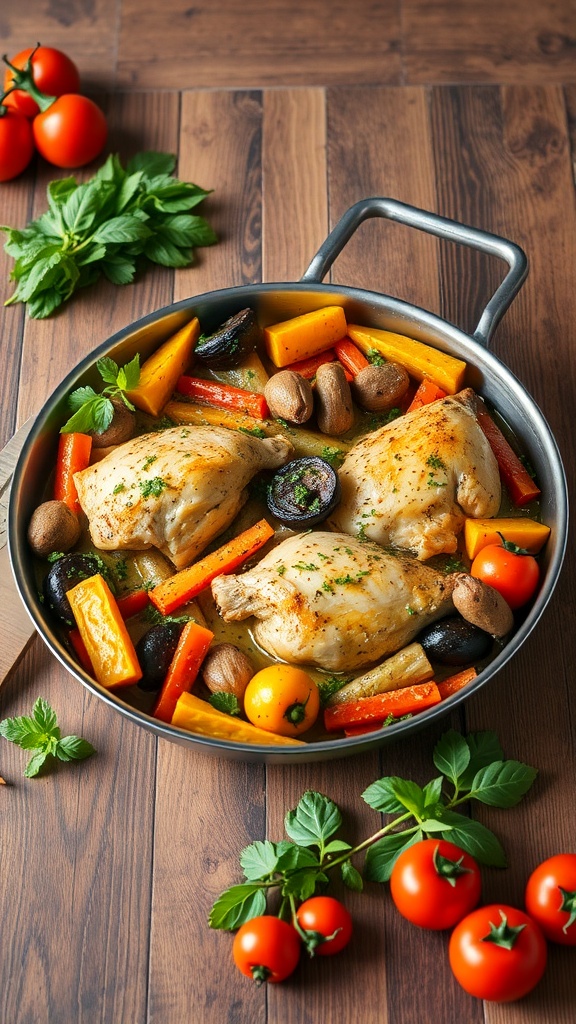
This One-Pan Chicken and Veggie Bake is a lifesaver for busy moms. It combines tender chicken with colorful vegetables, all cooked together in one pan. This means less cleanup and more time to enjoy with your family. The vibrant colors of the veggies make the dish appealing, and the aroma while it bakes is simply irresistible.
Using fresh ingredients like juicy tomatoes, carrots, and mushrooms, this meal is not just easy to prepare but also packed with nutrients. The chicken gets crispy on the outside while remaining juicy inside, thanks to the roasting process. Plus, you can customize the veggies based on what your family loves!
Ingredients
- 4 chicken thighs (bone-in, skin-on)
- 2 cups mixed vegetables (carrots, bell peppers, zucchini)
- 1 cup cherry tomatoes
- 1 cup mushrooms
- 2 tablespoons olive oil
- 1 teaspoon garlic powder
- 1 teaspoon paprika
- Salt and pepper to taste
- Fresh herbs (like basil or parsley) for garnish
Instructions
- Preheat your oven to 400°F (200°C).
- In a large baking dish, arrange the chicken thighs and surround them with mixed vegetables, cherry tomatoes, and mushrooms.
- Drizzle olive oil over everything and sprinkle with garlic powder, paprika, salt, and pepper. Toss the veggies to coat them evenly.
- Bake in the preheated oven for 35-40 minutes, or until the chicken is cooked through and the vegetables are tender.
- Garnish with fresh herbs before serving. Enjoy this simple, nutritious meal with your family!
Sheet Pan Salmon with Asparagus
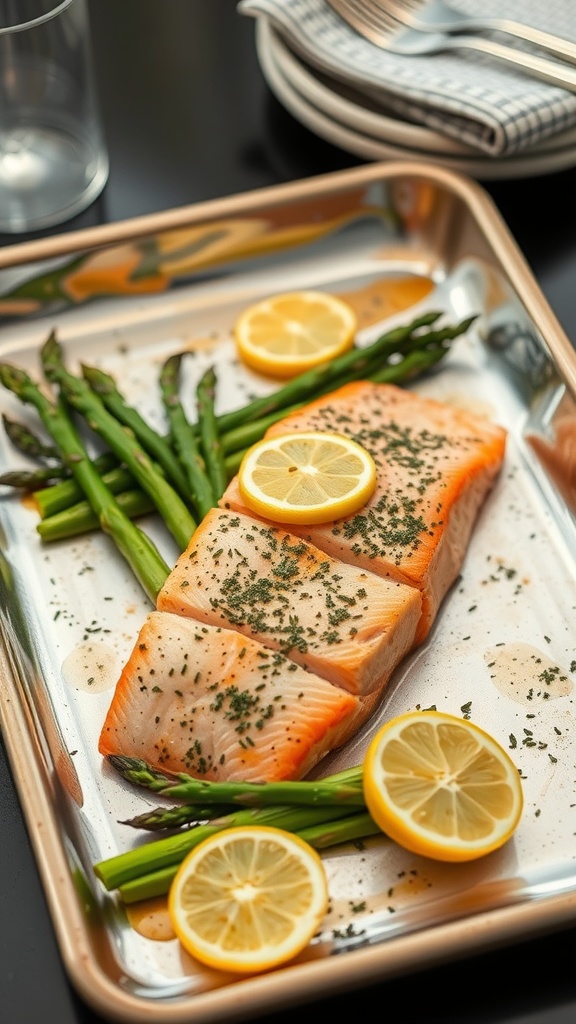
Sheet pan meals are a lifesaver for busy moms. They are quick, easy, and require minimal cleanup. This dish features tender salmon paired with fresh asparagus, all cooked together on one pan. The vibrant colors of the salmon and green asparagus make for a visually appealing meal that the whole family will love.
The salmon is seasoned simply with lemon and herbs, allowing the natural flavors to shine. Asparagus adds a nice crunch and is packed with nutrients. This meal is not just healthy; it’s also delicious and satisfying.
To make this dish, you’ll need fresh salmon fillets, asparagus, lemon slices, olive oil, and your favorite herbs. It’s perfect for a weeknight dinner or meal prep for the week ahead. Just pop it in the oven, and you’ll have a wholesome meal ready in no time!
Ingredients
- 4 salmon fillets
- 1 bunch of asparagus
- 2 lemons, sliced
- 2 tablespoons olive oil
- 1 teaspoon garlic powder
- 1 teaspoon dried dill
- Salt and pepper to taste
Instructions
- Preheat your oven to 400°F (200°C).
- On a large sheet pan, arrange the salmon fillets and asparagus.
- Drizzle olive oil over the salmon and asparagus. Sprinkle garlic powder, dill, salt, and pepper on top.
- Place lemon slices on top of the salmon and around the asparagus.
- Bake in the preheated oven for 15-20 minutes, or until the salmon is cooked through and flakes easily with a fork.
- Serve warm and enjoy your healthy, delicious meal!
Slow Cooker Beef Stew
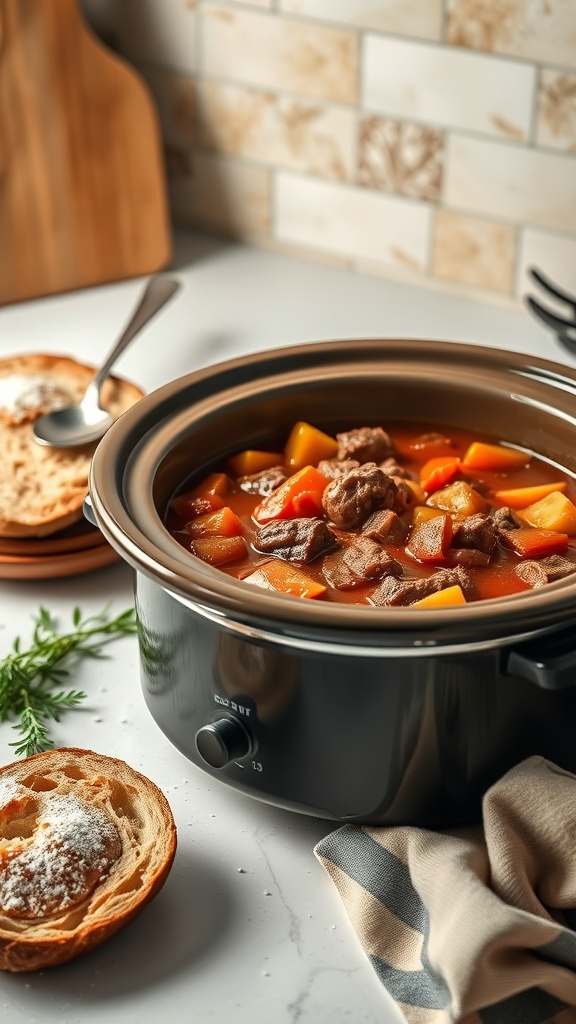
Slow cooker beef stew is a lifesaver for busy moms. It’s hearty, comforting, and perfect for family dinners. Just toss everything into the slow cooker in the morning, and by dinner time, you’ll have a delicious meal ready to go. The image shows a rich, savory stew bubbling away, filled with tender beef and colorful vegetables. It’s the kind of meal that warms you up and brings everyone together.
This dish is not only easy to prepare, but it also allows for flexibility. You can use whatever vegetables you have on hand, making it a great way to reduce food waste. Plus, the slow cooking process really brings out the flavors, making every bite satisfying.
Ingredients
- 2 pounds beef chuck, cut into 1-inch cubes
- 4 cups beef broth
- 4 carrots, sliced
- 3 potatoes, diced
- 1 onion, chopped
- 2 cloves garlic, minced
- 1 cup celery, chopped
- 2 tablespoons tomato paste
- 1 teaspoon dried thyme
- 1 teaspoon dried rosemary
- Salt and pepper to taste
- 2 tablespoons olive oil
Instructions
- Brown the Beef: In a skillet, heat olive oil over medium-high heat. Add the beef cubes and brown on all sides. This step adds extra flavor.
- Combine Ingredients: In the slow cooker, add the browned beef, beef broth, carrots, potatoes, onion, garlic, celery, tomato paste, thyme, rosemary, salt, and pepper.
- Cook: Cover and cook on low for 7-8 hours or on high for 4-5 hours, until the beef is tender.
- Serve: Taste and adjust seasoning if needed. Serve hot with crusty bread for dipping.
Quinoa and Black Bean Salad
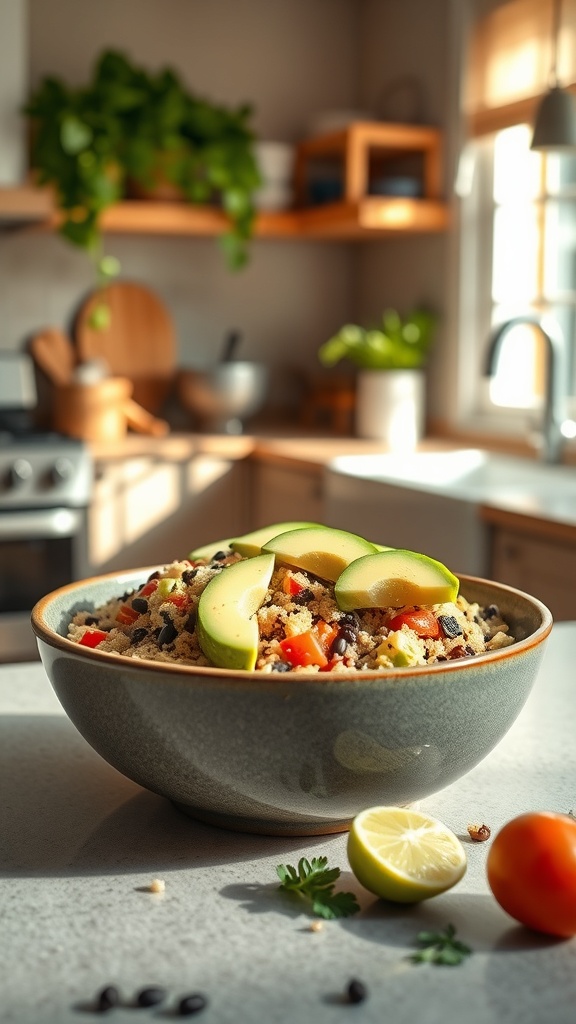
This Quinoa and Black Bean Salad is a fantastic choice for busy moms looking to whip up something healthy and delicious. Packed with protein and fiber, it keeps everyone satisfied and energized. The vibrant colors of the salad make it visually appealing, and it’s easy to prepare in advance.
The image shows a beautiful bowl of quinoa mixed with black beans, fresh vegetables, and topped with slices of green apple for a refreshing twist. The bright colors of the red bell peppers and green garnishes add a cheerful touch to your meal prep.
Making this salad is a breeze. You can serve it as a main dish or a side. It’s perfect for lunchboxes or family dinners. Plus, it keeps well in the fridge, making it a great option for meal prep.
Ingredients
- 1 cup quinoa
- 2 cups water
- 1 can (15 oz) black beans, rinsed and drained
- 1 red bell pepper, diced
- 1 cucumber, diced
- 1/4 cup red onion, finely chopped
- 1/4 cup fresh cilantro, chopped
- 1/4 cup lime juice
- 2 tablespoons olive oil
- Salt and pepper to taste
- 1 green apple, sliced (for topping)
Instructions
- Rinse the quinoa under cold water. In a medium saucepan, combine quinoa and water. Bring to a boil, then reduce heat to low, cover, and simmer for about 15 minutes or until water is absorbed.
- Fluff the quinoa with a fork and let it cool.
- In a large bowl, combine the black beans, red bell pepper, cucumber, red onion, and cilantro.
- Add the cooled quinoa to the bowl. Drizzle with lime juice and olive oil. Season with salt and pepper. Toss everything together until well mixed.
- Top with sliced green apple before serving. Enjoy your healthy and tasty salad!
Teriyaki Chicken Rice Bowls
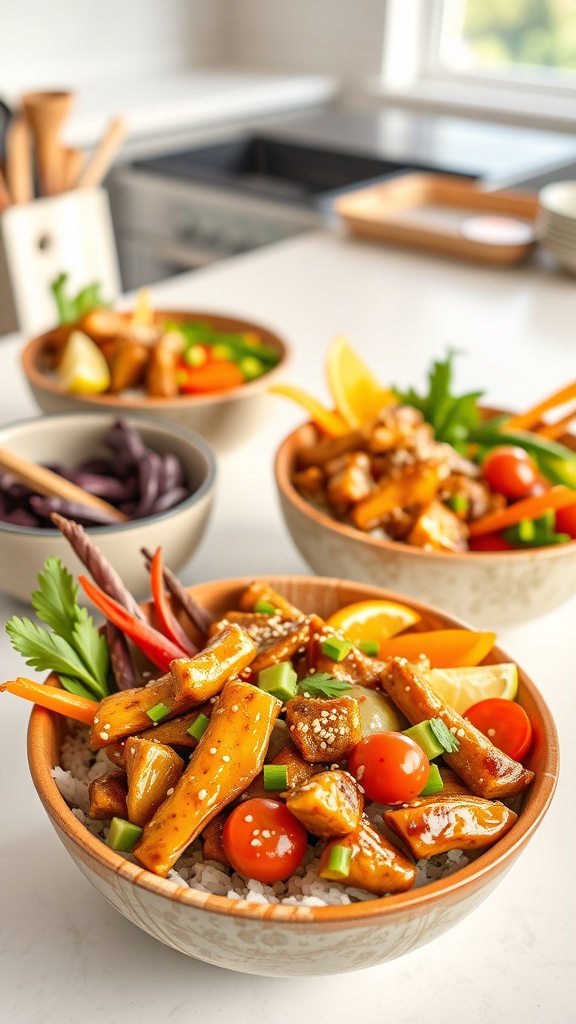
Teriyaki chicken rice bowls are a fantastic option for busy moms looking to whip up a quick and tasty meal. The image shows vibrant bowls filled with tender chicken, colorful veggies, and fluffy rice. Each bowl is topped with a glossy teriyaki sauce, making it not just delicious but visually appealing too.
This meal is perfect for meal prep. You can make a big batch and store it in the fridge for easy lunches or dinners throughout the week. The combination of protein, carbs, and veggies ensures everyone in the family gets a balanced meal.
To make these bowls, you’ll need simple ingredients that pack a punch in flavor. The sweet and savory teriyaki sauce pairs beautifully with the chicken and fresh vegetables. Plus, it’s easy to customize with your family’s favorite toppings!
Ingredients
- 1 pound boneless, skinless chicken thighs
- 1 cup teriyaki sauce
- 2 cups cooked jasmine rice
- 1 cup bell peppers, sliced
- 1 cup cherry tomatoes, halved
- 1/2 cup green onions, chopped
- 1 tablespoon sesame seeds
- 1 tablespoon vegetable oil
- Salt and pepper to taste
Instructions
- Prepare the Chicken: Cut the chicken thighs into bite-sized pieces. Season with salt and pepper.
- Cook the Chicken: Heat vegetable oil in a large skillet over medium heat. Add the chicken and cook until browned and cooked through, about 5-7 minutes.
- Add Sauce: Pour the teriyaki sauce over the chicken and stir to coat. Let it simmer for an additional 2-3 minutes.
- Assemble the Bowls: In each bowl, place a serving of jasmine rice. Top with the teriyaki chicken, bell peppers, cherry tomatoes, and green onions.
- Garnish: Sprinkle sesame seeds on top for an extra crunch and flavor.
These teriyaki chicken rice bowls are not only easy to make but also a hit with the whole family. Enjoy!
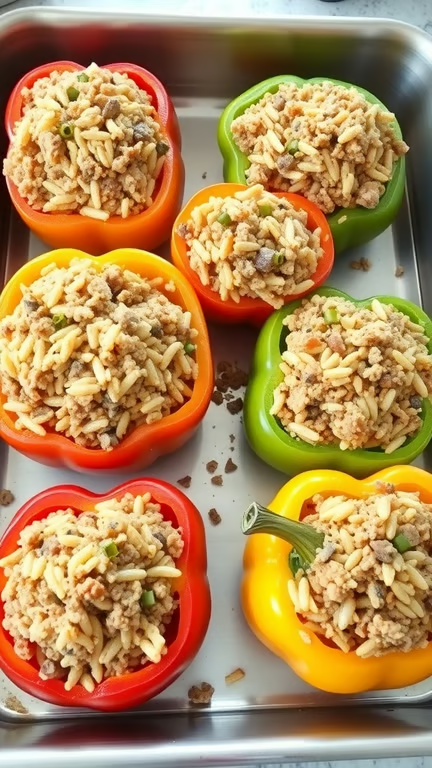
Stuffed Bell Peppers
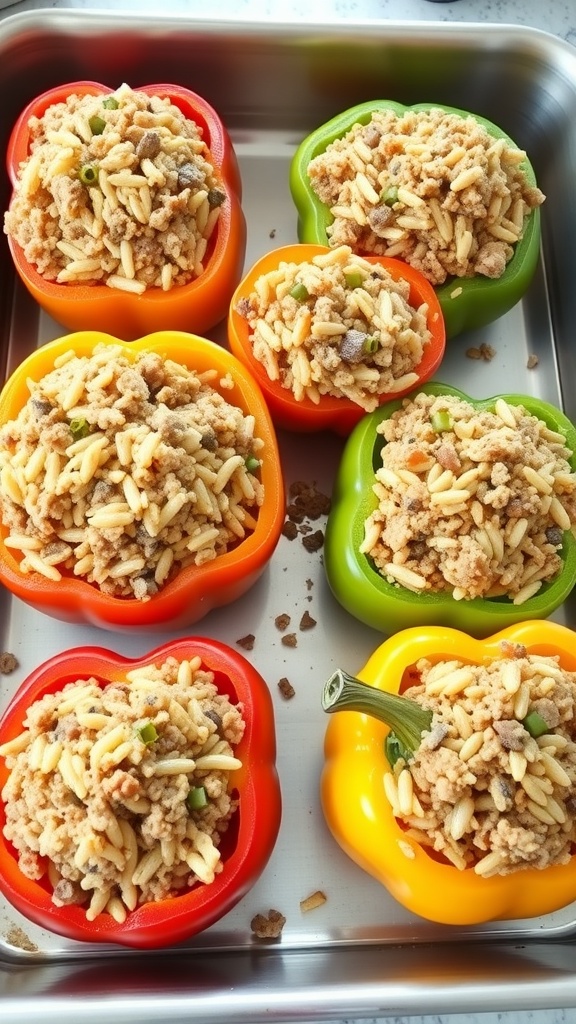
Stuffed bell peppers are a colorful and nutritious option for busy moms looking to prepare family-sized meals. These vibrant peppers are filled with a hearty mixture that is both satisfying and easy to make. The combination of flavors and textures makes them a hit with kids and adults alike.
To start, you can choose a variety of bell peppers—red, green, yellow, or orange. Each color brings its own sweetness and appeal. The filling can be customized based on what your family enjoys. Common ingredients include ground meat, rice, and a mix of spices.
These stuffed peppers are not just delicious; they are also a great way to sneak in some veggies. Plus, they can be made ahead of time and stored in the fridge or freezer for those hectic weeknights.
Ingredients
- 4 large bell peppers (any color)
- 1 pound ground beef or turkey
- 1 cup cooked rice
- 1 small onion, chopped
- 2 cloves garlic, minced
- 1 can diced tomatoes (14.5 oz)
- 1 teaspoon Italian seasoning
- Salt and pepper to taste
- 1 cup shredded cheese (optional)
Instructions
- Preheat your oven to 375°F (190°C).
- Cut the tops off the bell peppers and remove the seeds. Place them in a baking dish.
- In a skillet, cook the ground meat over medium heat until browned. Add the chopped onion and garlic, cooking until softened.
- Stir in the cooked rice, diced tomatoes, Italian seasoning, salt, and pepper. Mix well.
- Fill each bell pepper with the meat mixture, packing it down slightly. If desired, sprinkle cheese on top.
- Cover the baking dish with foil and bake for 25-30 minutes. Remove the foil and bake for an additional 10 minutes, or until the peppers are tender and the cheese is bubbly.
- Let cool for a few minutes before serving. Enjoy your colorful, tasty meal!
Pasta Primavera with Garlic Bread
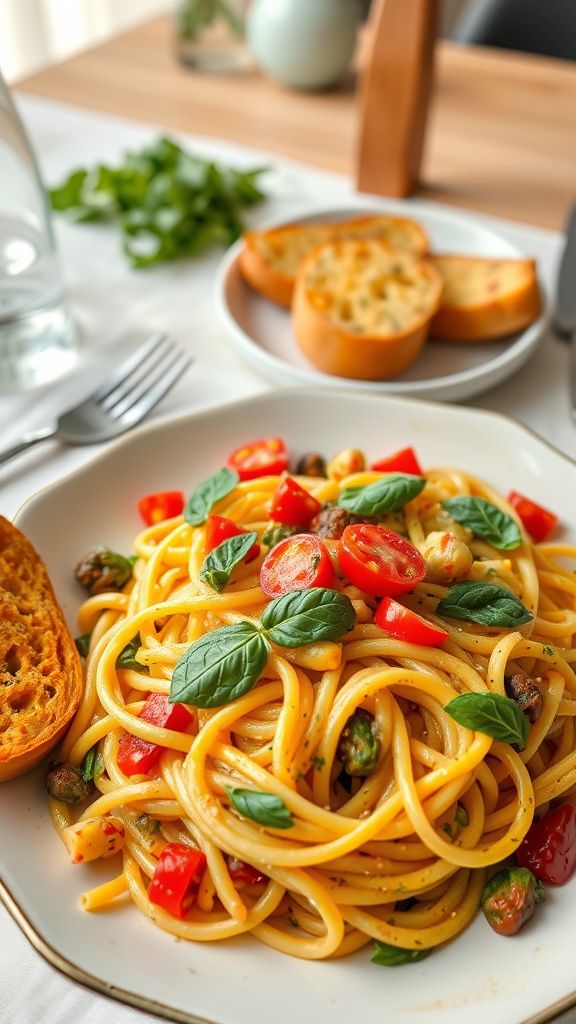
Pasta Primavera is a colorful and nutritious dish that brings together fresh vegetables and pasta in a delightful way. The image shows a plate filled with spaghetti tossed with vibrant cherry tomatoes, bell peppers, and fresh basil. It’s a feast for the eyes and the taste buds!
This meal is perfect for busy moms who want to serve something healthy and satisfying without spending hours in the kitchen. The addition of garlic bread on the side makes it even more appealing, providing that comforting crunch to complement the pasta.
Cooking this dish is simple and quick, making it a go-to recipe for weeknight dinners. You can customize it with your favorite veggies or whatever you have on hand. Let’s get into the recipe!
Ingredients
- 12 oz spaghetti
- 2 tablespoons olive oil
- 1 cup cherry tomatoes, halved
- 1 bell pepper, diced
- 1 zucchini, sliced
- 1 cup asparagus, cut into 1-inch pieces
- 2 cloves garlic, minced
- Salt and pepper to taste
- Fresh basil for garnish
- 1 loaf of garlic bread
Instructions
- Cook the Pasta: In a large pot, boil salted water and cook spaghetti according to package instructions. Drain and set aside.
- Sauté the Vegetables: In a large skillet, heat olive oil over medium heat. Add garlic and sauté for about 30 seconds. Then, add cherry tomatoes, bell pepper, zucchini, and asparagus. Cook until vegetables are tender, about 5-7 minutes.
- Combine: Add the cooked spaghetti to the skillet with the vegetables. Toss everything together and season with salt and pepper.
- Prepare Garlic Bread: While the pasta cooks, slice the garlic bread and toast it in the oven according to package instructions.
- Serve: Plate the pasta and garnish with fresh basil. Serve with warm garlic bread on the side.
Vegetarian Chili with Cornbread
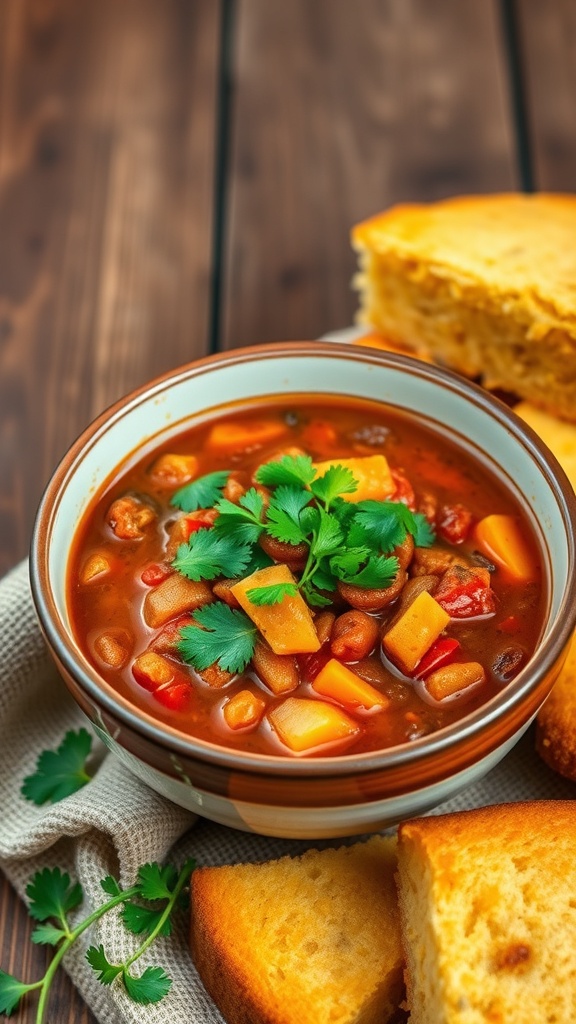
Vegetarian chili is a hearty dish that brings warmth and comfort, perfect for busy family nights. This bowl of chili is packed with colorful veggies and beans, making it both nutritious and filling. The vibrant colors of the peppers and beans pop against the rich, savory broth. Topped with fresh cilantro, it looks as good as it tastes!
Alongside the chili, you’ll find golden cornbread, which is the perfect companion. The cornbread is soft and slightly sweet, providing a delightful contrast to the spicy chili. Together, they make a satisfying meal that everyone will love.
Making this dish is simple and quick, which is ideal for a busy mom. You can prepare a big batch and store leftovers for easy lunches or dinners throughout the week. Plus, it’s a great way to sneak in those veggies!
Ingredients
- 2 tablespoons olive oil
- 1 onion, chopped
- 2 cloves garlic, minced
- 1 bell pepper, diced
- 2 carrots, diced
- 2 zucchini, diced
- 1 can (15 oz) kidney beans, drained and rinsed
- 1 can (15 oz) black beans, drained and rinsed
- 1 can (14.5 oz) diced tomatoes
- 2 cups vegetable broth
- 2 tablespoons chili powder
- 1 teaspoon cumin
- Salt and pepper to taste
- Fresh cilantro for garnish
Instructions
- Heat olive oil in a large pot over medium heat. Add onion and garlic, sautéing until softened.
- Add bell pepper, carrots, and zucchini. Cook for about 5 minutes until they start to soften.
- Stir in the kidney beans, black beans, diced tomatoes, vegetable broth, chili powder, cumin, salt, and pepper.
- Bring the mixture to a boil, then reduce heat and let it simmer for 20-30 minutes, stirring occasionally.
- Serve hot, garnished with fresh cilantro. Enjoy with warm cornbread on the side!
Vegetable Stir-Fry with Tofu
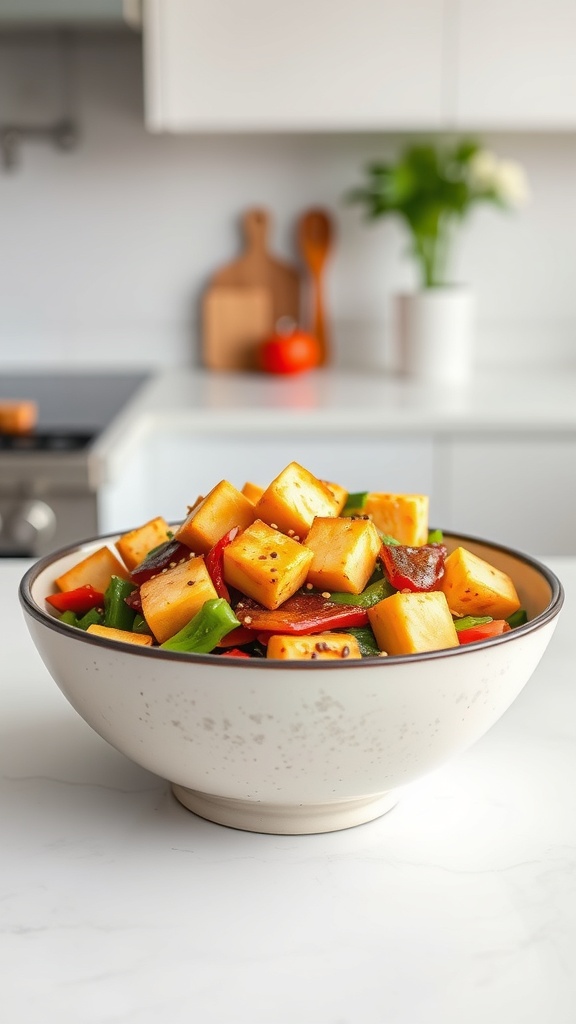
Vegetable stir-fry with tofu is a quick and healthy meal that fits perfectly into a busy mom’s schedule. This dish is colorful and packed with nutrients, making it a great option for the whole family. The vibrant mix of bell peppers, green beans, and tofu creates a delightful combination of textures and flavors.
To make this stir-fry, start by prepping your ingredients. Chop your favorite vegetables, like bell peppers and green beans, and cut the tofu into cubes. The tofu adds protein, making this dish filling and satisfying.
Cooking is simple! Heat some oil in a pan, add the tofu, and let it brown. Then, toss in the vegetables and stir-fry until they are tender yet crisp. A splash of soy sauce or your favorite stir-fry sauce brings everything together, enhancing the flavors.
This meal can be served over rice or noodles for a complete dinner. Plus, it’s easy to make in larger batches, so you can enjoy leftovers for lunch the next day!
Lentil Soup with Crusty Bread
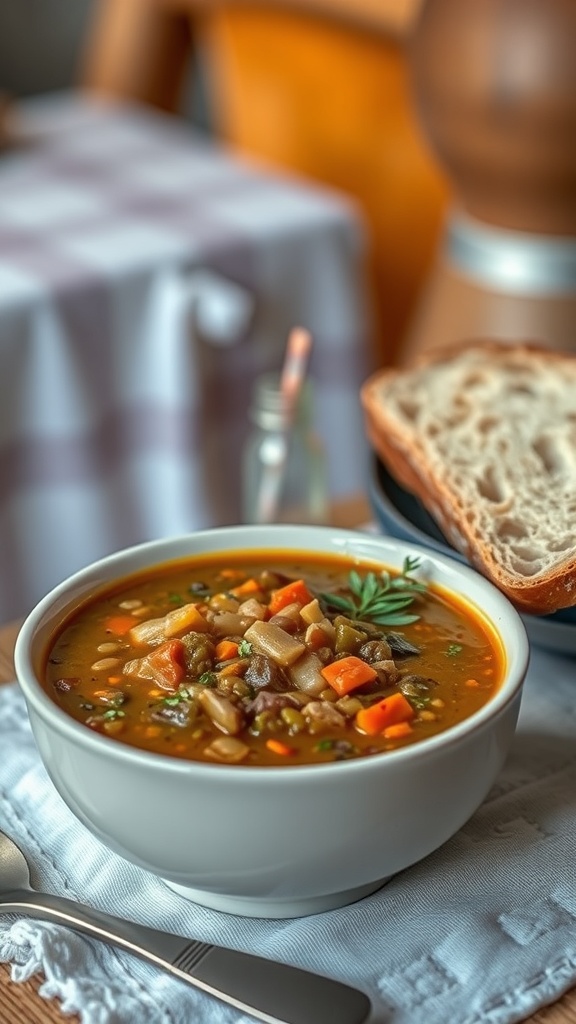
Lentil soup is a warm hug in a bowl, perfect for busy moms juggling a million things. This hearty dish is not only comforting but also packed with nutrients. The vibrant colors of the carrots and celery pop against the rich broth, making it as pleasing to the eyes as it is to the palate.
Pairing this soup with crusty bread is a game changer. The bread adds texture and is perfect for dipping. Imagine a cozy evening, with the aroma of lentils and spices wafting through your kitchen. It’s a simple meal that brings the family together, making it a staple for any busy weeknight.
Making lentil soup is straightforward. You can throw in whatever veggies you have on hand, making it a flexible recipe. Plus, it stores well, so you can enjoy leftovers for lunch or dinner the next day.
Ingredients
- 1 cup dried lentils (green or brown)
- 1 medium onion, diced
- 2 carrots, diced
- 2 celery stalks, diced
- 3 cloves garlic, minced
- 1 teaspoon cumin
- 1 teaspoon thyme
- 4 cups vegetable broth
- 1 can diced tomatoes (14.5 oz)
- Salt and pepper to taste
- 2 tablespoons olive oil
- Crusty bread for serving
Instructions
- Heat olive oil in a large pot over medium heat. Add the onion, carrots, and celery. Sauté for about 5 minutes until softened.
- Add the garlic, cumin, and thyme. Cook for another minute until fragrant.
- Stir in the lentils, diced tomatoes, and vegetable broth. Bring to a boil.
- Reduce heat and let it simmer for about 30-35 minutes, or until the lentils are tender.
- Season with salt and pepper to taste. Serve hot with crusty bread on the side.
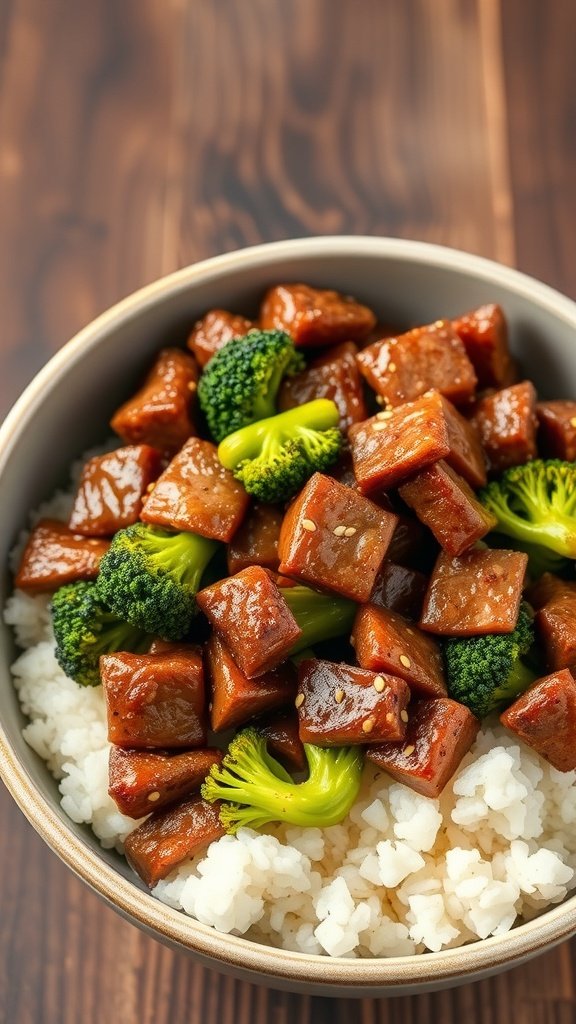
Beef and Broccoli Stir-Fry
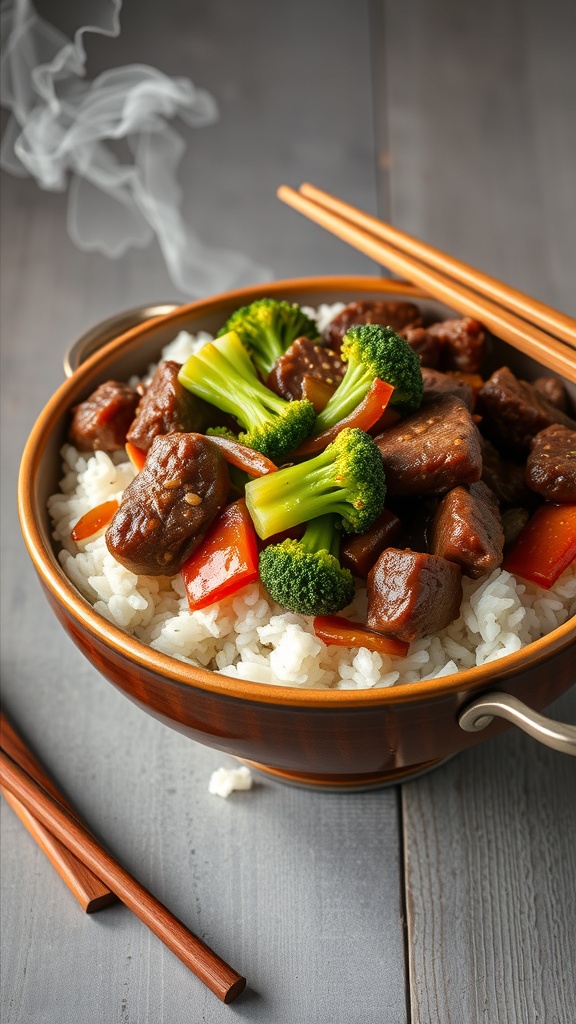
Beef and Broccoli Stir-Fry is a classic dish that brings together tender beef, vibrant broccoli, and colorful bell peppers. This meal is not only quick to whip up but also packed with flavor and nutrients. Perfect for busy moms, it can be made in under 30 minutes, making it a go-to for weeknight dinners.
The combination of soy sauce, garlic, and ginger creates a savory sauce that coats the beef and veggies beautifully. Serve it over fluffy white rice for a complete meal that your family will love. Plus, it’s a great way to sneak in some veggies!
Ingredients
- 1 pound beef sirloin, thinly sliced
- 2 cups broccoli florets
- 1 red bell pepper, sliced
- 3 tablespoons soy sauce
- 2 tablespoons oyster sauce
- 2 cloves garlic, minced
- 1 tablespoon ginger, minced
- 2 tablespoons vegetable oil
- 1 cup cooked white rice
Instructions
- Heat 1 tablespoon of vegetable oil in a large skillet over medium-high heat. Add the sliced beef and cook until browned, about 3-4 minutes. Remove and set aside.
- In the same skillet, add the remaining oil. Stir in the garlic and ginger, cooking for about 30 seconds until fragrant.
- Add the broccoli and bell pepper to the skillet. Stir-fry for 3-4 minutes until tender-crisp.
- Return the beef to the skillet and pour in the soy sauce and oyster sauce. Stir well to combine and heat through.
- Serve the stir-fry over cooked white rice and enjoy!
Creamy Mushroom Risotto

Creamy Mushroom Risotto is a comforting dish that brings warmth to any family meal. The image showcases a bowl of rich, creamy risotto, dotted with tender mushrooms and garnished with fresh parsley. The wooden background adds a rustic touch, making it feel homey and inviting.
This dish is perfect for busy moms looking to prepare a hearty meal that everyone will love. Risotto is not only delicious but also versatile, allowing you to customize it with different ingredients based on your family’s preferences.
Making risotto may seem intimidating, but it’s quite simple. The key is to stir the rice slowly while adding broth gradually. This process helps release the starches, creating that creamy texture we all adore.
Ingredients
- 1 cup Arborio rice
- 4 cups vegetable or chicken broth
- 1 cup mushrooms, sliced
- 1 small onion, finely chopped
- 2 cloves garlic, minced
- 1/2 cup grated Parmesan cheese
- 2 tablespoons olive oil
- Salt and pepper to taste
- Fresh parsley for garnish
Instructions
- Heat the broth in a saucepan and keep it warm over low heat.
- In a large skillet, heat olive oil over medium heat. Add the chopped onion and garlic, cooking until softened.
- Add the sliced mushrooms and cook until they’re tender and browned.
- Stir in the Arborio rice, allowing it to toast for about 2 minutes.
- Begin adding the warm broth, one ladle at a time, stirring continuously. Wait until the liquid is mostly absorbed before adding more.
- Continue this process for about 18-20 minutes, until the rice is creamy and al dente.
- Remove from heat and stir in the Parmesan cheese. Season with salt and pepper to taste.
- Serve hot, garnished with fresh parsley.
Chicken Enchiladas with Salsa Verde

Chicken enchiladas with salsa verde are a fantastic choice for busy moms looking to whip up a family-sized meal. These enchiladas are packed with flavor and are super easy to prepare. The image shows a plate of enchiladas drizzled with vibrant salsa verde and topped with melted cheese. Fresh cilantro adds a pop of color, making the dish look even more appetizing.
This meal is not only delicious but also a great way to use leftover chicken. You can prepare a big batch and store them for the week. Just reheat when you’re ready to eat! Pair them with some crunchy tortilla chips and a side of fresh salsa for a complete meal that everyone will love.
Let’s get into the recipe so you can enjoy these tasty enchiladas at home!
Ingredients
- 2 cups cooked chicken, shredded
- 1 cup salsa verde
- 1 cup shredded cheese (cheddar or Monterey Jack)
- 8 corn tortillas
- 1/2 cup sour cream
- 1/4 cup chopped cilantro
- 1 teaspoon cumin
- Salt and pepper to taste
Instructions
- Preheat your oven to 350°F (175°C).
- In a bowl, mix the shredded chicken with half of the salsa verde, cumin, salt, and pepper.
- Warm the tortillas in a skillet until soft. This makes them easier to roll.
- Place a few tablespoons of the chicken mixture in each tortilla, roll them up, and place seam-side down in a greased baking dish.
- Once all tortillas are in the dish, pour the remaining salsa verde over the top and sprinkle with cheese.
- Bake for 20-25 minutes until the cheese is bubbly and golden.
- Serve hot, topped with sour cream and cilantro. Enjoy your meal!
Baked Ziti with Mozzarella
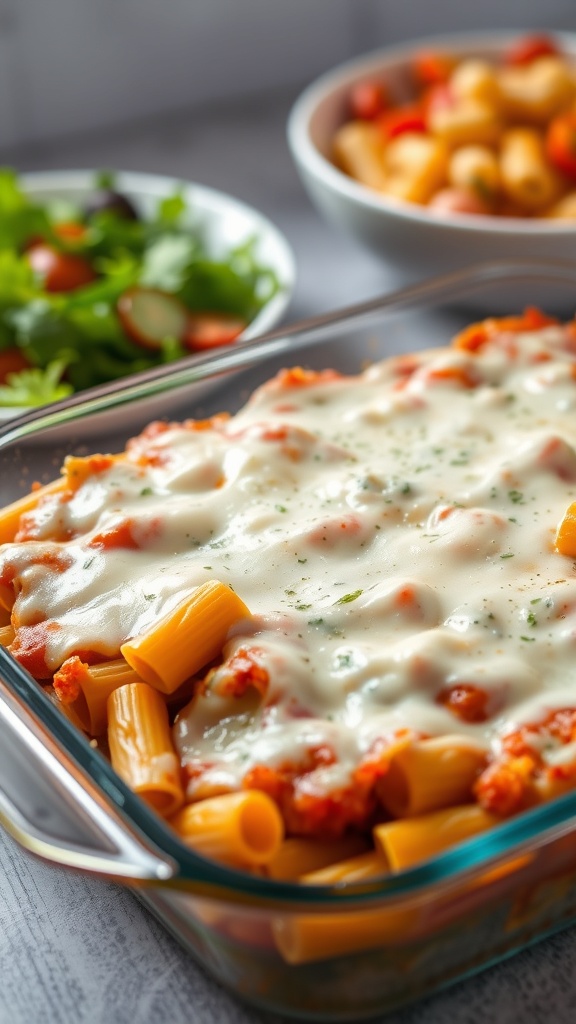
Baked Ziti with Mozzarella is a comforting dish that brings families together. This meal is perfect for busy moms who want to prepare something hearty without spending hours in the kitchen. The image shows a deliciously cheesy baked ziti, bubbling with melted mozzarella on top. It’s served alongside a fresh salad, making it a balanced meal that everyone will love.
This dish is not only satisfying but also easy to make in large batches. You can prepare it ahead of time and simply pop it in the oven when you’re ready to eat. The combination of pasta, marinara sauce, and gooey cheese creates a flavor that’s hard to resist. Plus, it’s a great way to sneak in some veggies if you add spinach or bell peppers!
Let’s jump into the recipe so you can whip this up for your family!
Ingredients
- 1 pound ziti pasta
- 2 tablespoons olive oil
- 1 onion, chopped
- 2 cloves garlic, minced
- 1 pound ground beef or turkey
- 4 cups marinara sauce
- 1 teaspoon Italian seasoning
- Salt and pepper to taste
- 2 cups ricotta cheese
- 2 cups shredded mozzarella cheese
- 1/2 cup grated Parmesan cheese
- Fresh basil for garnish (optional)
Instructions
- Cook the Pasta: In a large pot, boil water and cook the ziti according to package instructions until al dente. Drain and set aside.
- Sauté the Vegetables: In a large skillet, heat olive oil over medium heat. Add chopped onion and garlic, cooking until softened. Add ground beef or turkey, cooking until browned. Drain excess fat.
- Add Sauce and Seasoning: Stir in marinara sauce and Italian seasoning. Season with salt and pepper. Let it simmer for about 5 minutes.
- Combine Ingredients: In a large bowl, mix the cooked ziti with the meat sauce. Add ricotta cheese and half of the mozzarella, stirring until well combined.
- Assemble the Dish: Preheat your oven to 350°F (175°C). In a baking dish, layer half of the ziti mixture, then sprinkle with half of the remaining mozzarella and Parmesan. Add the rest of the ziti mixture on top and finish with the remaining cheeses.
- Bake: Cover with foil and bake for 25 minutes. Remove the foil and bake for an additional 15 minutes, or until the cheese is bubbly and golden.
- Serve: Let it cool for a few minutes before serving. Garnish with fresh basil if desired.
Greek Chicken Gyros with Tzatziki
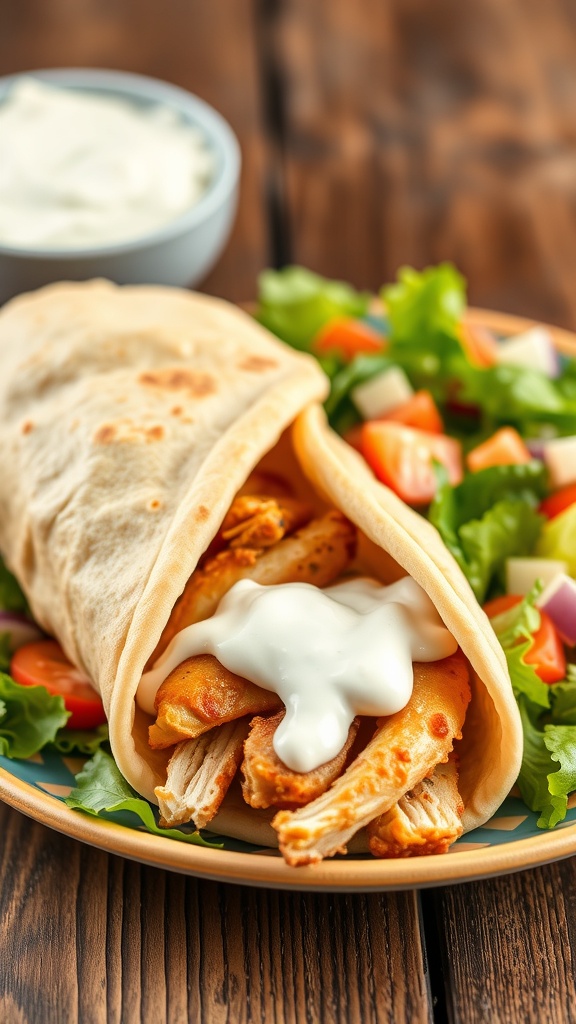
Greek Chicken Gyros are a fantastic meal prep option for busy moms. They are quick to make, delicious, and loved by the whole family. The image shows a warm pita filled with tender chicken, drizzled with creamy tzatziki sauce, and accompanied by a fresh salad. This dish is not only satisfying but also brings a taste of the Mediterranean to your dinner table.
The chicken is marinated with classic Greek flavors, making it juicy and flavorful. Pairing it with tzatziki adds a refreshing touch that complements the spices perfectly. You can prepare these gyros ahead of time, making them ideal for those hectic weeknights.
To make this meal even easier, consider prepping the ingredients in advance. You can marinate the chicken and chop the veggies ahead of time. When you’re ready to eat, just grill the chicken, assemble your gyros, and enjoy!
Ingredients
- 1 lb boneless, skinless chicken thighs
- 2 tablespoons olive oil
- 3 cloves garlic, minced
- 1 teaspoon dried oregano
- 1 teaspoon paprika
- Salt and pepper to taste
- 4 pita breads
- 1 cup lettuce, chopped
- 1 tomato, diced
- 1/2 cucumber, diced
- 1/2 red onion, thinly sliced
- 1 cup tzatziki sauce
Instructions
- Marinate the Chicken: In a bowl, mix olive oil, garlic, oregano, paprika, salt, and pepper. Add the chicken and coat well. Let it marinate for at least 30 minutes.
- Cook the Chicken: Preheat a grill or skillet over medium-high heat. Cook the chicken for about 6-7 minutes on each side, or until fully cooked. Remove from heat and let it rest for a few minutes.
- Prepare the Gyros: Slice the cooked chicken into strips. Warm the pita breads on the grill for a minute. Layer the chicken, lettuce, tomato, cucumber, and onion in each pita.
- Add Tzatziki: Drizzle tzatziki sauce over the filling. Wrap the pita around the filling and serve immediately.
Pork Carnitas Tacos

Pork carnitas tacos are a fantastic choice for busy moms looking to whip up something delicious without spending hours in the kitchen. These tacos are not just tasty; they are also easy to prepare and perfect for meal prep. Imagine tender, flavorful pork nestled in warm tortillas, topped with fresh ingredients. It’s a meal that the whole family will love!
The image shows a plate of pork carnitas tacos, beautifully arranged with vibrant toppings. You can see the juicy pork, diced tomatoes, and fresh cilantro, all waiting to be enjoyed. The colorful background adds a cheerful touch, making it clear that these tacos are not only a meal but a celebration of flavors.
To make these tacos, you’ll need some simple ingredients. The key is to let the pork cook low and slow, allowing all those flavors to meld together. Serve them with your favorite toppings like salsa, lime wedges, and extra cilantro for a fresh kick.
Ingredients
- 2 lbs pork shoulder, cut into chunks
- 1 onion, chopped
- 4 cloves garlic, minced
- 1 tsp cumin
- 1 tsp oregano
- 1 tsp salt
- 1/2 tsp black pepper
- 1/2 cup orange juice
- 1/4 cup lime juice
- 12 small corn tortillas
- 1 cup diced tomatoes
- 1/2 cup chopped cilantro
- Lime wedges for serving
Instructions
- Prepare the Pork: In a slow cooker, combine the pork shoulder, onion, garlic, cumin, oregano, salt, pepper, orange juice, and lime juice. Stir to mix well.
- Cook: Cover and cook on low for 8 hours or until the pork is tender and easily shreds with a fork.
- Shred the Pork: Remove the pork from the slow cooker and shred it with two forks. Return the shredded pork to the slow cooker and mix it with the juices.
- Warm the Tortillas: In a skillet, warm the corn tortillas over medium heat for about 30 seconds on each side.
- Assemble the Tacos: Fill each tortilla with the shredded pork, then top with diced tomatoes and chopped cilantro. Serve with lime wedges on the side.