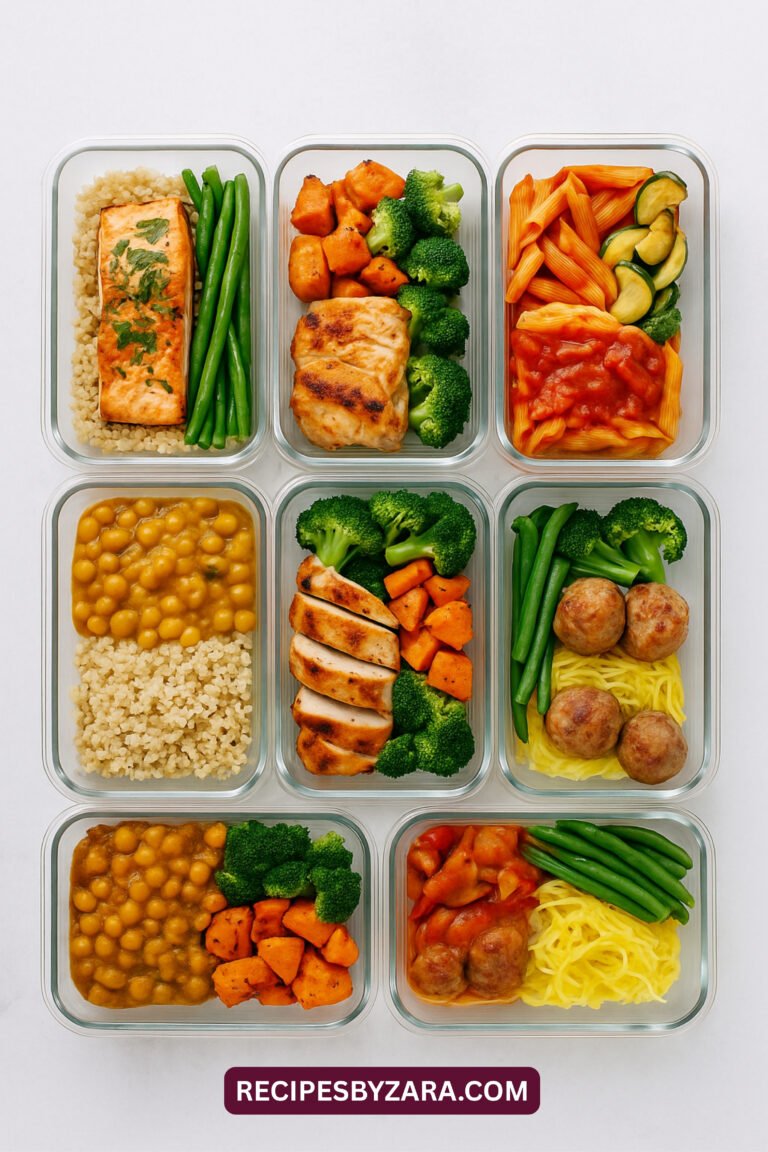
15 Delicious Adult Lunch Prep Ideas for Busy Weekdays
Adult lunch prep is your ticket to enjoying delicious, homemade meals during your busy workdays without the hassle of cooking each morning. With a little planning, you can whip up satisfying lunches that are both nutritious and easy to grab on the go. Say goodbye to sad desk lunches and hello to tasty meals that keep your energy up and your taste buds happy!
Nutritious Overnight Oats

Overnight oats are a fantastic way to kickstart your day. They are easy to prepare and can be customized to fit your taste. In the image, you see a jar filled with creamy oats layered with fresh berries and nuts. This colorful presentation not only looks appealing but also packs a nutritional punch.
The base of overnight oats is simple: rolled oats soaked in milk or yogurt. This allows the oats to soften overnight, making them ready to eat in the morning. You can add fruits, nuts, or seeds for extra flavor and texture. The berries in the jar provide antioxidants, while the nuts add healthy fats and protein.
Making overnight oats is a breeze. Just combine your ingredients in a jar, give it a good shake, and let it sit in the fridge overnight. In the morning, you have a delicious breakfast waiting for you!
Ingredients
- 1 cup rolled oats
- 1 cup milk (or a dairy-free alternative)
- 1/2 cup yogurt (optional)
- 1 tablespoon honey or maple syrup
- 1/2 cup mixed berries (strawberries, blueberries, raspberries)
- 1/4 cup nuts (walnuts, almonds, or peanuts)
- 1 tablespoon chia seeds (optional)
- Pinch of salt
Instructions
- In a jar, combine rolled oats, milk, yogurt, honey, and a pinch of salt. Stir well to mix.
- Add chia seeds if using, and mix again.
- Layer the mixed berries on top of the oat mixture.
- Sprinkle the nuts over the berries.
- Seal the jar and refrigerate overnight.
- In the morning, give it a good stir and enjoy your nutritious breakfast!
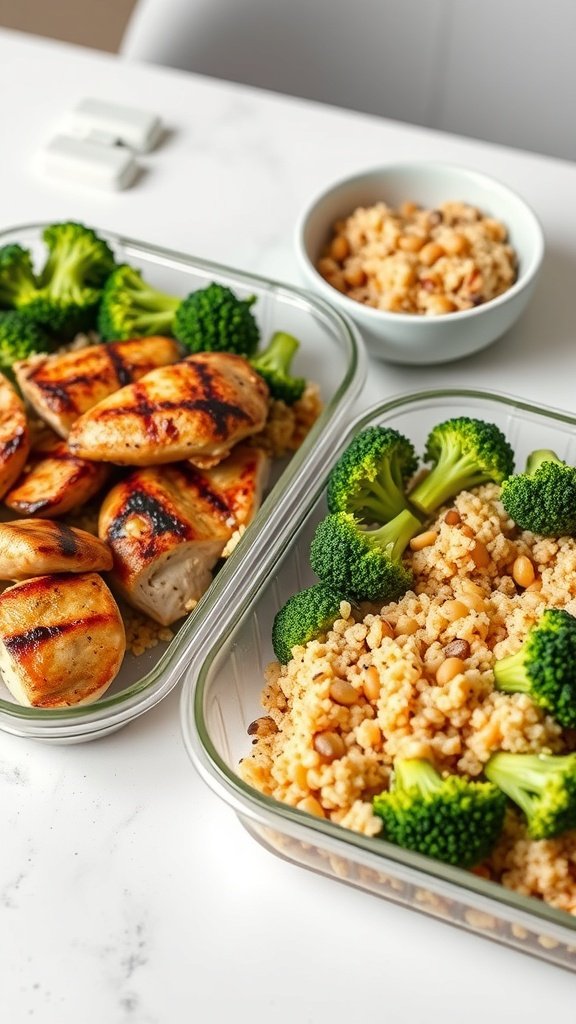
Balanced Protein-Packed Bowls
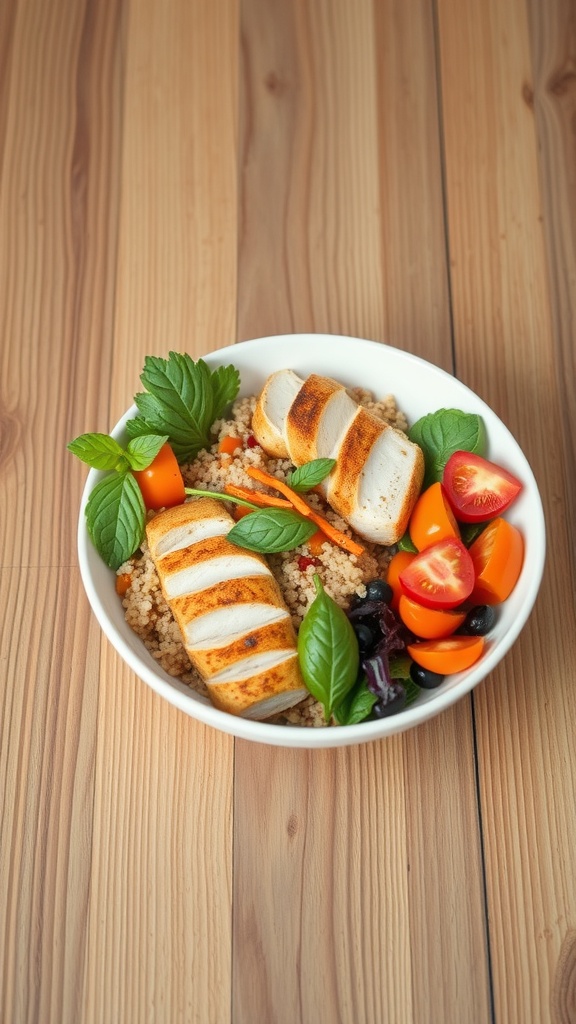
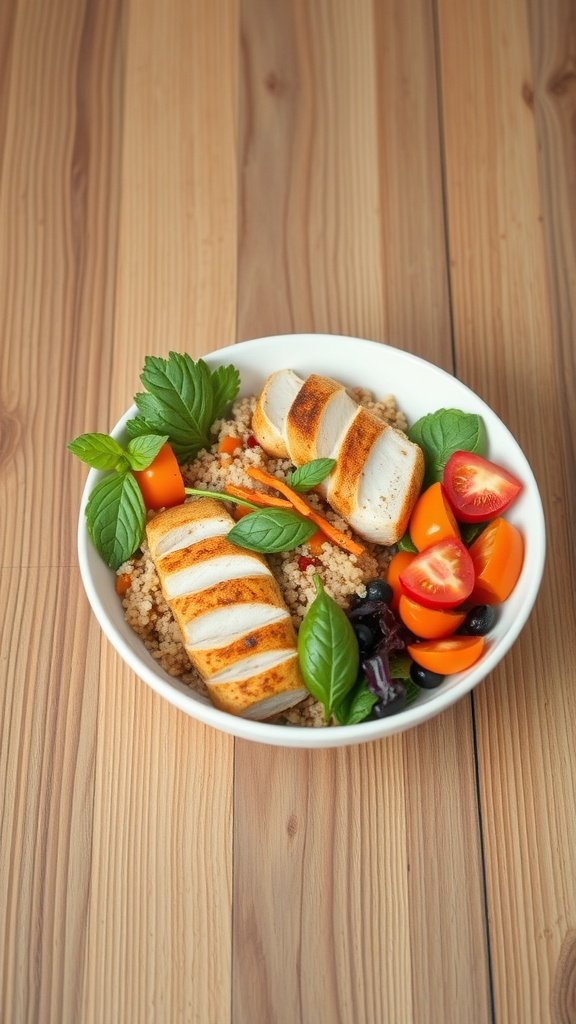
Protein-packed bowls are a fantastic way to enjoy a balanced meal. They combine healthy grains, lean proteins, and colorful veggies, making them both nutritious and visually appealing. In the image, you can see a delicious bowl featuring grilled chicken, fluffy couscous, and a variety of fresh vegetables like cherry tomatoes and bell peppers. The vibrant greens add a fresh touch, making it a feast for the eyes as well.
These bowls are perfect for meal prep. You can easily customize them based on your preferences or what you have on hand. Start with a base like quinoa or brown rice, then layer on your choice of protein, such as chicken, tofu, or beans. Top it off with a mix of your favorite vegetables, and don’t forget a sprinkle of herbs for extra flavor.
Here’s a simple recipe to create your own balanced protein-packed bowl:
Ingredients
- 1 cup cooked couscous
- 1 grilled chicken breast, sliced
- 1/2 cup cherry tomatoes, halved
- 1/2 cup bell peppers, sliced
- 1/4 cup black olives
- Fresh basil leaves
- Olive oil, for drizzling
- Salt and pepper, to taste
Instructions
- Prepare the Couscous: Cook couscous according to package instructions. Fluff with a fork and set aside.
- Grill the Chicken: Season the chicken breast with salt and pepper. Grill until cooked through, about 6-7 minutes per side. Let it rest before slicing.
- Assemble the Bowl: In a bowl, layer the couscous, sliced chicken, cherry tomatoes, bell peppers, and olives.
- Add Fresh Herbs: Top with fresh basil leaves and drizzle with olive oil.
- Serve: Enjoy your balanced protein-packed bowl warm or cold!
Savory Grain Salads

Grain salads are a fantastic option for adult lunch prep. They are not only filling but also packed with nutrients. The image shows a vibrant bowl of a grain salad, featuring colorful cherry tomatoes, fresh greens, and slices of lemon. This combination not only looks appealing but also offers a burst of flavors.
Using grains like quinoa, farro, or bulgur as a base adds texture and heartiness. You can mix in various vegetables, herbs, and even proteins to make it more satisfying. The lemon slices in the salad add a refreshing zing, making every bite enjoyable.
To prepare a delicious grain salad, you can start by cooking your chosen grain according to package instructions. Once cooled, toss it with your favorite veggies, a drizzle of olive oil, and a squeeze of lemon juice. This simple method allows for endless variations, so feel free to get creative!
Ingredients
- 1 cup cooked quinoa
- 1 cup cherry tomatoes, halved
- 1 cup arugula or spinach
- 1/4 cup diced cucumber
- 1/4 cup chopped parsley
- 1/4 cup feta cheese, crumbled
- 1 lemon, sliced
- 2 tablespoons olive oil
- Salt and pepper to taste
Instructions
- Cook the quinoa according to package instructions. Let it cool.
- In a large bowl, combine the cooked quinoa, cherry tomatoes, arugula, cucumber, and parsley.
- Drizzle with olive oil and season with salt and pepper. Toss gently to combine.
- Top with crumbled feta cheese and garnish with lemon slices.
- Serve immediately or store in the fridge for up to three days.
Flavorful Stir-Fry Containers
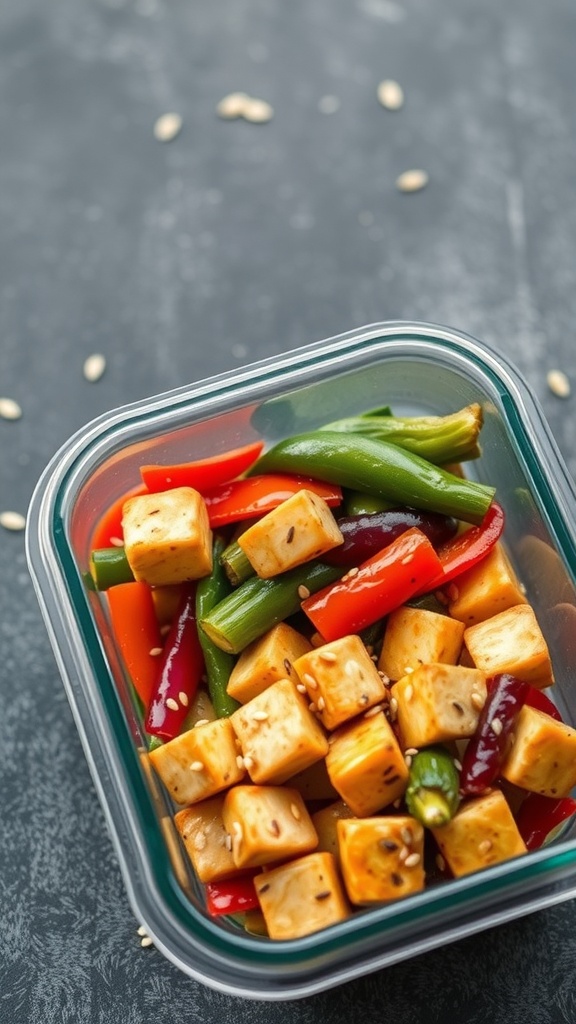
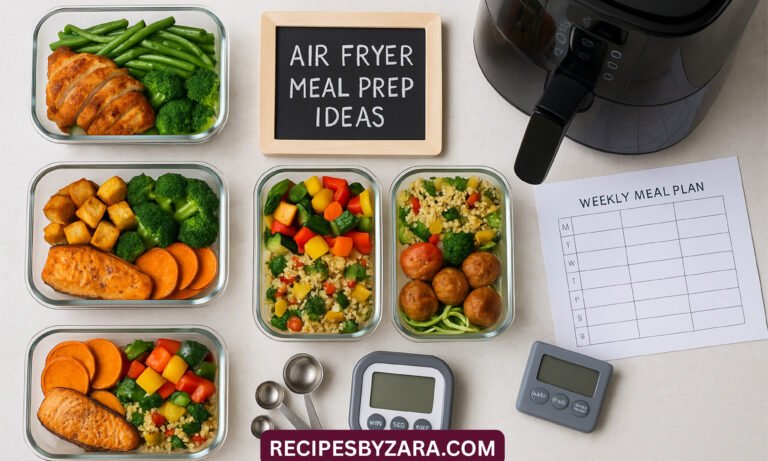
Stir-fry is a fantastic option for meal prep. It’s quick, colorful, and packed with nutrients. The image shows a vibrant mix of vegetables and tofu, all neatly stored in a container. This makes it perfect for lunch on the go. You can easily grab it, heat it up, and enjoy a delicious meal without any fuss.
Using a variety of vegetables, like bell peppers and green beans, adds crunch and flavor. The tofu provides protein, making this dish satisfying and healthy. Plus, you can customize it with your favorite sauces to amp up the taste. Meal prepping stir-fry means you can have a tasty lunch ready in minutes!
Ingredients
- 1 block of firm tofu, cubed
- 1 red bell pepper, sliced
- 1 green bell pepper, sliced
- 1 cup green beans, trimmed
- 2 tablespoons soy sauce
- 1 tablespoon sesame oil
- 1 teaspoon garlic, minced
- 1 teaspoon ginger, minced
- 1 tablespoon sesame seeds
- Salt and pepper to taste
Instructions
- Prepare the Tofu: Press the tofu to remove excess moisture. Cut it into cubes.
- Cook the Tofu: In a pan, heat sesame oil over medium heat. Add the tofu and cook until golden brown on all sides. Remove and set aside.
- Stir-Fry the Vegetables: In the same pan, add garlic and ginger. Sauté for about 30 seconds. Then, add the bell peppers and green beans. Stir-fry for 5-7 minutes until tender-crisp.
- Add Tofu and Sauce: Return the tofu to the pan. Pour in the soy sauce and mix well. Cook for another 2-3 minutes.
- Serve: Sprinkle sesame seeds on top before serving. Divide into containers for meal prep.
Vibrant Mediterranean Wraps

These Mediterranean wraps are a colorful and healthy option for lunch. They are packed with fresh ingredients, making them both tasty and nutritious. The wraps feature a soft tortilla filled with a mix of vibrant vegetables, olives, and a creamy spread.
The combination of tomatoes, cucumbers, and fresh herbs creates a refreshing flavor. Plus, the olives add a nice briny touch that complements the other ingredients perfectly. These wraps are not only easy to make but also great for meal prep.
To prepare these wraps, simply gather your ingredients and start assembling. They are perfect for a quick lunch at home or on the go. Enjoy them with a side of hummus or a light salad for a complete meal.
Ingredients
- 4 large tortillas
- 1 cup hummus
- 1 cup cherry tomatoes, halved
- 1 cup cucumber, diced
- 1/2 cup black olives, pitted and sliced
- 1/2 cup feta cheese, crumbled
- 1/4 cup fresh parsley, chopped
- Salt and pepper to taste
Instructions
- Spread a generous layer of hummus over each tortilla.
- Layer the cherry tomatoes, cucumber, black olives, and feta cheese on top of the hummus.
- Sprinkle with fresh parsley, and season with salt and pepper.
- Carefully roll up each tortilla tightly, folding in the sides as you go.
- Slice the wraps in half and serve immediately or wrap them in foil for later.
Zesty Taco Meal Prep
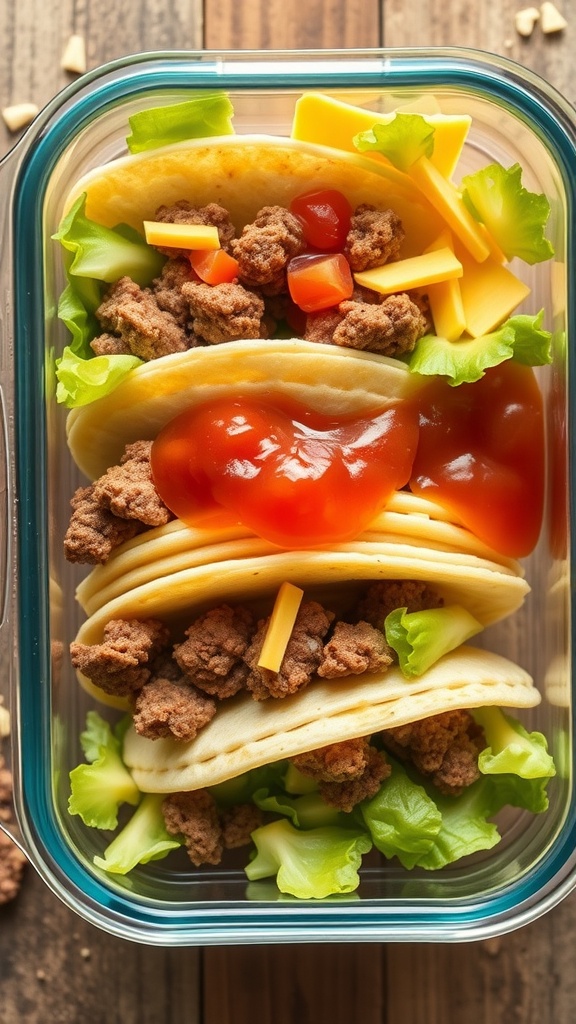
Meal prepping can be a fun and rewarding way to stay on track with healthy eating. This zesty taco meal prep is not only simple but also packed with flavor. Imagine opening your fridge and finding delicious tacos ready to go! The image shows a colorful container filled with soft taco shells, seasoned ground beef, fresh lettuce, diced tomatoes, and shredded cheese. It’s a perfect balance of protein, veggies, and carbs.
To make these tacos, you can use your favorite seasonings for the ground beef. A mix of cumin, chili powder, and garlic powder works wonders. Layer the ingredients in the taco shells, and don’t forget to add a dollop of salsa or your favorite sauce for that extra kick.
This meal prep is great for busy weekdays. Just grab a container, and you’re set for lunch or dinner. Plus, you can customize the toppings to suit your taste. Whether you prefer spicy jalapeños or creamy avocado, the options are endless!
Ingredients
- 1 pound ground beef
- 1 packet taco seasoning
- 8 small soft taco shells
- 1 cup shredded lettuce
- 1 cup diced tomatoes
- 1 cup shredded cheese (cheddar or your choice)
- Salsa or taco sauce
Instructions
- Cook the Ground Beef: In a skillet over medium heat, cook the ground beef until browned. Drain excess fat and add taco seasoning. Follow package instructions for adding water and simmer.
- Prepare the Tacos: Warm the taco shells in the microwave or oven. Fill each shell with a portion of the seasoned beef.
- Add Toppings: Top each taco with shredded lettuce, diced tomatoes, and cheese. Drizzle with salsa or taco sauce as desired.
- Pack for Meal Prep: Place the filled tacos in meal prep containers. Keep any extra toppings separate to maintain freshness.
- Store: Refrigerate the containers and enjoy your zesty tacos throughout the week!
Hearty Soup Jars
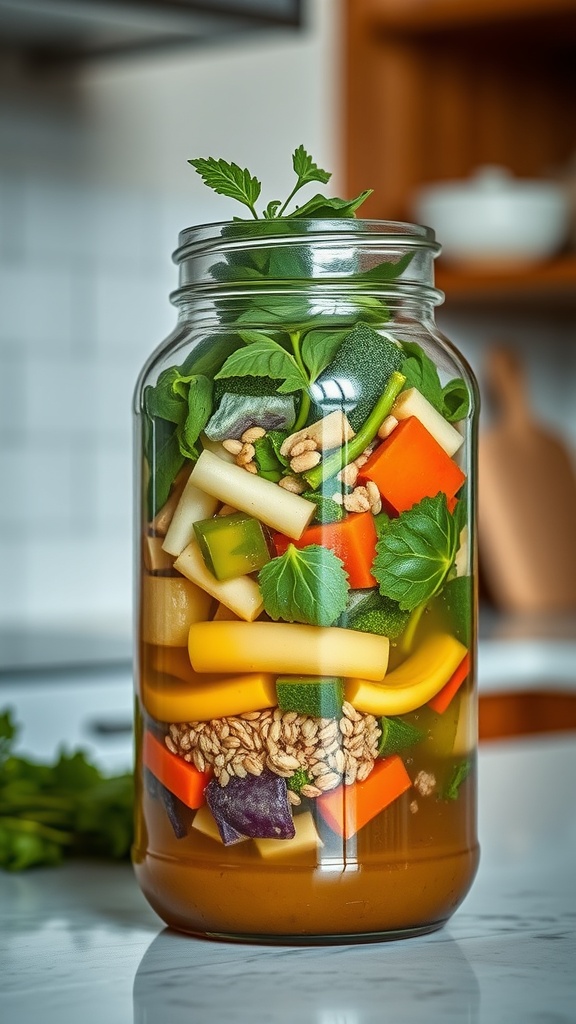
Hearty soup jars are a fantastic way to prepare meals ahead of time. They are not only visually appealing but also packed with nutrients. Imagine a jar filled with vibrant vegetables, grains, and herbs, all waiting to be transformed into a warm, comforting soup. This method makes it easy to grab a jar and have a delicious meal ready in no time.
To create your own hearty soup jar, start with a base of your favorite broth. Layer in ingredients like chopped carrots, bell peppers, and zucchini. Add grains like barley or quinoa for extra texture. Fresh herbs like basil and parsley can elevate the flavor. The beauty of this idea is that you can customize it to your taste.
When you’re ready to enjoy your soup, simply pour the contents into a pot, add water or broth, and heat until everything is cooked through. This is perfect for busy days when you want something homemade without the fuss.
Ingredients
- 1 cup vegetable broth
- 1/2 cup chopped carrots
- 1/2 cup diced bell peppers
- 1/2 cup chopped zucchini
- 1/4 cup barley or quinoa
- 1/4 cup chopped fresh herbs (basil, parsley)
- Salt and pepper to taste
Instructions
- Layer the ingredients in a large jar, starting with the grains at the bottom.
- Add the chopped vegetables, followed by the fresh herbs.
- Pour the vegetable broth over the top, ensuring everything is covered.
- Seal the jar and store it in the refrigerator until ready to use.
- When ready to eat, pour the contents into a pot, add additional water or broth if needed, and heat until warm.
Creative Sushi Rolls
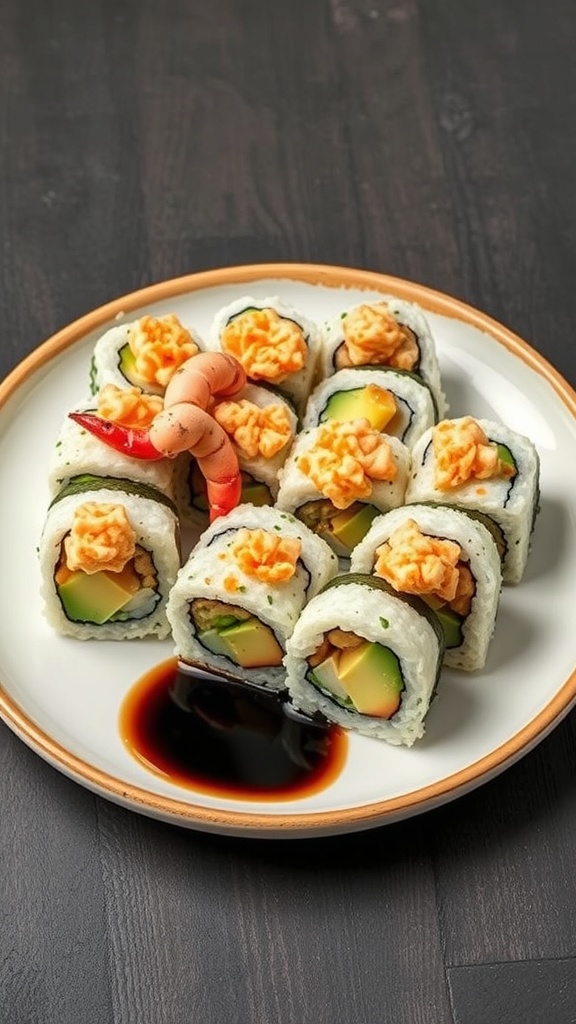
Making sushi at home is a fun way to enjoy a delicious meal. The image shows a plate of colorful sushi rolls that are both visually appealing and tasty. Each roll is filled with fresh ingredients, making it perfect for lunch prep. You can customize your rolls with your favorite fillings, which adds a personal touch to your meal.
To start, gather your ingredients. You’ll need sushi rice, nori (seaweed), and a variety of fillings like cucumber, avocado, and shrimp. The rolls in the image have a beautiful presentation, topped with a creamy sauce and garnished with a shrimp. This adds a nice flair to your lunch.
Making sushi is easier than you might think. With a little practice, you can create rolls that look as good as they taste. Plus, it’s a great way to impress friends or family. So, let’s get rolling!
Ingredients
- 2 cups sushi rice
- 2 1/2 cups water
- 1/4 cup rice vinegar
- 2 tablespoons sugar
- 1 teaspoon salt
- 4 sheets nori (seaweed)
- 1 cucumber, julienned
- 1 avocado, sliced
- 8 shrimp, cooked
- Spicy mayo (for topping)
- Soy sauce (for dipping)
Instructions
- Rinse the sushi rice under cold water until the water runs clear. Combine the rice and water in a rice cooker and cook according to the manufacturer’s instructions.
- Once cooked, transfer the rice to a large bowl. Mix rice vinegar, sugar, and salt in a small bowl until dissolved. Pour over the rice and gently fold to combine. Let it cool.
- Place a sheet of nori on a bamboo sushi mat, shiny side down. Wet your hands to prevent sticking and spread a thin layer of rice over the nori, leaving a small border at the top.
- Arrange cucumber, avocado, and shrimp in a line across the rice. Roll the sushi tightly from the bottom, using the mat to help. Seal the edge with a bit of water.
- Slice the roll into bite-sized pieces and arrange on a plate. Drizzle with spicy mayo and serve with soy sauce for dipping.
Delicious Quiche Slices

Quiche is a fantastic option for lunch prep. It’s versatile, tasty, and can be made ahead of time. The image shows a slice of quiche, perfectly baked with a golden crust and colorful filling. The combination of eggs, cheese, and fresh vegetables makes it both satisfying and nutritious.
Making quiche is simple. You can customize it with your favorite ingredients, whether that’s spinach, tomatoes, or cheese. It’s great served warm or cold, making it perfect for lunchboxes or quick meals at home.
Here’s a straightforward recipe to whip up your own delicious quiche:
Ingredients
- 1 pre-made pie crust
- 6 large eggs
- 1 cup milk
- 1 cup shredded cheese (cheddar or your choice)
- 1 cup chopped vegetables (spinach, bell peppers, or tomatoes)
- 1/2 teaspoon salt
- 1/4 teaspoon black pepper
- 1/4 teaspoon garlic powder
Instructions
- Preheat the oven to 375°F (190°C).
- Place the pie crust in a pie dish and prick the bottom with a fork.
- In a bowl, whisk together the eggs, milk, salt, pepper, and garlic powder.
- Stir in the cheese and chopped vegetables.
- Pour the egg mixture into the pie crust.
- Bake for 35-40 minutes, or until the quiche is set and lightly browned on top.
- Let it cool for a few minutes before slicing. Enjoy your quiche warm or cold!
Flavorful Frittatas
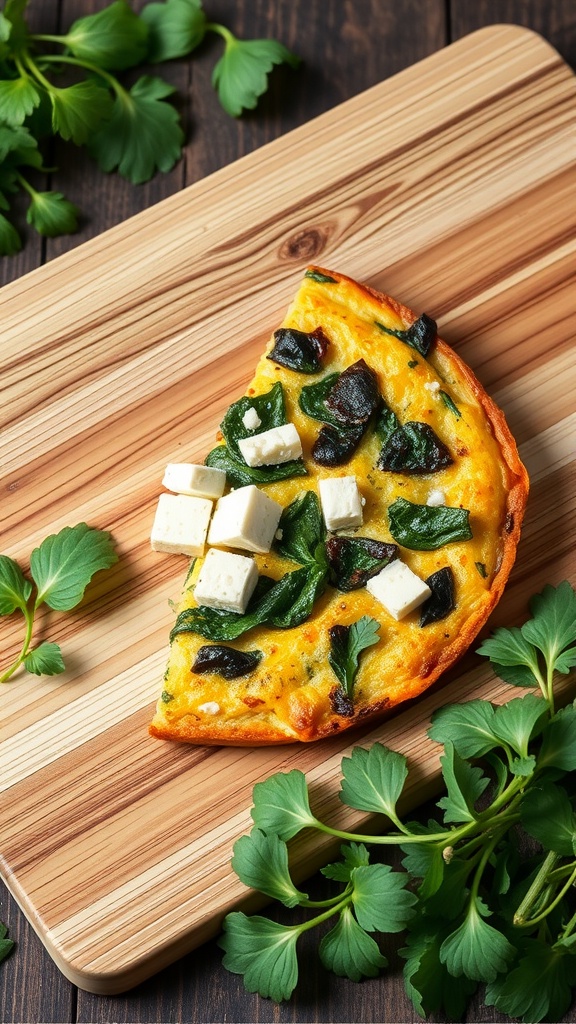
Frittatas are a fantastic choice for adult lunch prep. They are easy to make and can be packed with a variety of ingredients. This image shows a delicious slice of frittata topped with fresh spinach and cubes of cheese, sitting on a wooden cutting board. The vibrant greens and golden yellow of the eggs create an inviting look.
Making frittatas is a breeze. You can customize them with your favorite vegetables, meats, or cheeses. They store well in the fridge, making them perfect for meal prep. Just slice them up and grab a piece whenever you need a quick meal.
Let’s get into how to make your own tasty frittata!
Ingredients
- 6 large eggs
- 1 cup fresh spinach, chopped
- 1/2 cup feta cheese, cubed
- 1/4 cup milk
- 1/4 cup onion, diced
- 1 tablespoon olive oil
- Salt and pepper to taste
Instructions
- Preheat your oven to 375°F (190°C).
- In a skillet, heat olive oil over medium heat. Add the diced onion and cook until soft.
- In a bowl, whisk together the eggs, milk, salt, and pepper.
- Add the chopped spinach and feta cheese to the skillet, stirring to combine.
- Pour the egg mixture over the vegetables in the skillet. Cook for about 5 minutes until the edges start to set.
- Transfer the skillet to the oven and bake for 15-20 minutes until the frittata is fully set and lightly golden on top.
- Let it cool slightly before slicing. Enjoy your frittata warm or cold!
Wholesome Snack Packs

Snack packs can be a lifesaver for busy adults. They offer a quick way to enjoy nutritious bites throughout the day. This image showcases a delightful assortment of snacks packed neatly in a container. You can see a mix of fruits, nuts, and cheese, making it a balanced choice.
The vibrant colors of strawberries, blackberries, and other fruits are not just pleasing to the eye; they also provide essential vitamins. The nuts and seeds add a satisfying crunch and healthy fats, while the cheese offers a good source of protein. Together, these elements create a snack that is both tasty and filling.
Preparing these snack packs is simple. You can mix and match your favorite ingredients based on what you enjoy or have on hand. This flexibility makes it easy to keep things interesting. Plus, they are perfect for on-the-go munching, whether at work or during a day out.
Ingredients
- 1 cup mixed berries (strawberries, blackberries, blueberries)
- 1/2 cup cheese cubes (cheddar or your choice)
- 1/2 cup mixed nuts (almonds, walnuts, cashews)
- 1/4 cup sunflower seeds
- 2 packets of your favorite healthy snack bars
Instructions
- Start by washing the berries thoroughly and patting them dry.
- Cut the cheese into bite-sized cubes.
- In a container, layer the berries, cheese, and nuts.
- Add the sunflower seeds for an extra crunch.
- Include the healthy snack bars for a convenient treat.
- Seal the container and store it in the fridge until you’re ready to enjoy!
Fresh Salad Jars
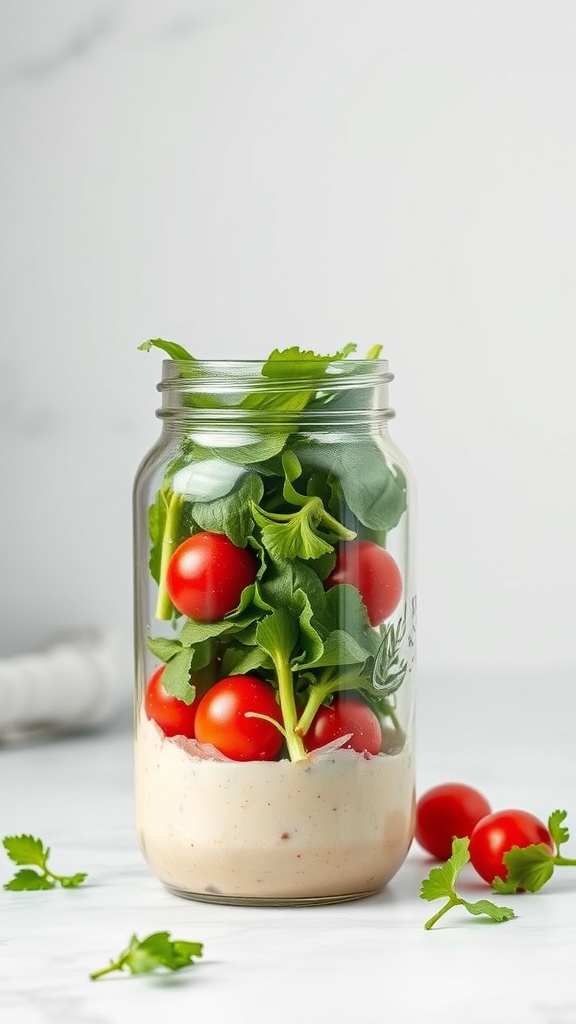
Fresh salad jars are a fun and easy way to enjoy healthy lunches. They keep your ingredients fresh and ready to go. Just layer your favorite veggies, greens, and dressing in a jar, and you’re set for the week!
In the image, you can see a vibrant salad jar filled with cherry tomatoes, leafy greens, and a creamy dressing at the bottom. This layering method not only looks appealing but also keeps the salad crisp. The dressing stays at the bottom, preventing the greens from wilting.
Making salad jars is simple. You can customize them with whatever ingredients you love. Try adding cucumbers, bell peppers, or even grains like quinoa for extra texture. The possibilities are endless!
Ingredients
- 1/2 cup salad dressing of your choice
- 1 cup cherry tomatoes
- 2 cups mixed greens (spinach, arugula, etc.)
- 1/2 cup chopped cucumbers
- 1/4 cup shredded carrots
- 1/4 cup chopped bell peppers
- Fresh herbs (like cilantro or parsley) for garnish
Instructions
- Start by pouring the salad dressing into the bottom of a clean jar.
- Add cherry tomatoes next, followed by cucumbers and shredded carrots.
- Layer the mixed greens on top, packing them down gently.
- Finish with fresh herbs for a pop of flavor.
- Seal the jar and store it in the fridge. Shake before serving!
Crispy Chickpea Bowls
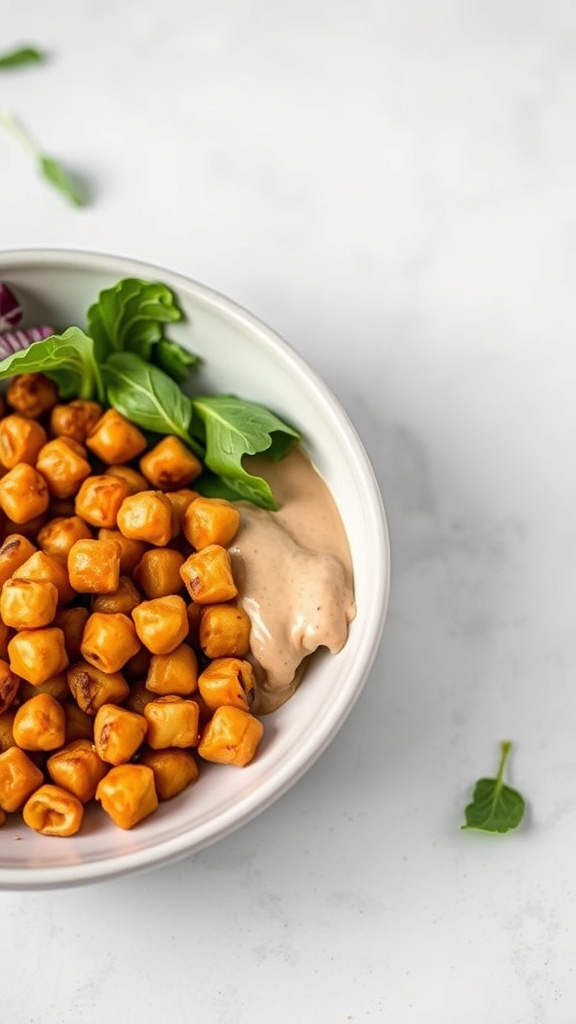
Crispy chickpea bowls are a fantastic option for adult lunch prep. They are not only easy to make but also packed with flavor and nutrition. The image shows a bowl filled with golden, crispy chickpeas, fresh greens, and a creamy sauce. This combination makes for a satisfying meal that can be enjoyed at home or on the go.
Chickpeas are a great source of protein and fiber, making them a perfect base for a hearty lunch. Roasting them gives a delightful crunch that pairs well with the freshness of the greens. You can customize this bowl with your favorite veggies or toppings, making it versatile for any palate.
To prepare these crispy chickpea bowls, you’ll need a few simple ingredients. Let’s get into the recipe!
Ingredients
- 1 can (15 oz) chickpeas, drained and rinsed
- 2 tablespoons olive oil
- 1 teaspoon garlic powder
- 1 teaspoon smoked paprika
- Salt and pepper, to taste
- 2 cups mixed greens (spinach, arugula, etc.)
- 1/4 cup tahini sauce or your favorite dressing
- Optional: chopped vegetables (cucumbers, bell peppers, etc.)
Instructions
- Preheat your oven to 400°F (200°C).
- In a bowl, toss the chickpeas with olive oil, garlic powder, smoked paprika, salt, and pepper until well coated.
- Spread the chickpeas on a baking sheet in a single layer. Roast for 25-30 minutes, shaking the pan halfway through, until they are golden and crispy.
- While the chickpeas are roasting, prepare your greens and any additional vegetables you want to add.
- Once the chickpeas are done, let them cool slightly. Assemble your bowls by adding the greens, crispy chickpeas, and drizzle with tahini sauce or your favorite dressing.
- Enjoy your delicious and nutritious crispy chickpea bowl!
Satisfying Buddha Bowls
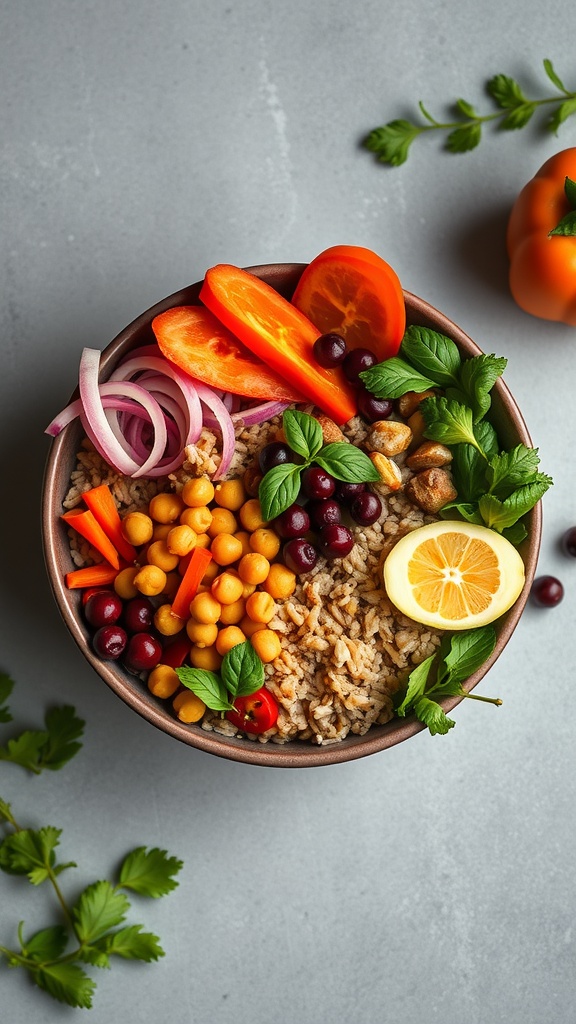
Buddha bowls are a fantastic way to enjoy a balanced meal that’s both colorful and nutritious. They combine grains, proteins, and a variety of fresh vegetables, all in one bowl. This image showcases a vibrant Buddha bowl filled with brown rice, chickpeas, and an array of fresh veggies like bell peppers, onions, and herbs.
The beauty of Buddha bowls lies in their versatility. You can mix and match ingredients based on what you have on hand or what you enjoy. The combination of textures and flavors makes each bite satisfying. Plus, they’re easy to prepare ahead of time, making them perfect for adult lunch prep.
To make your own Buddha bowl, start with a base of grains like quinoa or brown rice. Add a protein source such as chickpeas or grilled chicken. Then, pile on the veggies—think crunchy bell peppers, sweet cherry tomatoes, and leafy greens. Don’t forget a squeeze of lemon or a drizzle of your favorite dressing to tie it all together!
Ingredients
- 1 cup brown rice
- 1 can chickpeas, drained and rinsed
- 1 red bell pepper, sliced
- 1/2 cup cherry tomatoes, halved
- 1/4 red onion, thinly sliced
- 1 lemon, sliced
- Fresh herbs (like basil or cilantro)
- Salt and pepper to taste
- Your favorite dressing (optional)
Instructions
- Cook the Brown Rice: Rinse the brown rice under cold water. In a pot, combine rice with 2 cups of water and a pinch of salt. Bring to a boil, then reduce heat, cover, and simmer for about 40-45 minutes until tender.
- Prepare the Chickpeas: While the rice cooks, heat a skillet over medium heat. Add the chickpeas and season with salt and pepper. Cook for about 5-7 minutes until slightly crispy.
- Chop the Veggies: Slice the bell pepper, halve the cherry tomatoes, and thinly slice the red onion.
- Assemble the Bowl: In a large bowl, layer the cooked brown rice, chickpeas, and fresh veggies. Add lemon slices and herbs on top.
- Dress and Serve: Drizzle with your favorite dressing or a squeeze of lemon juice. Enjoy your delicious and nutritious Buddha bowl!
Savory Meatball Subs
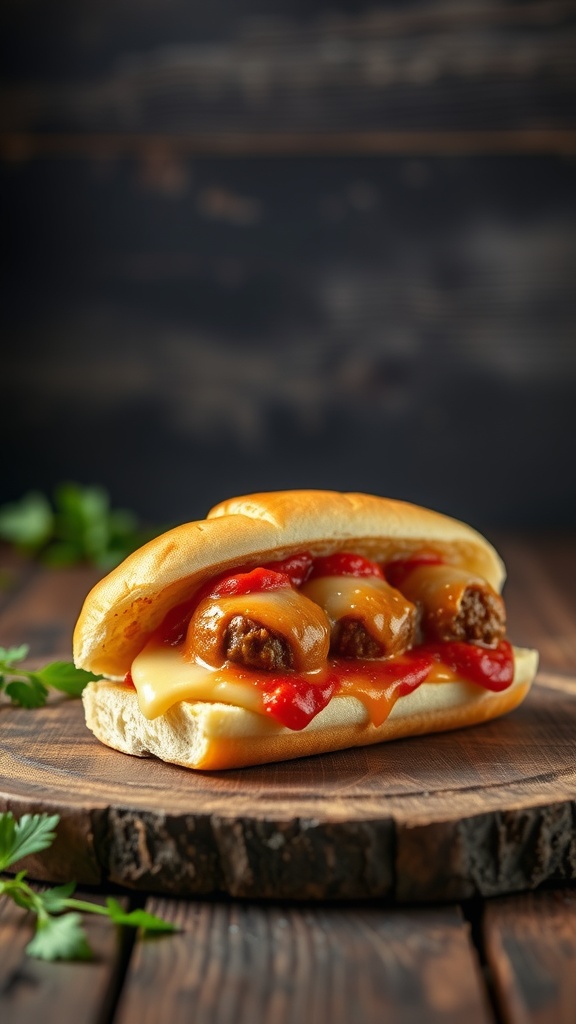
Meatball subs are a classic comfort food that never disappoints. Picture a warm, toasted sub roll filled with juicy meatballs, melted cheese, and a rich tomato sauce. It’s the kind of meal that makes you feel cozy and satisfied.
These subs are perfect for lunch prep. You can make a batch of meatballs ahead of time and store them in the fridge or freezer. When you’re ready to eat, just heat them up, assemble your subs, and enjoy!
To make these delicious meatball subs, you’ll need some simple ingredients. The combination of flavors is sure to please everyone.
Ingredients
- 1 pound ground beef
- 1/2 cup breadcrumbs
- 1/4 cup grated Parmesan cheese
- 1/4 cup chopped parsley
- 1 egg
- 1 teaspoon garlic powder
- 1 teaspoon onion powder
- Salt and pepper to taste
- 1 cup marinara sauce
- 4 sub rolls
- 1 cup shredded mozzarella cheese
Instructions
- Preheat your oven to 375°F (190°C).
- In a large bowl, mix together ground beef, breadcrumbs, Parmesan cheese, parsley, egg, garlic powder, onion powder, salt, and pepper until well combined.
- Shape the mixture into meatballs, about 1 inch in diameter.
- Place the meatballs on a baking sheet and bake for 20-25 minutes, or until cooked through.
- While the meatballs are baking, heat the marinara sauce in a saucepan over medium heat.
- Once the meatballs are done, add them to the sauce and stir to coat.
- Cut the sub rolls in half and place them on a baking sheet. Fill each roll with meatballs and sauce, then top with mozzarella cheese.
- Bake the assembled subs for an additional 10 minutes, or until the cheese is melted and bubbly.
- Serve warm and enjoy your savory meatball subs!