15 Easy Weekly Meal Prep Ideas for Busy Moms
Cooking for your family can feel like a juggling act, especially with a busy schedule. These 15 stress-free weekly meal prep ideas are here to make your life easier, helping you serve up delicious, nutritious meals without the chaos. Set aside a little time during the week, and enjoy the benefits of planning ahead!
One-Pan Chicken and Veggies
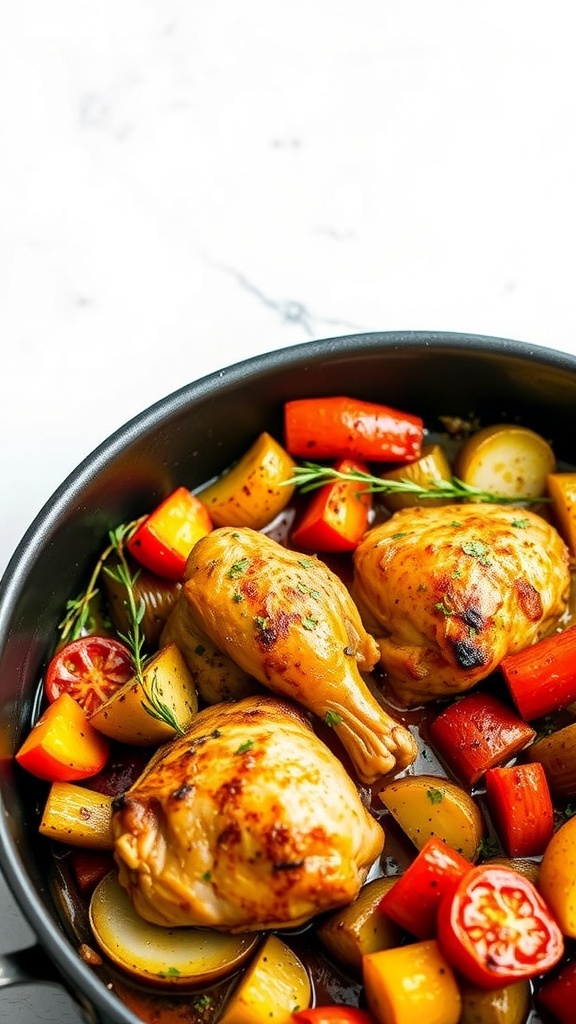
One-Pan Chicken and Veggies is a lifesaver for busy moms. This dish is not only easy to prepare, but it also minimizes cleanup time. You can toss everything into one pan and let it cook while you focus on other tasks.
The vibrant colors of the chicken, peppers, and potatoes make this meal visually appealing. The juicy chicken thighs are perfectly seasoned, and the veggies add a nice crunch. This dish is nutritious and satisfying, making it a great choice for family dinners.
With just a few ingredients, you can create a delicious meal that everyone will love. Plus, it’s versatile! You can swap out veggies based on what you have on hand. Let’s get cooking!
Ingredients
- 4 chicken thighs
- 2 cups mixed bell peppers, chopped
- 1 cup baby potatoes, halved
- 1 cup cherry tomatoes
- 2 tablespoons olive oil
- 1 teaspoon garlic powder
- 1 teaspoon paprika
- Salt and pepper to taste
- Fresh thyme for garnish (optional)
Instructions
- Preheat your oven to 400°F (200°C).
- In a large bowl, mix the olive oil, garlic powder, paprika, salt, and pepper.
- Add the chicken thighs and veggies to the bowl, tossing everything until well coated.
- Transfer the mixture to a large baking pan, spreading it out evenly.
- Bake for 30-35 minutes, or until the chicken is cooked through and the veggies are tender.
- Garnish with fresh thyme if desired and serve hot.
Slow Cooker Chili

Slow cooker chili is a lifesaver for busy moms. It’s easy to prepare and perfect for those hectic weeknights. Just toss everything into the slow cooker in the morning, and by dinner, you’ll have a warm, hearty meal waiting for you.
This chili is not just filling; it’s packed with flavor. The combination of beans, spices, and your choice of meat creates a comforting dish that everyone will love. Plus, it’s a great way to sneak in some veggies!
Serve it with a sprinkle of cheese and fresh cilantro on top, and maybe some cornbread on the side. It’s a simple meal that feels special.
Ingredients
- 1 pound ground beef or turkey
- 1 can (15 oz) kidney beans, drained and rinsed
- 1 can (15 oz) black beans, drained and rinsed
- 1 can (15 oz) diced tomatoes
- 1 can (8 oz) tomato sauce
- 1 cup corn (frozen or canned)
- 1 onion, chopped
- 2 cloves garlic, minced
- 2 tablespoons chili powder
- 1 teaspoon cumin
- Salt and pepper to taste
- Shredded cheese and fresh cilantro for topping
Instructions
- Brown the Meat: In a skillet, brown the ground beef or turkey over medium heat. Drain any excess fat.
- Combine Ingredients: In the slow cooker, add the browned meat, kidney beans, black beans, diced tomatoes, tomato sauce, corn, onion, garlic, chili powder, cumin, salt, and pepper.
- Cook: Stir everything together. Cover and cook on low for 6-8 hours or on high for 3-4 hours.
- Serve: Once cooked, ladle the chili into bowls. Top with shredded cheese and cilantro. Enjoy with cornbread!
Overnight Oats with Berries
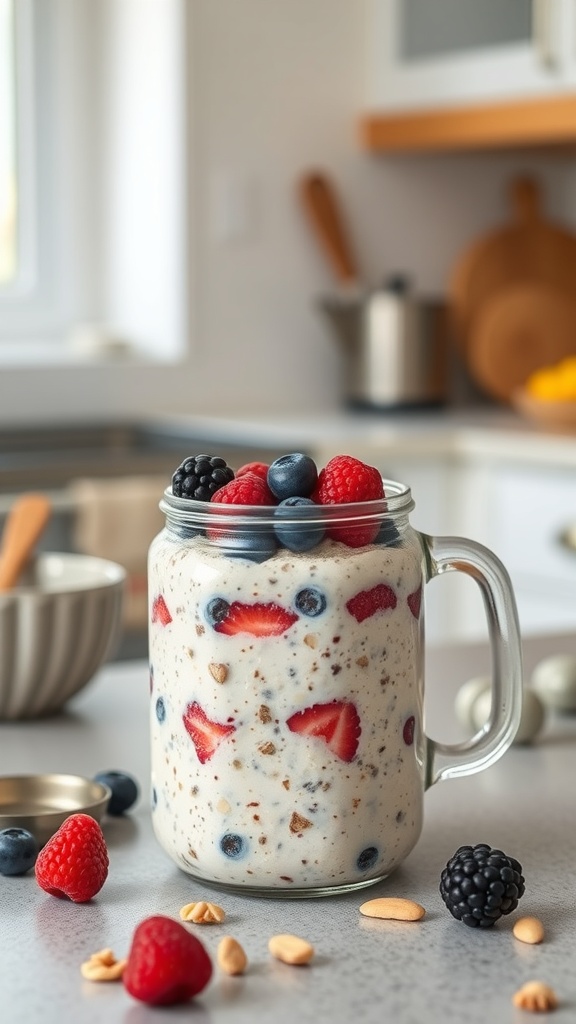
Overnight oats are a lifesaver for busy moms. They are quick to prepare and packed with nutrients. The image shows a beautiful jar filled with creamy oats, topped with vibrant berries. This colorful breakfast is not only appealing but also delicious.
Making overnight oats is simple. Just mix oats with your favorite milk or yogurt, add some sweetener, and top with fresh fruits. The combination of oats and berries provides a great balance of fiber and antioxidants, making it a perfect start to your day.
Here’s how to make your own overnight oats with berries:
Ingredients
- 1 cup rolled oats
- 1 cup milk (dairy or non-dairy)
- 1 tablespoon honey or maple syrup
- 1/2 teaspoon vanilla extract
- 1/2 cup mixed berries (strawberries, blueberries, raspberries, blackberries)
- 1/4 cup yogurt (optional)
- Chopped nuts or seeds for topping (optional)
Instructions
- In a jar or bowl, combine the rolled oats, milk, honey, and vanilla extract. Stir well to combine.
- If using yogurt, mix it in at this stage for extra creaminess.
- Add the mixed berries on top, pressing them slightly into the oat mixture.
- Cover the jar or bowl and refrigerate overnight.
- In the morning, give it a good stir and add more berries or nuts if desired. Enjoy your nutritious breakfast!
Sheet Pan Salmon and Asparagus
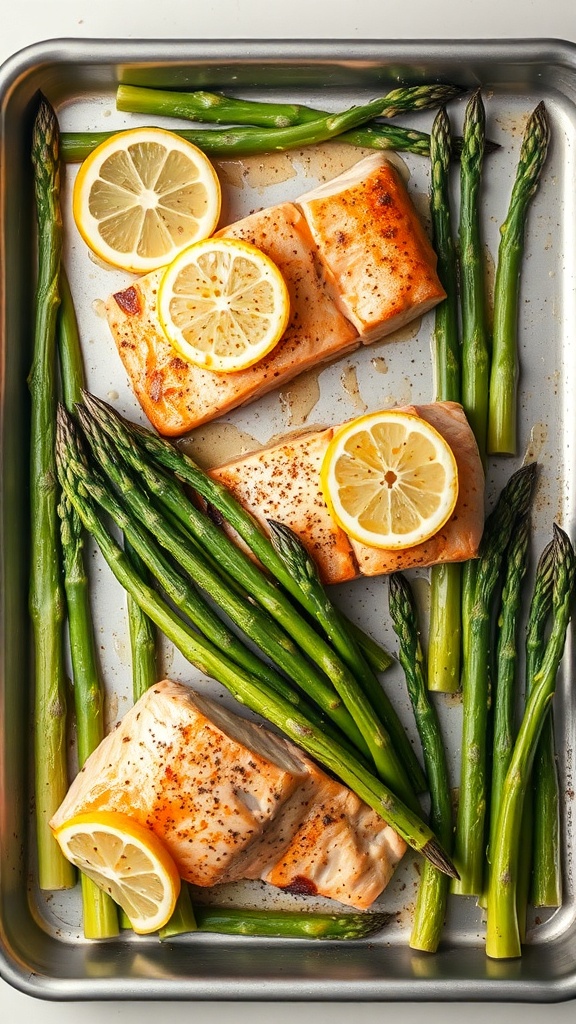
Sheet pan meals are a lifesaver for busy moms. They’re quick, easy, and clean-up is a breeze. This dish features tender salmon paired with fresh asparagus, all cooked together on one pan. The vibrant colors and delicious flavors make it a hit for the whole family.
The salmon is seasoned simply with salt, pepper, and lemon slices, which add a refreshing zing. Asparagus complements the fish perfectly, providing a nutritious side that cooks at the same time. This meal not only saves time but also keeps things healthy.
To make this dish, you’ll need just a few ingredients. It’s perfect for meal prep, allowing you to whip up multiple servings at once. Plus, it’s versatile—feel free to swap in your favorite veggies if asparagus isn’t your thing!
Ingredients
- 4 salmon fillets
- 1 bunch of asparagus, trimmed
- 2 tablespoons olive oil
- 1 lemon, sliced
- Salt and pepper to taste
- 1 teaspoon garlic powder (optional)
Instructions
- Preheat your oven to 400°F (200°C).
- On a large sheet pan, arrange the asparagus and drizzle with olive oil. Season with salt, pepper, and garlic powder if using.
- Place the salmon fillets on the pan, skin side down. Top each fillet with lemon slices and season with salt and pepper.
- Bake for 12-15 minutes, or until the salmon is cooked through and flakes easily with a fork.
- Serve warm, and enjoy your stress-free meal!
Quick Breakfast Burritos

Breakfast burritos are a fantastic way to kickstart your day. They’re quick, easy, and packed with nutrients. These burritos are perfect for busy mornings when you need something delicious and filling. Just grab one, and you’re good to go!
The image shows a stack of delicious breakfast burritos, filled with fluffy scrambled eggs, colorful bell peppers, and fresh tomatoes. They are neatly wrapped in soft tortillas, making them easy to hold and eat. This meal is not only tasty but also visually appealing, which can make breakfast feel a bit more special.
Making these burritos ahead of time can save you a lot of stress during the week. You can prepare a batch on Sunday, store them in the fridge or freezer, and simply reheat them in the morning. Pair them with a piece of fruit, like a banana, for a complete breakfast!
Ingredients
- 4 large eggs
- 1/4 cup milk
- 1/2 cup diced bell peppers (any color)
- 1/2 cup diced tomatoes
- 1/4 cup shredded cheese (cheddar or your choice)
- 4 large flour tortillas
- Salt and pepper to taste
- Fresh cilantro for garnish (optional)
Instructions
- Whisk the eggs and milk together in a bowl. Season with salt and pepper.
- In a skillet over medium heat, add the diced bell peppers. Sauté for about 2-3 minutes until they soften.
- Add the egg mixture to the skillet. Cook, stirring gently, until the eggs are scrambled and cooked through.
- Remove from heat and stir in the diced tomatoes and cheese until melted.
- Lay out the tortillas and divide the egg mixture evenly among them. Roll each tortilla tightly, folding in the sides as you go.
- To serve, you can either eat them immediately or wrap them in foil and store them in the fridge or freezer.
Simple Quinoa Salad
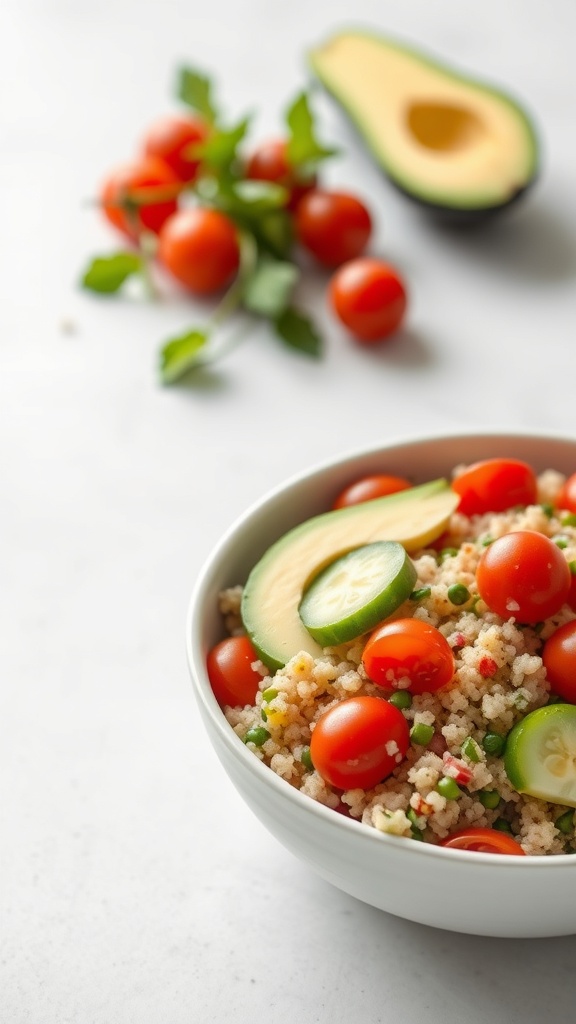
This Simple Quinoa Salad is a perfect dish for busy moms looking to prepare healthy meals ahead of time. The image shows a vibrant bowl filled with fluffy quinoa, cherry tomatoes, and fresh avocado slices. It’s colorful and inviting, making it a great addition to any meal prep plan.
Quinoa is not just nutritious; it’s also quick to cook. Pair it with fresh veggies like tomatoes and cucumbers, and you have a refreshing salad that can be enjoyed on its own or as a side. This salad is versatile, allowing you to mix in your favorite ingredients or dressings.
Making this salad is straightforward. You can whip it up in no time, making it ideal for those hectic weeks. Plus, it stores well in the fridge, so you can grab it whenever you need a quick meal.
Ingredients
- 1 cup quinoa
- 2 cups water
- 1 cup cherry tomatoes, halved
- 1 cucumber, diced
- 1 avocado, sliced
- 1/4 cup red onion, finely chopped
- 1/4 cup fresh parsley, chopped
- 2 tablespoons olive oil
- 1 tablespoon lemon juice
- Salt and pepper to taste
Instructions
- Rinse the quinoa under cold water. In a medium pot, combine quinoa and water. Bring to a boil, then reduce heat, cover, and simmer for about 15 minutes until the quinoa is fluffy and water is absorbed.
- In a large bowl, combine the cooked quinoa, cherry tomatoes, cucumber, red onion, and parsley.
- In a small bowl, whisk together olive oil, lemon juice, salt, and pepper. Pour over the quinoa mixture and toss to combine.
- Gently fold in the avocado slices just before serving to keep them intact.
- Store any leftovers in an airtight container in the fridge for up to 3 days.
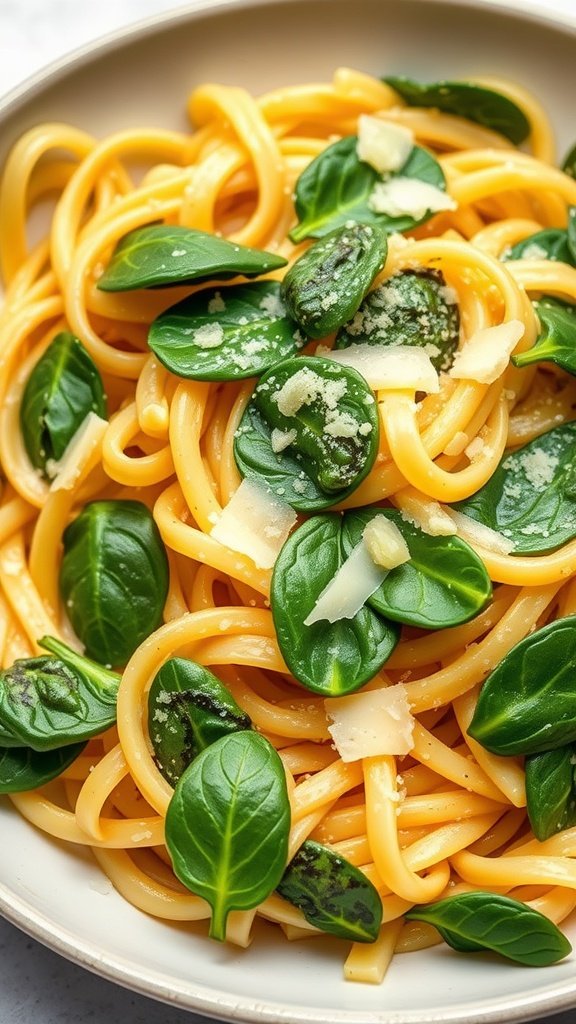
Pasta Primavera

Pasta Primavera is a delightful dish that brings a burst of color and flavor to your table. This recipe is perfect for busy moms who want a quick yet nutritious meal. The combination of fresh vegetables and pasta makes it a favorite among kids and adults alike.
The image shows a vibrant plate of spaghetti topped with cherry tomatoes, green beans, mushrooms, and fresh basil. The bright colors not only make it visually appealing but also indicate the freshness of the ingredients. This dish is not just tasty; it’s also packed with vitamins and minerals.
Making Pasta Primavera is simple and can be done in under 30 minutes. It’s a great way to use up any leftover veggies in your fridge. Plus, it’s versatile; you can swap in your family’s favorite vegetables or whatever you have on hand.
Ingredients
- 8 ounces spaghetti
- 1 cup cherry tomatoes, halved
- 1 cup green beans, trimmed
- 1 cup mushrooms, sliced
- 1/2 cup bell pepper, sliced
- 2 cloves garlic, minced
- 1/4 cup olive oil
- Salt and pepper to taste
- Fresh basil for garnish
- Grated Parmesan cheese (optional)
Instructions
- Cook the Pasta: In a large pot, bring salted water to a boil. Add spaghetti and cook according to package instructions until al dente. Drain and set aside.
- Sauté the Vegetables: In a large skillet, heat olive oil over medium heat. Add garlic and sauté for about 1 minute until fragrant. Then, add green beans, mushrooms, and bell pepper. Cook for 5-7 minutes until vegetables are tender.
- Add Tomatoes: Stir in the cherry tomatoes and cook for another 2-3 minutes until they soften.
- Combine: Add the cooked spaghetti to the skillet. Toss everything together, seasoning with salt and pepper to taste.
- Serve: Plate the Pasta Primavera and garnish with fresh basil and grated Parmesan cheese if desired. Enjoy your colorful and healthy meal!
Vegetable Stir-Fry with Tofu
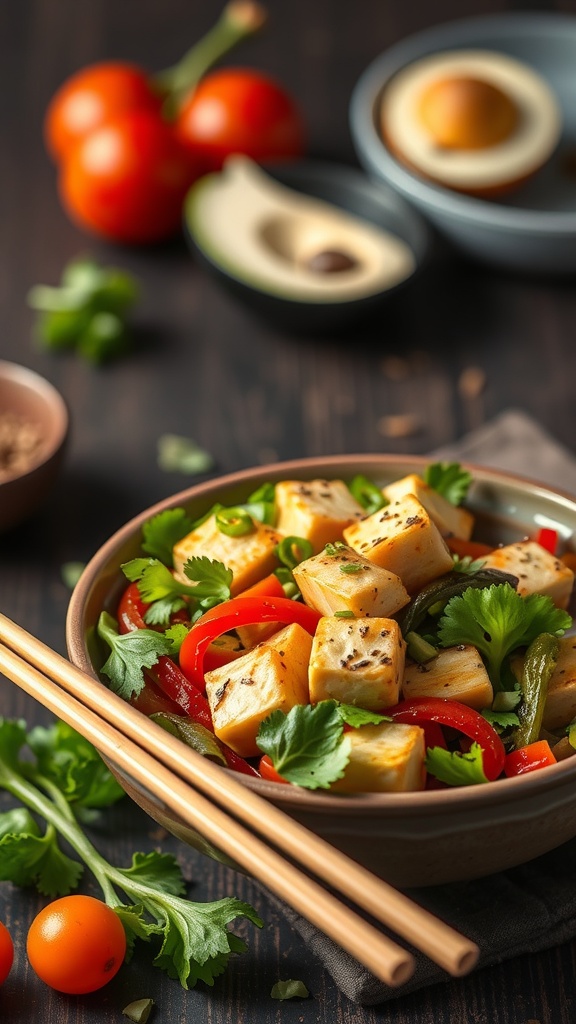
Vegetable stir-fry with tofu is a quick and healthy meal that busy moms can whip up in no time. This dish is packed with colorful veggies and protein-rich tofu, making it a nutritious choice for the family. The vibrant colors of the peppers and fresh herbs make it visually appealing, while the flavors come together beautifully in just a few minutes.
To make this dish, start by prepping your ingredients. Chop up some bell peppers, snap peas, and fresh cilantro. The tofu should be cubed and lightly seasoned. Heat a bit of oil in a pan, add the tofu, and cook until golden brown. Then, toss in the vegetables and stir-fry until they are tender yet crisp. A splash of soy sauce or your favorite stir-fry sauce can enhance the flavors.
This meal is perfect for meal prep. You can store it in the fridge and reheat it for a quick lunch or dinner. Plus, it’s versatile! Feel free to swap in any veggies you have on hand. It’s a great way to use up leftovers and keep things fresh.
Ingredients
- 1 block firm tofu, cubed
- 2 cups bell peppers, sliced (red and green)
- 1 cup snap peas
- 1 onion, sliced
- 2 cloves garlic, minced
- 2 tablespoons soy sauce
- 1 tablespoon olive oil
- Fresh cilantro, for garnish
- Salt and pepper, to taste
Instructions
- Prepare the Tofu: Press the tofu to remove excess moisture. Cut it into cubes and season with salt and pepper.
- Cook the Tofu: In a large skillet, heat olive oil over medium heat. Add the tofu and cook until golden brown on all sides, about 8-10 minutes.
- Add Vegetables: Stir in the sliced onion, bell peppers, and snap peas. Cook for another 5-7 minutes until the veggies are tender but still crisp.
- Season: Add minced garlic and soy sauce. Stir well and cook for another minute.
- Serve: Remove from heat, garnish with fresh cilantro, and enjoy!
Chickpea and Spinach Stew
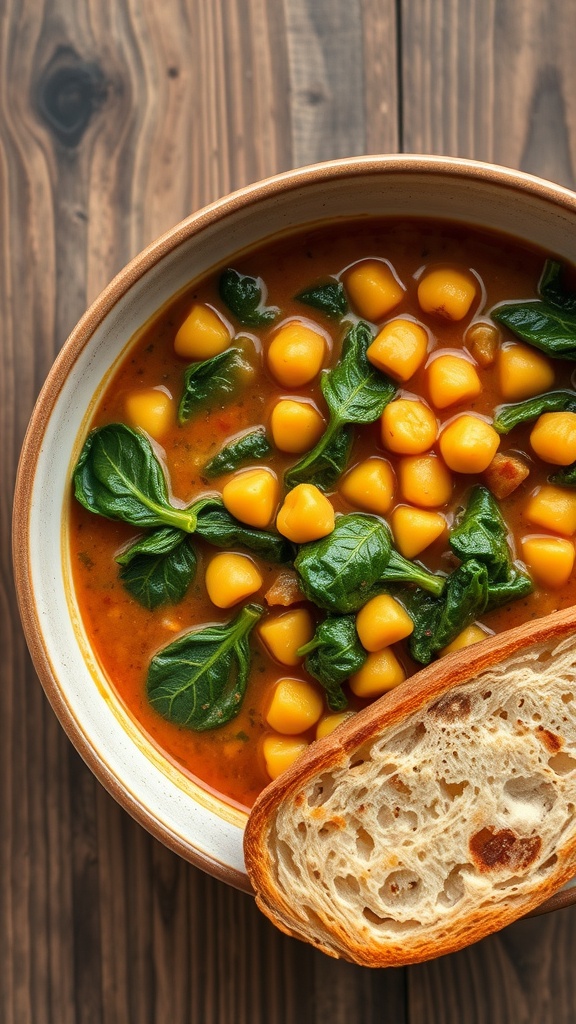
Chickpea and spinach stew is a warm, comforting dish perfect for busy moms. This meal is not only quick to prepare but also packed with nutrients. The vibrant colors of the spinach and chickpeas make it visually appealing, while the rich flavors will satisfy everyone at the table.
This stew is great for meal prep. You can make a big batch and store it for the week. Just heat it up when you’re ready to eat. Pair it with a slice of crusty bread for a complete meal that your family will love.
Here’s how to make this delicious stew:
Ingredients
- 1 can chickpeas, drained and rinsed
- 2 cups fresh spinach
- 1 can diced tomatoes
- 1 onion, chopped
- 2 cloves garlic, minced
- 1 teaspoon cumin
- 1 teaspoon paprika
- 2 cups vegetable broth
- Salt and pepper to taste
- Olive oil for cooking
Instructions
- Heat olive oil in a pot over medium heat. Add chopped onion and sauté until translucent.
- Add minced garlic, cumin, and paprika. Stir for about 1 minute until fragrant.
- Pour in the diced tomatoes and vegetable broth. Bring to a simmer.
- Add the chickpeas and cook for about 10 minutes.
- Stir in the fresh spinach and cook until wilted, about 2-3 minutes.
- Season with salt and pepper to taste. Serve hot with bread on the side.
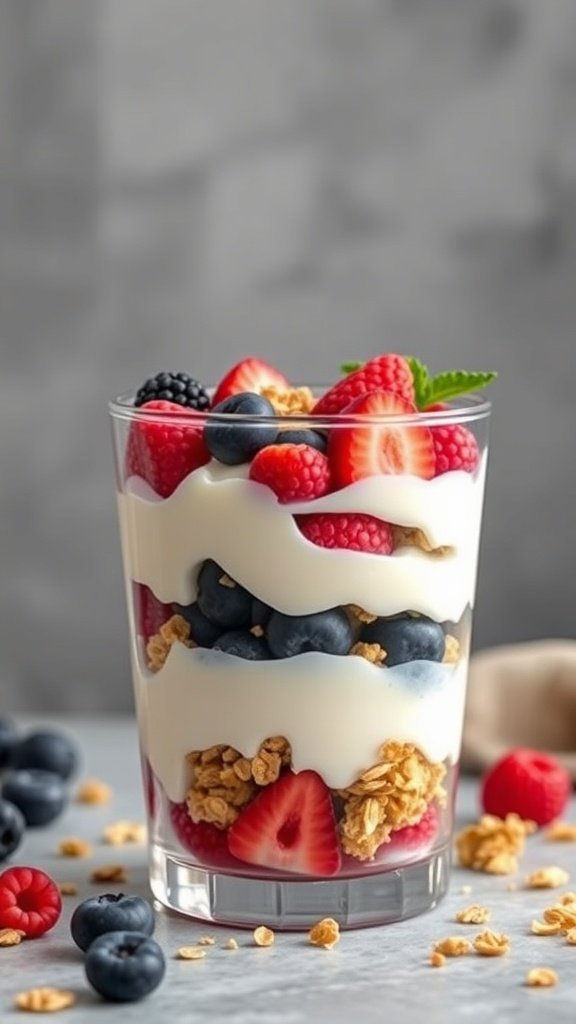
Greek Yogurt Parfaits

Greek yogurt parfaits are a delightful and nutritious option for busy moms looking to simplify their meal prep. These tasty treats are layered with creamy Greek yogurt, crunchy granola, and fresh fruits, making them both satisfying and visually appealing.
To make these parfaits, you can use any combination of fruits you like. Strawberries and blueberries are popular choices, but feel free to mix in bananas or peaches for variety. The granola adds a nice crunch, while the yogurt provides protein and probiotics.
These parfaits can be prepared in advance and stored in the fridge, ready to grab on hectic mornings or as a quick snack. They are perfect for breakfast or a light dessert, and kids love them too!
Ingredients
- 2 cups Greek yogurt
- 1 cup granola
- 1 cup mixed berries (strawberries, blueberries, raspberries)
- 1 tablespoon honey (optional)
- Mint leaves for garnish (optional)
Instructions
- Prepare the Ingredients: Wash and slice the berries as needed. If using strawberries, cut them into small pieces.
- Layer the Parfaits: In a glass or bowl, start with a layer of Greek yogurt at the bottom. Add a layer of granola followed by a layer of mixed berries.
- Repeat Layers: Continue layering until you reach the top of the glass, finishing with berries and a sprinkle of granola.
- Drizzle with Honey: If desired, drizzle honey over the top for added sweetness.
- Garnish: Add mint leaves for a fresh touch.
- Serve or Store: Enjoy immediately or cover and store in the fridge for up to 2 days.
Fruit and Nut Energy Bites

Fruit and nut energy bites are a fantastic snack for busy moms. They are quick to make, easy to store, and perfect for on-the-go munching. These little bites are packed with energy, making them a great pick-me-up during hectic days.
In the image, you see a delightful platter of energy bites. They are round, colorful, and look incredibly inviting. The mix of nuts and dried fruits adds a vibrant touch, making them not just tasty but also visually appealing. You can see almonds, blueberries, and bits of chocolate, all combining to create a snack that is both nutritious and satisfying.
Making these energy bites is simple. You can customize them with your favorite nuts and dried fruits. They are perfect for kids too, making them a great addition to lunchboxes or after-school snacks.
Ingredients
- 1 cup rolled oats
- 1/2 cup nut butter (like almond or peanut butter)
- 1/3 cup honey or maple syrup
- 1/2 cup mixed nuts, chopped
- 1/2 cup dried fruit (like cranberries or raisins)
- 1/4 cup mini chocolate chips (optional)
- 1 teaspoon vanilla extract
Instructions
- In a large bowl, mix together the rolled oats, nut butter, and honey until well combined.
- Add in the chopped nuts, dried fruit, chocolate chips, and vanilla extract. Stir until everything is evenly mixed.
- Using your hands, form the mixture into small balls, about 1 inch in diameter.
- Place the energy bites on a baking sheet lined with parchment paper and refrigerate for at least 30 minutes to set.
- Once set, transfer them to an airtight container. They can be stored in the fridge for up to a week.
Zucchini Noodles with Pesto

Zucchini noodles, or zoodles, are a fantastic way to enjoy a lighter meal. They’re not just healthy; they’re also super quick to prepare. This dish pairs beautifully with pesto, bringing a burst of flavor that will please everyone at the table.
The vibrant green of the zucchini contrasts nicely with the rich, green pesto. Cherry tomatoes add a pop of color and sweetness, while cashews give a satisfying crunch. This meal is perfect for busy moms looking to whip up something nutritious without spending hours in the kitchen.
Making zucchini noodles is easy. You can use a spiralizer or a simple vegetable peeler to create thin strips. Toss them with pesto, and you have a meal ready in minutes. It’s a great way to sneak in some veggies while keeping things fun and tasty!
Ingredients
- 4 medium zucchinis
- 1 cup basil pesto
- 1 cup cherry tomatoes, halved
- 1/4 cup cashews, chopped
- Salt and pepper to taste
- Fresh basil leaves for garnish
Instructions
- Spiralize the Zucchini: Use a spiralizer to create noodles from the zucchinis. If you don’t have one, a vegetable peeler works too.
- Cook the Zoodles: In a large skillet, lightly sauté the zucchini noodles over medium heat for about 2-3 minutes until just tender. Avoid overcooking to keep them crisp.
- Add Pesto: Remove the skillet from heat and stir in the basil pesto until the noodles are well coated.
- Mix in Tomatoes: Gently fold in the halved cherry tomatoes.
- Serve: Plate the zoodles and sprinkle with chopped cashews. Add salt and pepper to taste, and garnish with fresh basil leaves before serving.
Homemade Pizza Kits

Homemade pizza kits are a fantastic way to bring the family together for a fun and tasty meal. The image shows a vibrant setup with fresh ingredients like tomatoes, lettuce, and herbs, all ready for pizza-making. It’s a perfect way to let everyone customize their own pizza, making dinner both interactive and enjoyable.
To create your own pizza kits, start with pre-made dough or make your own. Gather a variety of toppings like cheese, pepperoni, bell peppers, and olives. You can even include some homemade sauce in small containers. This way, everyone can build their pizza just the way they like it!
Not only is this a great way to spend time together, but it also allows kids to get creative in the kitchen. Plus, it’s a stress-free meal prep option for busy moms. You can prepare the ingredients ahead of time and store them in the fridge. When dinner time comes, just set everything out and let the fun begin!
Ingredients
- 1 lb pizza dough (store-bought or homemade)
- 1 cup pizza sauce
- 2 cups shredded mozzarella cheese
- 1 cup cherry tomatoes, halved
- 1/2 cup sliced bell peppers
- 1/2 cup sliced olives
- 1/4 cup fresh basil leaves
- Olive oil for brushing
Instructions
- Preheat your oven to 475°F (245°C).
- If using store-bought dough, follow the package instructions. If making your own, roll out the dough on a floured surface to your desired thickness.
- Transfer the rolled dough to a baking sheet or pizza stone. Brush the surface lightly with olive oil.
- Spread a layer of pizza sauce over the dough, leaving a small border around the edges.
- Sprinkle the shredded mozzarella cheese evenly over the sauce.
- Add your favorite toppings, like halved cherry tomatoes, bell peppers, olives, and fresh basil.
- Bake in the preheated oven for 12-15 minutes, or until the crust is golden and the cheese is bubbly.
- Remove from the oven, let cool for a few minutes, slice, and serve!
Homemade Turkey Meatballs

Turkey meatballs are a fantastic option for busy moms looking to whip up a quick and nutritious meal. They are easy to make and can be paired with various sides, making them versatile for any dinner. The image shows delicious turkey meatballs served over a bed of spaghetti, topped with rich marinara sauce and fresh basil. This dish is not only comforting but also a hit with kids!
Making turkey meatballs at home allows you to control the ingredients, ensuring they are healthy and tasty. You can prepare a big batch and freeze them for later, saving time on those hectic weeknights. Plus, they can be enjoyed in sandwiches, salads, or as a snack!
Ingredients
- 1 pound ground turkey
- 1/2 cup breadcrumbs
- 1/4 cup grated Parmesan cheese
- 1/4 cup chopped fresh parsley
- 1 egg
- 2 cloves garlic, minced
- 1 teaspoon onion powder
- 1 teaspoon salt
- 1/2 teaspoon black pepper
- 1/2 teaspoon Italian seasoning
- 1 cup marinara sauce
- Spaghetti, for serving
Instructions
- Preheat your oven to 400°F (200°C) and line a baking sheet with parchment paper.
- In a large bowl, combine ground turkey, breadcrumbs, Parmesan cheese, parsley, egg, garlic, onion powder, salt, pepper, and Italian seasoning. Mix until well combined.
- Form the mixture into meatballs, about 1 inch in diameter, and place them on the prepared baking sheet.
- Bake for 20-25 minutes, or until the meatballs are cooked through and golden brown.
- While the meatballs are baking, heat the marinara sauce in a saucepan over medium heat.
- Once the meatballs are done, add them to the sauce and let them simmer for a few minutes.
- Serve the meatballs over spaghetti and garnish with fresh basil. Enjoy your homemade turkey meatballs!
Baked Sweet Potatoes with Black Beans
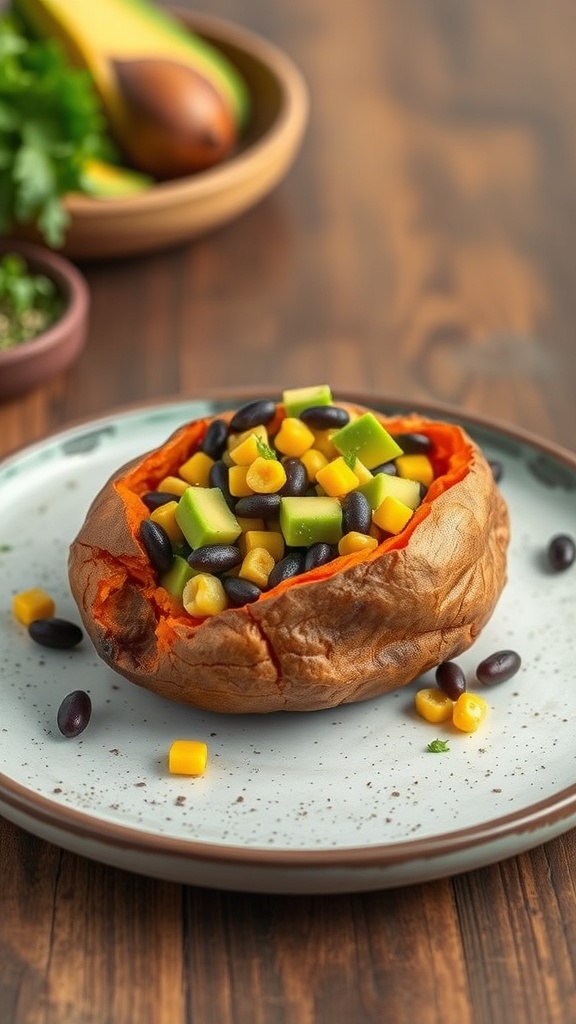
Baked sweet potatoes with black beans are a perfect meal for busy moms. They are simple to prepare, nutritious, and delicious. This dish combines the natural sweetness of the potatoes with the hearty texture of black beans, making it a filling option for any day of the week.
To make this meal even more appealing, you can add colorful veggies like corn and bell peppers. They not only enhance the flavor but also add a nice crunch. Plus, it’s a great way to sneak in some extra nutrients for the family.
Preparing these baked sweet potatoes is easy. Just bake the potatoes until tender, scoop out a bit of the flesh, and mix it with black beans and your choice of veggies. Then, fill the potato skins back up and enjoy!
Ingredients
- 4 medium sweet potatoes
- 1 can black beans, rinsed and drained
- 1 cup corn (fresh or frozen)
- 1 green bell pepper, diced
- 1 teaspoon cumin
- Salt and pepper to taste
- Fresh cilantro for garnish
Instructions
- Preheat your oven to 400°F (200°C).
- Wash the sweet potatoes and prick them with a fork. Bake for about 45-60 minutes until tender.
- While the potatoes are baking, mix the black beans, corn, bell pepper, cumin, salt, and pepper in a bowl.
- Once the sweet potatoes are done, let them cool slightly. Cut them in half and scoop out a little flesh to mix with the bean mixture.
- Fill the sweet potato skins with the black bean mixture and return to the oven for an additional 10 minutes.
- Garnish with fresh cilantro before serving.